Features on Demand in Server 2012

Windows 8 and Server 2012 introduce a new concept of Features on Demand whereby each installation contains only basic components. Adding new components requires the OS to gather source files from an external location for installation. This is a move away from Server 2008 and Server 2008 R2 where an installation contained everything necessary to service the installation. When adding new features, Windows would simply use its locally cached installation sources.

This was a great concept for home users who no longer needed to worry about having source media, and it resolved a lot of problems for IT administrators having to deal with missing files for patching. The problem was that it drastically increased the size of every installation in the datacenter, chewing up tons of un-needed space. With Server 2012, Microsoft has found a decent balance between the two – provided you configure your environment appropriately.

By default, Server 2012 will go out to Windows Update any time it’s looking for a feature for which it does not have the source files. For example, a common feature that many programs still use for which Windows does not cache installation files locally is the .NET Framework 3.5. Under normal circumstances, you’ll simply use Server Manager to add the new features and never notice the difference. However, if you have a WSUS configured or if the server does not have Internet access, you might see the following error:

Update NetFx3 of Package Microsoft .NET Framework 3.0 failed to be turned on. Status: 0x800f0906.

The error means that Windows was unable to find appropriate source installation files to add the feature. This is because WSUS doesn’t currently support the new Features on Demand functionality in Server 2012. There are a few ways to workaround this issue.

First, you can specify a source from the command line using the Enable-Feature and Source switches for the DISM tool (or -Source parameter from the Install-WindowsFeature powershell command). You can then point to the X:\Sources\Sxs directory to proceed with the installation. The GUI will also allow you to specify this alternate source via the Add Roles and Features Wizard via a yellow warning banner on the confirmation screen.

Second, you can use a GPO or modify the registry to tell Windows to by-pass your WSUS server and go directly to Windows Update when servicing your Server 2012 installation. There are two REG_DWORD values that control this behavior located under [Software\Microsoft\Windows\CurrentVersion\Policies\Servicing]. The first is UseWindowsUpdate – setting this to 2 tells Windows to NEVER go to Windows Update for enabling features. The second is RepairContentServerSource – setting this to 2 tells Windows to go to Windows Update for repair source only (does not affect servicing). Both of these can be controlled via GPO (new Servicing.admx template) under Computer Configuration > Administrative Templates > System > Specify settings for optional component installation and component repair.

Last, you can use a GPO or modify the registry to point Windows to a list of installation source locations – similar to functionality in Server 2003 and XP. These can either be a copy of the X:\Sources\Sxs directory from installation media, or the actual WIM file (either install.wim from installation media or a copy of your company’s customized WIM image). Again, the value is located under [Software\Microsoft\Windows\CurrentVersion\Policies\Servicing]. Setting the REG_EXPAND_SZ value named LocalSourcePath allows you to specify one or more installation source locations (separated by a semicolon). To point to a WIM file, use the following format:

WIM:[path to wim]:[index]

You must specify the index so Windows knows where to find the appropriate installation files for your Server 2012 instance. The nice thing about using a WIM file is that you can perform offline servicing of the image to ensure that it always contains the latest patches and updates.
Error creating Server 2012 cluster on 2008 domain

We worked with Microsoft extensively throughout the Server 2012 TAP program providing feedback in various areas. We encountered an issue late in the program when creating a Server 2012 cluster on our production domain. We did not see this same issue in any lab environment, or in our development environment which mirrors production.

When attempting to create the cluster, the wizard would fail when creating the AD objects. We confirmed that the user had proper permissions, and did not encounter the same issues creating 2008 or 2008 R2 clusters on our production domain. After working with Microsoft, they recommended we install KB 976424 on our production domain controllers. After installing this hotfix and rebooting all of the domain controllers, we were able to create a Server 2012 cluster on our 2008 domain without issue.

Cisco VPN Client on Windows 8

Just upgraded my late 2007 MacBook Pro Boot Camp partition to Win 8 RTM and was in the process of re-installing several apps. The Cisco VPN Client we use to connect to our corporate network was a bit finicky. There are a few workarounds to get it running on Win8.

First, you need to fix the following registry key to resolve error 442 Unable to enable virtual adapter:

HKEY_LOCAL_MACHINE\SYSTEM\CurrentControlSet\Services\CVirtA\DisplayName

It will be set to something like “@oem8.inf,%CVirtA_Desc%;Cisco Systems VPN Adapter for 64-bit Windows” – drop everything before “Cisco Systems” from that value.

Next, when using certs, you cannot use your certificate from the local user store. Rather, import the certificate to the local computer store and delete it from your user store. This should resolve error 403 Unable to contact the security gateway.

Patching Server 2012 using Solarwinds Patch Manager

**UPDATE: Microsoft released KB 2734608 on August 24th, 2012 that describes a patch for WSUS 3.0 SP2 to support Windows 8 and Server 2012 which makes this procedure unnecessary unless you want to take advantage of new features supported in WSUS on Server 2012.

**NOTE: The configuration described here is not supported by SolarWinds.

With Server 2012 RTM around the corner, we’re working diligently to ensure that our infrastructure is configured appropriately to support it. Part of the excellent service OrcsWeb provides is managed Windows patching for all of the systems on our network. We pride ourselves in ensuring the best possible hosting experience, so deploying Microsoft critical and security patches in a timely manner is a must.

In order to patch a Server 2012 system, you must use a Server 2012 system running the WSUS role – WSUS 3.0 SP2 will not work with Server 2012. The reason is an incompatibility between the Windows Update client on Server 2012 and the WSUS server. That being said, a Server 2012 system running the WSUS role, can provide updates to Windows Server 2003, Server 2008, Server 2008 R2, and Server 2012 clients – provided they have the client update of KB 2720211. Using GPO’s, you could then configure your systems to connect to your WSUS server, and patch themselves during an appropriate window. We utilize Solarwinds Patch Manager (formerly EminentWare Extension Pack) to compliment WSUS for our environment. It provides additional functionality like the ability to publish 3rd party updates via WSUS (for Dell firmware & drivers, or Adobe updates for instance) and pushing patches during discrete windows – something our customers have asked for time and again.

Unfotunately, even the current beta version of Patch Manager (version 1.8) cannot be installed on Server 2012 (at the time of this writing), so that leaves us without a fully supported way of patching our Server 2012 systems. That being said, anyone in the IT industry knows *supported* and *it works* are two completely different concepts. Using a decentralized architecture, we are able to leverage a Server 2012 system running the WSUS role and Patch Manager 1.8 beta running on Server 2008 R2 with the WSUS 3.0 SP2 console to successfully patch Server 2012 clients.

I’ve outlined the steps below to accomplish this:

  1. Install the WSUS role on a Server 2012 system (we’ll call this WSUS-SERVER).
  2. Configure WSUS-SERVER to synchronize updates and arrange computers into groups like you would in previous versions of WSUS.
  3. Configure a GPO for domain clients to use WSUS-SERVER to receive updates.
  4. Install the WSUS 3.0 SP2 console on a Server 2008 R2 SP1 system (we’ll call this PATCH-SERVER).
  5. Connect to WSUS-SERVER from the WSUS 3.0 SP2 console on PATCH-SERVER.
  6. Install Patch Manager 1.8 Beta on PATCH-SERVER.
  7. During the configuration of Patch Manager, select WSUS-SERVER as your WSUS server and DO NOT configure 3rd party updates (unfortunately, 3rd party update publishing does not work because of the console version mismatch).

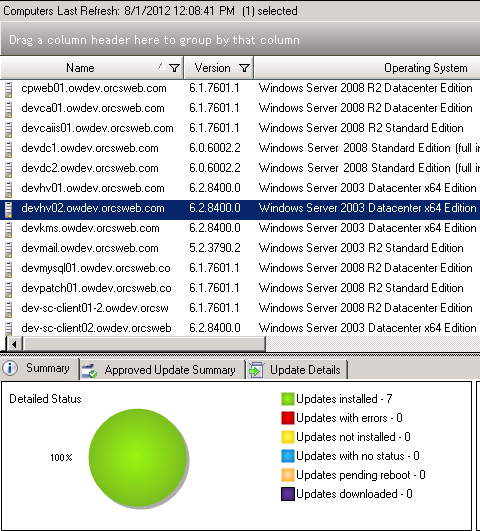
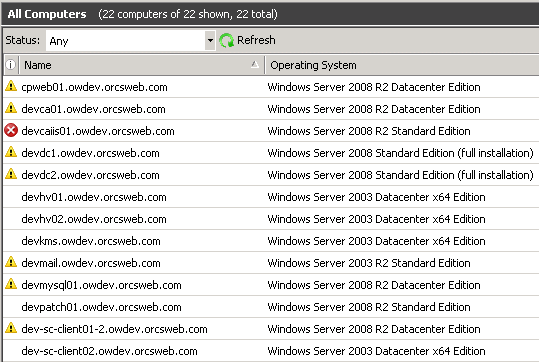
The WSUS 3.0 SP2 and Patch Manager consoles will incorrectly report the Operating System version as Windows Server 2003 x64 Edition, even though the systems are running Server 2012 RC (8400).


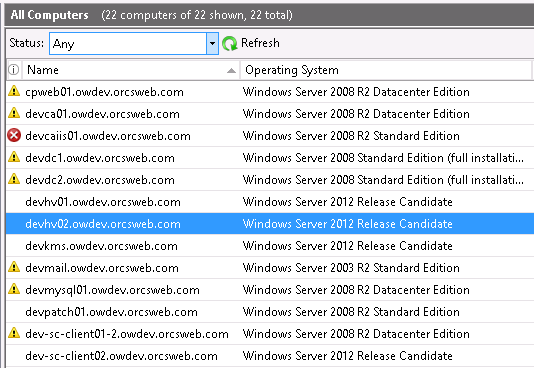
The WSUS console on Server 2012 will show the correct OS version:

Server 2012 clients can be included in standard Patch Manager jobs like any other client.

Happy Patching!