VMM 2012 R2 service crashes on start with exception code 0xe0434352

Was working on a new VMM 2012 R2 install for a Windows Azure Pack POC and spent the better part of a day dealing with a failing VMM Service. SQL 2012 SP1 had been installed on the same server and during install, VMM was configured to run under the local SYSTEM account and use the local SQL instance. Installation completed successfully, but the VMM service would not start, logging the following errors in the Application log in Event Viewer:

Log Name: Application
Source: .NET Runtime
Date: 12/31/2013 12:43:27 PM
Event ID: 1026
Task Category: None
Level: Error
Keywords: Classic
User: N/A
Computer: AZPK01
Description:
Application: vmmservice.exe
Framework Version: v4.0.30319
Description: The process was terminated due to an unhandled exception.
Exception Info: System.AggregateException
Stack:
at Microsoft.VirtualManager.Engine.VirtualManagerService.WaitForStartupTasks()
at Microsoft.VirtualManager.Engine.VirtualManagerService.TimeStartupMethod(System.String, TimedStartupMethod)
at Microsoft.VirtualManager.Engine.VirtualManagerService.ExecuteRealEngineStartup()
at Microsoft.VirtualManager.Engine.VirtualManagerService.TryStart(System.Object)
at System.Threading.ExecutionContext.RunInternal(System.Threading.ExecutionContext, System.Threading.ContextCallback, System.Object, Boolean)
at System.Threading.ExecutionContext.Run(System.Threading.ExecutionContext, System.Threading.ContextCallback, System.Object, Boolean)
at System.Threading.TimerQueueTimer.CallCallback()
at System.Threading.TimerQueueTimer.Fire()
at System.Threading.TimerQueue.FireNextTimers()

Log Name: Application
Source: Application Error
Date: 12/31/2013 12:43:28 PM
Event ID: 1000
Task Category: (100)
Level: Error
Keywords: Classic
User: N/A
Computer: AZPK01
Description:
Faulting application name: vmmservice.exe, version: 3.2.7510.0, time stamp: 0x522d2a8a
Faulting module name: KERNELBASE.dll, version: 6.3.9600.16408, time stamp: 0x523d557d
Exception code: 0xe0434352
Fault offset: 0x000000000000ab78
Faulting process id: 0x10ac
Faulting application start time: 0x01cf064fc9e2947a
Faulting application path: C:\Program Files\Microsoft System Center 2012 R2\Virtual Machine Manager\Bin\vmmservice.exe
Faulting module path: C:\windows\system32\KERNELBASE.dll
Report Id: 0e0178f3-7243-11e3-80bb-001dd8b71c66
Faulting package full name:
Faulting package-relative application ID:

I attempted re-installing VMM 2012 R2 and selected a domain account during installation, but had the same result. I enabled VMM Tracing to collect debug logging and was seeing various SQL exceptions:

[0]0BAC.06EC::‎2013‎-‎12‎-‎31 12:46:04.590 [Microsoft-VirtualMachineManager-Debug]4,2,Catalog.cs,1077,SqlException [ex#4f] caught by scope.Complete !!! (catch SqlException) [[(SqlException#62f6e9) System.Data.SqlClient.SqlException (0x80131904): Could not obtain information about Windows NT group/user ‘DOMAIN\jeff’, error code 0x5.

I was finally able to find a helpful error message in the standard VMM logs located under C:\ProgramData\VMMLogs\SCVMM.\report.txt (probably should have looked their first):

System.AggregateException: One or more errors occurred. —> Microsoft.VirtualManager.DB.CarmineSqlException: The SQL Server service account does not have permission to access Active Directory Domain Services (AD DS).
Ensure that the SQL Server service is running under a domain account or a computer account that has permission to access AD DS. For more information, see “Some applications and APIs require access to authorization information on account objects” in the Microsoft Knowledge Base at http://go.microsoft.com/fwlink/?LinkId=121054.

My local SQL instance was configured to run under a local user account, not a domain account. I re-checked the VMM installation requirements, and this requirement is not documented anywhere. Sure enough, once I reconfigured SQL to run as a domain account (also had to fix a SPN issue: http://softwarelounge.co.uk/archives/3191) and restarted the SQL service, the VMM service started successfully.

How DBPM affects guest VM performance

Dell introduced a feature in their 11G servers called demand-based power management (DBPM). Other platforms refer to this feature as “power management” or “power policy” whereby the system adjusts power used by various system components like CPU, RAM, and fans. In today’s green-pc world, it’s a nice idea, but the reality with cloud-based environments is that we are already consolidating systems to fewer physical machines to increase density and power policies often interfere with the resulting performance.

We recently began seeing higher than normal READY times on our VM’s. Ready time refers to the amount of time a process needed CPU time, but had to wait because no processors were available. In the case of virtualization, this means a VM had some work to do, but it could not find sufficient free physical cores that matched the number of vCPU’s assigned to the VM. VMWare has a decent guide for troubleshooting VM performance issues which led to some interesting analysis. Specifically, our overall CPU usage was only around 50%, but some VM’s were seeing ready times of more than 20%.

This high CPU ready with low CPU utilization could be due to several factors. Most commonly in cloud environments, it suggests the ratio of vCPU’s (virtual CPU’s) to pCPU’s (physical CPU’s) is too high, or that you’ve sized your VM’s improperly with too many vCPU’s. One important thing to understand with virtual environments, is that a VM with multiple cores needs to wait for that number of cores to become free across the system. Assuming you have a single host with 4 cores running 4 VM’s, 3 VM’s with 1vCPU and 1 VM with 4vCPU’s, the 3 single vCPU VM’s could be scheduled to run concurrently while the fourth would have to wait for all pCPU’s to become idle.

Naturally, the easiest way to fix this is to add additional physical CPU’s into the fold. We accomplished this by upgrading all of our E5620 processors (4-core) in our ESXi hosts to E5645 processors (6-core) thereby adding 28 additional cores to the platform. However, this did not help with CPU READY times. vSphere DRS was still reporting trouble delivering CPU resources to VM’s:

DRS-before-dbpm

After many hours of troubleshooting, we were finally about to find a solution – disabling DBPM. One of the hosts consistently showed lower CPU ready times even though it had higher density. We were able to find that this node had a different hardware power management policy than the other nodes. You can read more about what this setting does in the Host Power Management whitepaper from VMWare. By default, this policy is automatically set as a result of ACPI CPU C-States, Intel Speedstep and the hardware’s power management settings on the system.

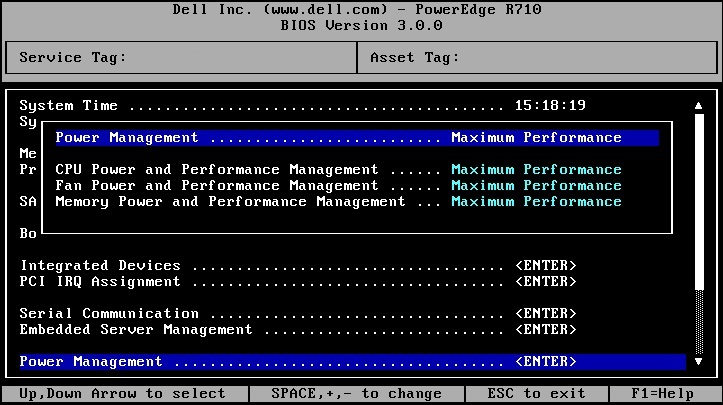
On our Dell Poweredge R610 host systems, the DBPM setting was under Power Management in the BIOS. Once we changed all systems from Active Power Controller to Maximum Performance, CPU ready times dropped to normal levels.

dell-r610-bios-power-management-settings

Information on the various options can be found in this Power and Cooling wiki from Dell. Before settling on this solution, we attempted disabling C-States altogether and C1E specifically in the BIOS, but neither had an impact. We found that we could also specify OS Control for this setting to allow vSphere to set the policy, though we ultimately decided that Maximum Performance was the best setting for our environment. Note that this isn’t specific to vSphere – the power management setting applies equally to all virtualization platforms.

Skip header with bash sort

Recently needed to sort output from a unix command but wanted to leave the 3 line header intact. Seems like a much more difficult thing to do than it should be, but was finally able to come up with a command that worked. The output from the command I was running had 3 header lines I wanted to leave intact and used fixed width, so this command worked:

... | (for i in $(seq 3); do read -r; printf "%s\n" "$REPLY"; done; sort -rk1.47,1.66)

To explain what this is doing – first, I’m piping the output of the command into a sub-command which allows me to perform multiple functions on it. The for loop is needed because the read command will read a single line from stdin. Since I needed the first 3 lines excluded, I used the for loop (change the $(seq 3) to any number for your output). Inside the for loop, I’m using printf which effectively just prints the line that was read. Lastly, we’re running sort on the remaining data. The data output was fixed width, so I’m using the character position in F[.C] notation (see sort –help or the sort man page for more info). The -r flag for sort is sorting that column in descending order. Several possible solutions involved using head & tail commands, but I couldn’t find the proper syntax because my source was output from a stdin instead of a file and the result was dropping a significant number of rows from the output. If my source was in a file, I could have done the same thing with:

head -n 3 && tail -n +4  | sort -rk1.47,1.66