Problems installing KB2479628, KB2485376 and SP1 with SATA IDE mode on P55 chipset

After Microsoft released February’s patches, I ran into a strange issue on my custom-built Win7 x64 desktop. I would get to the windows 7 splash screen, but the system would inexplicably reboot at that screen. In order to get my system back up and running, I would have to boot into Safe mode to allow it to unconfigure the failed patch attempt, and then boot Safe mode a second time before I could boot windows normally. No memory dump was created and nothing was logged to Event Viewer about the failed attempts.

I spent one evening installing each patch one-by-one and rebooting until I was able to narrow it down to KB2479628 and KB2485376. The first patch affects kernel mode drivers and given the type of failure I was seeing, I started looking at driver issues. The most logical was my graphics driver since I could load safe mode without issue. I have an ATI Radeon HD5770 and a co-worker recommended trying driver ver 10.11 but that didn’t solve the issue. Since SP1 was around the corner, I figured I just hide the patches and deal with it then.

Fast-forward to yesterday, and I decided to give the SP1 install a try after I finished working for the day. Installation went off without a hitch, but alas, I ran into the same issue on first reboot. It was time tackle the driver issue. First thing I did was get back to a good desktop, and then perform a reboot and enable boot logging (press F8 after the POST to enable boot logging). Doing so will write a list of drivers loaded to C:\windows\ntbtlog.txt. This can be helpful in finding the last driver loaded before a failure when no BSOD occurs.

Knowing that KB2479628 caused the same behavior as the SP1 install, was directly related to drivers and only took a second to install, I decided that I would use it to “test” if a change I made solved the problem. So, I ran the install and on reboot I enabled boot logging again – last driver to load lis flpydisk.sys … hmmm … I don’t even have a floppy drive. I then compared to the reference log looking for what might load right after this driver. First thing that pops up is my graphics card, so after I go through the safe mode process to boot back to a desktop, I uninstall the display adapter, selecting the “Delete driver software for this device” option and then reboot. I have to repeat the process several times as it keeps picking up an older version of the driver but eventually, I get the base MSFT VGA driver. At that point, I retry the patch installation with boot logging enabled, but again windows automatically power cycles at the splash screen.

Long story short, I repeat the process for nearly every driver on my system: SATA controller, Realtek HD audio, Realtek NIC, etc. The boot logging led me on a wild goose chase and had me uninstalling any software that had a device associated with it including MagicDisc, my IOCell NDAS software, even Microsoft Intellipoint all to no avail. Finally, I remember that when I first built this system, I had an issue with the SATA controller mode. I had tried installing Windows 7 in AHCI mode, but saw something similar to this issue so switched to IDE mode. Looking at the BIOS settings, it was still set to IDE mode, but I tried switching to AHCI mode since nothing else had worked and I was basically out of ideas at that point. To my surprise, system booted after the patch installation.

I was then able to re-install the latest drivers from the mobo manufacturer’s website and finally, I tried a SP1 install. After about an hour, the system rebooted and updated to SP1 properly. After all was said and done, I tried switching SATA mode back to IDE and for whatever reason, I now can’t reproduce the issue. It’s possible it was a race condition with the driver for the SATA controller in IDE mode while trying to update (perhaps the updates were looking to replace though drivers but couldn’t because of some incompatibility) – though the currently loaded driver is from 2006 so that’s doubtful.

For reference, this is a Core i5-750 on a Gigabyte P55-UD4P motherboard running BIOS F10. If you have similar problems, try switching your SATA controller mode from IDE to AHCI or vice-versa.

UPDATE: After installing a OCZ Vertex SSD, I had to set the controller mode back to AHCI as I was experiencing the same issue. Since changing it, I’ve had no problems.

Using RPC custom port range with Windows Firewall

I ran into an interesting issue today. We use a dedicated port range for RPC connections through firewall per this Microsoft article. Doing so allows RPC to work through dedicated hardware firewalls. We also enable the local Windows firewall on several boxes as this provides a firewall for any systems not using a dedicated piece of hardware or from other systems behind dedicated firewalls.

While using Shavlik NetChk Configure to scan systems for compliance, I noticed some inconsistencies which I traced back to a firewall issue on the server being scanned. The scans perform some of the checks over RPC. I confirmed that Remote Administration had been enabled using this command:

netsh firewall set service REMOTEADMIN enable

However,  netstat would show the connection in a SYN_SENT state on a port in the dedicated RPC range. Buried in this technet article, I found the reason:

Remote Administration Adds TCP ports 135 and 445 to the exceptions list. Also adds Svchost.exe and Lsass.exe to the exceptions list to allow hosted services to open additional, dynamically-assigned ports, typically in the range of 1024 to 1034. This setting allows a computer to be remotely managed with administrative tools, such as the Microsoft Management Console (MMC) and Windows Management Instrumentation (WMI). It also allows a computer to receive unsolicited incoming Distributed Component Object Model (DCOM) and remote procedure call (RPC) traffic.

It seems that when setting a custom range of ports for RPC via the HKLM\Software\Microsoft\RPC\Internet key, it “breaks” the Remote Administration firewall rule in the Windows Firewall. This was tested on a Server 2003 R2 SP2 system, but I suspect similar issues would apply to Server 2008.

Correcting SFC (System File Checker) errors

We recently began using Microsoft’s built-in SFC (System File Checker) as part of our FIM (File Integrity Monitoring) solution for PCI (Payment Card Industry) compliance. This great feature will compute hashes of core system files and compare those against originals looking for differences. If any are found, it can automatically replace those files with the original. The best part is that it incorporates all system updates into these checks so you can rest easy knowing that the checks are being performed against the latest, patched system files.

In most cases, this runs without intervention, but every now and then it needs a little help correcting any problems it encounters. If running a scan (via sfc /scannow) indicates there were unfixable errors found (eg. “Windows Resource Protection found corrupt files but was unable to fix some of them.”), you can use the log file under C:\Windows\Logs\CBS\CBS.log to determine which file(s) are having problems being fixed. Microsoft’s KB928228 article has great instructions on how to analyze this file. The basic gist is to run the following command and view the details only:

findstr /c:”[SR]” %windir%\logs\cbs\cbs.log >sfcdetails.txt

Search the resulting file for the phrase “cannot repair” – this should give you the file(s) that SFC is having problems replacing. To fix this, replace these file(s) manually with trusted versions (either from source media or from other working systems with same edition, bitness, and patch-level). It is probably best to review the text in the CBS.log file surrounding that entry to be certain you are replacing with the appropriate versions.

In very rare cases, you may not find the phrase “cannot repair” in the log file. In fact, you will find an entry to the contrary: “Verify and Repair Transaction completed. All files and registry keys listed in this transaction have been successfully repaired” at the end of the log file, but the SFC program will still still report that it found unfixable files. In these cases, I have found that renaming the file(s) specified in the logs and re-running SFC will correct the issue. You may need to take ownership, change permissions, or boot into safe mode to rename the suspect file(s) depending upon the system file in question.

Closing open file handles

Every now and then we have problems deleting or changing permissions on a file because it is open by a process. However, we often times have trouble finding that process. There is a neat sysinternals (now MS) utility called “handle” that will show you all open handles on a file, and, more importantly, let you close that handle. Below is the syntax of how to find the handle, and close it:

To find the handle:

O:\Tools>handle C:\Test\Example.dll

Handle v3.31
Copyright (C) 1997-2008 Mark Russinovich
Sysinternals – http://www.sysinternals.com/

svchost.exe        pid: 1388    240: C:\Test\Example.dll

The above output shows us the name of the process, the pid, and file handle (in hex) and the file name. If we wanted to see all handles by a particular process, we could use the –p option:

O:\Tools>handle -p 1388

Handle v3.31
Copyright (C) 1997-2008 Mark Russinovich
Sysinternals – http://www.sysinternals.com/

8: File  (—)   C:\WINDOWS\System32
74: File  (—)   C:\WINDOWS\System32\en-US\svchost.exe.mui
194: Section       \BaseNamedObjects\__ComCatalogCache__
198: Section       \BaseNamedObjects\__ComCatalogCache__
1A4: File  (—)   C:\WINDOWS\Registration\R00000000000f.clb
1B0: File  (—)   C:\WINDOWS\System32\en-US\crypt32.dll.mui
1B4: File  (—)   C:\WINDOWS\winsxs\amd64_microsoft.windows.common-controls_6595b64144ccf1df_6.0.6001.18000_none_152e7382f3bd50c6
1C0: File  (—)   C:\WINDOWS\winsxs\amd64_microsoft.windows.common-controls_6595b64144ccf1df_6.0.6001.18000_none_152e7382f3bd50c6
1CC: File  (—)   C:\WINDOWS\System32\inetsrv\config\schema
1D8: File  (—)   C:\WINDOWS\Microsoft.NET\Framework64\v2.0.50727\CONFIG
1DC: File  (—)   C:\WINDOWS\Microsoft.NET\Framework64\v2.0.50727\CONFIG
1E0: File  (—)   C:\WINDOWS\System32\inetsrv\config
1E8: Section       \RPC Control\DSEC56c
1FC: File  (—)   C:\WINDOWS\winsxs\amd64_microsoft.windows.common-controls_6595b64144ccf1df_6.0.6001.18000_none_152e7382f3bd50c6
200: Section       \BaseNamedObjects\windows_shell_global_counters
240: File  (—)   C:\Test\Example.dll
264: File  (—)   C:\WINDOWS\System32\en-US\kernel32.dll.mui
284: File  (—)   C:\WINDOWS\System32\inetsrv\config

This happens to be a Windows 2008 box, so I can take it one step further and find the service via task manager:

Process

Since we need to delete or change this file and windows is not allowing me to since it is locked by the FTP service, I can forcefully close the handle by specifying the handle and pid (*Note: This should be used with care as it can cause the process to crash. Consider using this as a last resort instead of restarting a service or rebooting to free the lock):

O:\Tools>handle -c 240 -p 1388

Handle v3.31
Copyright (C) 1997-2008 Mark Russinovich
Sysinternals – http://www.sysinternals.com/

240: File  (—)   C:\Test\Example.dll
Close handle 240 in svchost.exe (PID 1388)? (y/n) y

Handle closed.

The file can now be modified/deleted.

Calculating disk usage and capacity using Diskmon

While evaluating SAN storage solutions for our VMWare environment, we found ourselves asking the question “How many systems can we fit on this system before IOPs and/or throughput become a bottleneck?” Come to find out, the answer is not a simple one. In fact, all of the vendors we posed this question to were only able to give us vauge performance numbers based on perfect conditions. We set out on a quest to quantify the capacity of each of the backend storage systems we tested.

Generally speaking IOPs is inversely proportional to the request size while throughput is proportional. This means that as the request size descreases the total number of IOPs increases while throughput decreases and vice versa. So when you see performance numbers that claim very high IOPs those are based on small requests and therefore throughput will be very minimal. In additional, disk latency and rotational speed can play a role in skewing these numbers as well. Sequential operations will produce much higher numbers than random operations. When we add RAID to the equation, we will see a difference in numbers depending upon whether the operation is a read or a write.

What does all this mean? It means that the performance capacity of a disk or storage device is determined by 3 main factors: Request Size, Random/Sequential operation, and Read/Write operation. There are other factors that can play a role, but focusing on these three factores will provide an estimation of the capacity of a disk, array or storage system. There are differing opinions as to what these numbers are in “real life.” The generally accepted view is that the average request size is 32K, 60% of transactions are random while 40% are sequential, and 65% are reads while 35% are writes. However, these numbers differ depending upon the application. The best way to determine these numbers for your environment is to capture statistics from production systems and average them together.

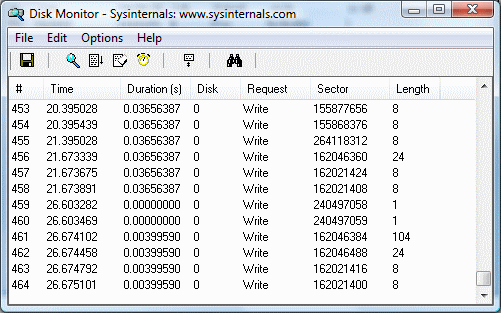
Fortunately, there is a nice utility for Windows that will allow you to get this information. The Diskmon utility: http://technet.microsoft.com/en-us/sysinternals/bb896646.aspx available from SysInternals (now part of Microsoft), will log every disk transaction with the necessary information.

Diskmon from SysInternals (now Microsoft)

Diskmon will begin capturing data immediately. To stop Diskmon from capturing data, click the magnifying glass in the toolbar:

Stop capture

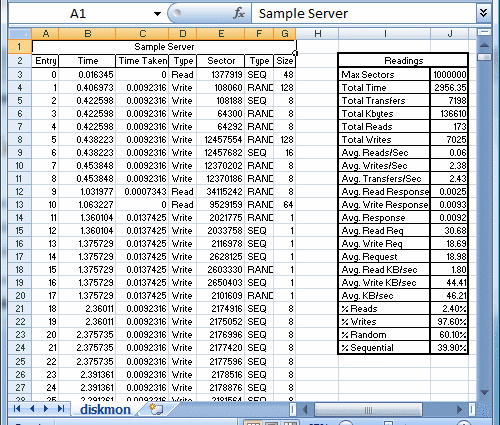
You can then save the output to a text file by clicking the save button. I recommend capturing data during normal usage over a reasonable period of time. Also, it is best to minimize the Diskmon window to keep CPU usage to a minimum. The next step is to import the text file into Excel. I have provided a sample excel spreadsheet you can use as a template to perform the necessary calculations: server_diskmon.

Diskmon output to Excel spreadsheet

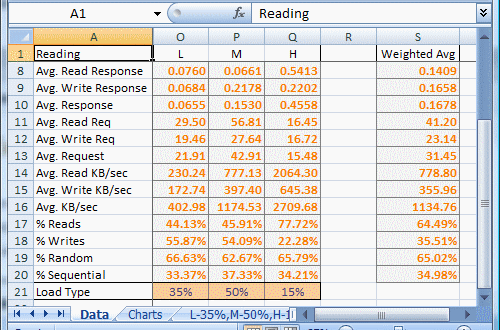
By taking a sampling from various systems on our network and using a weighted average, we calculated average of usage on our systems. In our case, we were using a common storage backend, and we wanted to categorize different systems into low (L), medium (M), and high (H) usage systems. We then assigned a percentage to each. By doing this, we can calculate the disk usage on the system if x% are low usage, y% medium usage, and z% high usage.

Weighted average of several systems on our network

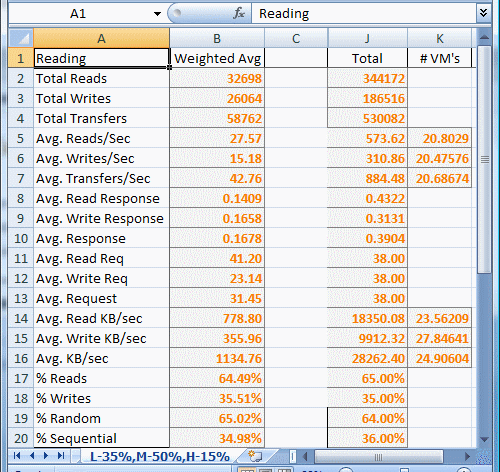
We now have an accurate estimation of the Read Request Size, Random/Sequential percentages, and Read/Write percentages. If we feed these numbers into IOMeter, we can get a baseline of what the backend storage system can support. Divide that by our weighted average and we can find exactly how many systems our backend can support. If we look at point in time numbers, we can figure out the percentage of disk capacity being used:

Capacity of storage backend

I have put together a sample IOMeter configuration file containing the “real life” specification of 32K requests, 60% Random / 40% Sequential, and 65% Reads / 35% Writes.

Also, there’s a great comparison of SAN backends for VMWare environments here: http://communities.vmware.com/message/584154. Users have run the same real life test against their backend storage systems which will allow you to compare your devices performance with other vendors.

One side note when using IOMeter, be sure to set your disk size to something greater than the amount of cache in your backend storage systems in order to calculate raw disk performance. The configuration file I have provided uses a 8GB test file which should suffice for most installations.

Windows 2003 SP2 Network Issues

Included with SP2 is the Scalable Networking Pack which was a redeisgn of some major networking components to offload some of the processing to onboard components of certain network cards. Unfortunately, this seems to still be in its infancy and we started noticing very strange problems right away. A colleauge found this post on the MS Exchange team’s blog which ultimately led us to the answer: http://msexchangeteam.com/archive/2007/07/18/446400.aspx.

The symptoms we noted on our side were specifically that OS X users behind certain NAT firewalls would timeout when trying to retrieve pages from our web servers. After weeks of troublehsooting, we finally narrowed it down to a problem where pages less than 1440 bytes worked fine, but larger pages simply timed out. We also noticed that some of our technicians had problems connecting via RDP to various servers. The initial connection would drop, but sub-sequent connections worked find. Most of our Dell systems have onboard Broadcom NIC’s. Supposedly, this new Networking Pack which is enabled by default works only with the latest drivers. However, we found that even using the latest drivers provided directly from Broadcom, we were still having problems.

Luckily, the fix does not require a reboot and is easily implemented. Simply disabling the tcp chimney offload solved all of our issues:

netsh int ip set chimney disabled

You can view the state of each of the connections to the server and their offload state by running the netstat -t command.

Create a Mail-Enabled Public Folder in Exchange 2007

Microsoft is threatening to deprecate Public Folders, though they claim they will maintain support through 2016. The alternative, Windows Sharepoint Services, isn’t a good fit for all circumstances … specifically when you would like to use a Public Folder as a mailing list. Use the commands below to create a new Mail-Enabled Public Folder:

Create public folder:
– New-PublicFolder “Folder Name”
– Enable-MailPublicFolder “\Folder Name”
– Set-MailPublicFolder -Identity “\Folder Name” -EmailAddressPolicyEnabled 0
– Set-MailPublicFolder -Identity “\Folder Name” -PrimarySMTPAddress “foldername@aliasdomain.com

Perfomance Monitor Perfomance Objects displays numbers only

There are a number of posts regarding a hotfix available for Windows 2000 to fix an issue where Performance Monitor displays only numbers for performance objects and counters. However, I came across this problem the other day on a Windows 2003 server. After searching for a while, I found a solution that worked: http://support.microsoft.com/?kbid=300956. Simply running the following command from the command prompt, restored the text values to the Performace Objects:

lodctr /R

"cannot open the rich text editor" error on MS Sharepoint Site

If you are trying to edit a page on a MS Sharepoint site and clicking the “Edit Content” link yeilds a pop-up window that gives you this message: “cannot open the rich text editor”, there are two workarounds that may fix this.

First, try unregistering and re-registering the control dlls. Open a command prompt and type the following:

> cd C:\Program Files\Common Files\Microsoft Shared\Triedit

> regsvr32 /u dhtmled.ocx

> regsvr32 /u triedit.dll

> regsvr32 dhtmled.ocx

> regsvr32 triedit.dll

Then restart IE. If this doesn’t work, you can try adding the Sharepoint site to your list of trusted sites:

In IE, click Tools>Internet Options>Security Tab>Trusted Sites>Sites Button>Add

Be sure to uncheck the “Require server verification (https:) for all sites in this zone” checkbox if your site does not support SSL.

Sychronize Outlook calendar between two PC’s for free

A very common problem with no “free” solution. If you come across this post, you’ve undoubtly read and re-read the Slipstick article. With the help of Jake Ludington’s blog, I came across a nifty freeware plugin to sychronize an Outlook calendar with an ICS calendar – specifically a Google ICS Calendar, called Remote Calendars. The product is a sourceforge project and is provided under the GNU Public License. Once installed, a toolbar will appear in Outlook that will provide 2-way synchronization between your local Outlook calendar and your Google calendar. Note that this plugin only supports Outlook 2003/2007.

Installation

  1. Close Microsoft Outlook
  2. Download and install .NET 2.0
  3. Download and unpack Remote Calendars (*NOTE: Version 5.82 did not work for me, so I used version 5.81)
  4. Install the Microsoft Office 2003 Primary Interop Assemblies (found in the Prerequisites folder – O2003PIA.EXE)
  5. Install the Microsoft Visual Studio 2005 Tools for Office Runtime (found in the Prerequisites – vstor.exe)

Configuration

  1. Upon opening outlook, you will have a new toolbar.Toolbar
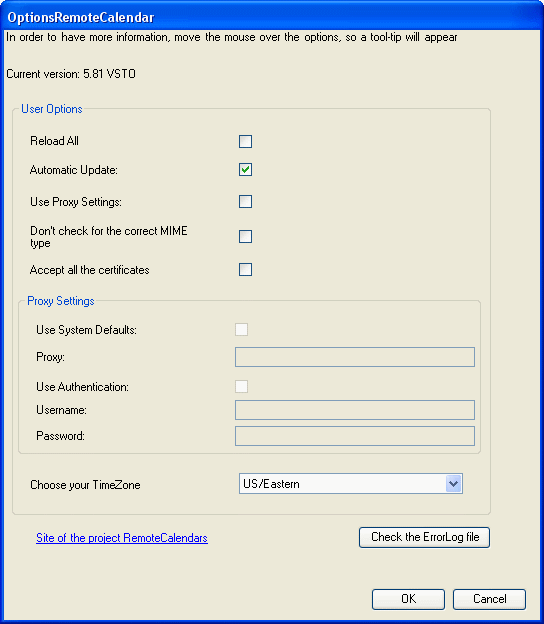
  2. A pop-up window should appear with general settings (if it doesn’t pop-up, click the RC Options button on the far right of the toolbar). Set you time zone and click Automatic Update checkbox if you’d like to download the Google ICS at startup:Options
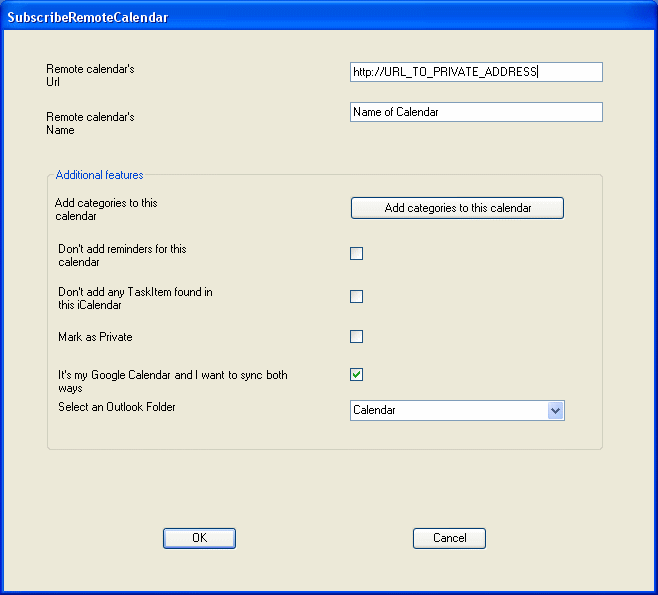
  3. Click the RC Subscribe button to subscribe to your Google Calendar. You’ll find your Google Calendar’s ICS URL by clicking Settings>Calendars>Name of Calendar and then right-clicking and Copy Shortcut on the ICAL button in the Private Address section. Check the “It’s my Google Calendar and I want to sync both ways” checkbox so we can push changes in your local calendar up to Google.Subscribe 
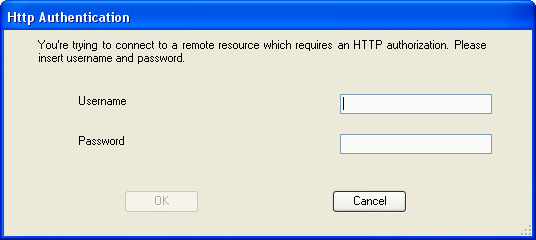
  4. After clicking OK you will be prompted to enter your Google username and password:HTTP Authentication
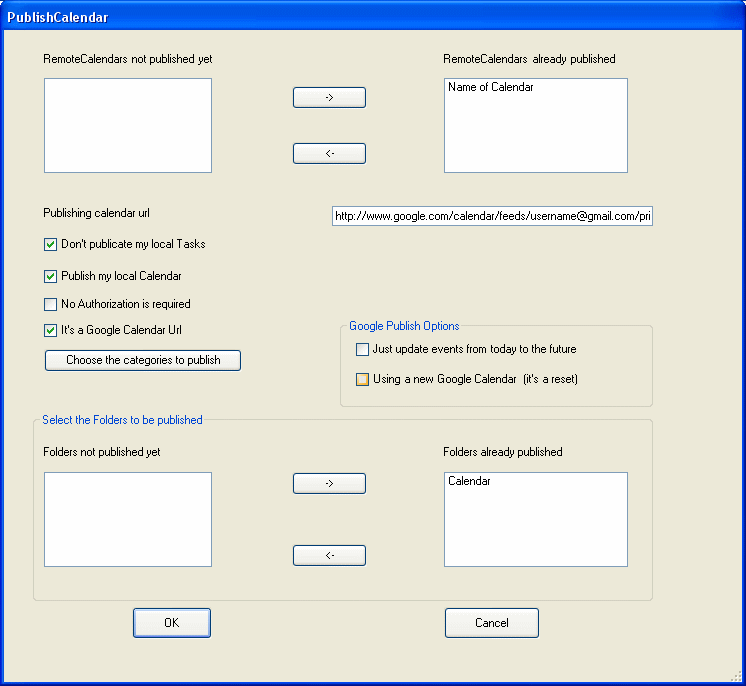
  5. Items added to you Google Calendar will now be synchronized with your local calendar upon startup. You can also manually force a synchronize by clicking the RC Reload button. However, we want to be able to create calendar events in Outlook and push them to Google. To do this we use the RC Publish button. Select you’re remote calendar and click the -> button to move it to the RemoteCalendars already published window. Check the “Don’t publicate my local Tasks”, “Publish my local Calendar”, and “It’s a Google URL”. The “Publishing Calendar URL” should be the XML Private Address of your calendar (See step 3 for info on where to find this on Google Calendars)Publish
  6. After you click OK, if everything went well, you should receive a message that your Google calendar was updated successfully. To synchronize to another PC, perform the above steps on the PC you want to share calendars with.