Use CSP’s AOBO to manage Azure subscriptions from other channels

Microsoft’s Cloud Solution Provider program is a great option for service providers that provide managed services on Azure. It enables the partner to provide a single bill encompassing both cloud services costs and managed services costs to the customer. There are scenarios where the customer may have purchased Azure through another licensing channel and wants the service provider to take over management of the environment. For CSP partners, they can leverage the existing identity model that CSP provides to manage Azure subscriptions provisioned through other licensing channels. This is enabled by establishing a reseller relationship with the existing tenant and then assigning permissions to the appropriate group in the partner’s AAD tenant.

  1. Log in to Partner Center using your admin CSP credentials and generate a link to establish a reseller relationship from Dashboard > CSP > Customers > Request reseller relationship.
  2. Send the link to the customer to have them accept the invitation and authorize the CSP relationship.
  3. Once authorized, the customer can see the Partner in Admin Center under Partner Relationships
  4. As a partner, you will now find the customer in your Customer List in Partner Center under Dashboard > CSP > Customers.
  5. Open the Azure Active Directory Admin Center, browse Groups and select the group you want to have access to the customer’s subscription (note: You must select either AdminAgents or HelpdeskAgents groups). Copy the Object ID of the group.
  6. Using PowerShell, an existing admin in the customer’s subscription will need to grant the partner’s group permissions to the subscription using the New-AzureRmRoleAssignment cmdlet. Permissions can use any Role Definition (ie. Reader, Contributor, Owner) in the customer’s subscription and can be scoped appropriately (ie. Subscription, Resource Group, Resource).
    New-AzureRmRoleAssignment -ObjectId 50c74629-d946-40cb-9123-819ae3ddd105 -RoleDefinitionName Reader -Scope /subscriptions/bbd470a5-a7be-41c4-a1f2-fd9c776a977d

  7. The partner can now use the link to the Azure portal from Partner Center to manage the customer’s subscription.

  8. The partner can also manage the subscription using PowerShell by using the TenantId parameter.
    Login-AzureRmAccount -TenantId 7d82b0b6-a196-46ec-9f36-5afe127177a2

Enforcing MFA for partner AAD tenant in CSP

The Cloud Solution Provider program from Microsoft is a great way for partners to bundles their managed services with Microsoft first-party cloud services like Azure. CSP partners use Partner Center to manage their customers by logging in using identities in their Azure AD tenant. This happens using a concept of Admin-on-behalf-of in CSP which allows them to manage their customer’s cloud services. Given that these identities have access to multiple customers, they are prime targets for bad actors. As such, partners frequently want to enable multi-factor authentication to help secure these identities. Azure AD supports this natively, however, there is some additional configuration necessary to ensure it is enforced when managing customer’s Azure environments. Follow these steps to enable MFA on a partner AAD tenant and enforce it when managing a customer’s AAD subscription.

Configure an AAD user for MFA

  1. To configure MFA on the partner’s AAD tenant, go to https://aad.portal.azure.com. Click on Azure Active Directory from the menu and then select Users. From the Menu bar, select Multi-factor Authentication.
  2. This will open a new window to MFA settings for users. You can enable a specific user by finding them from the list and selecting enable, or using the bulk update link at the top.
  3. Review the deployment guide, and select the enable multi-factor auth button when prompted.
  4. The next time the user logs in, they will be prompted to configure MFA.
  5. The user can choose to receive a phone call, SMS text message or use the Mobile Application for multi-factor auth.
  6. Now when the user logs in to Partner Center they will be prompted for multi-factor authentication and receive a notification per their preferred MFA settings.

Enforce MFA on a customer’s tenant

Even though we have configured MFA for the partner’s AAD user, we need to ensure it is enforced when managing the customer’s Azure subscription. This gets tricky with CSP and Admin-on-behalf-of – because the user will be managing a customer’s Azure environment, it’s the customer’s MFA settings that will decide whether MFA is necessary for logins. This means we need to create a conditional access policy in the customer’s Azure subscription in order for MFA to be applied to partner’s users. To set this up for the customer, they need at least 1 license of Azure AD Premium provisioned for their tenant.

  1. To configure the customer’s tenant, login to the Azure portal for the customer: https://portal.azure.com/tenant.onmicrosoft.com. Click on Azure Active Directory from the menu and then Conditional access.
  2. Next, we’ll create a policy that enforces MFA for all users when managing Azure. Select New Policy.
  3. Configure the policy to apply to All users, select the Microsoft Azure Management cloud application and Require multi-factor authentication under Grant access. Switch the policy On under Enable Policy, then click Create.

Now, MFA will be enforced any time a user attempts to manage Azure – including a partner’s AAD users. Note that the partner’s users can use the shortcut URL (https://portal.azure.com/tenant.onmicrosoft.com) only if they have already authenticated using MFA. If they have not authenticated using MFA and attempt to access the portal or PowerShell on behalf of the customer, the sign-in will fail.

Benefits of buying public cloud through a Managed Services Provider

At Microsoft, we see Hosting and Managed Services Providers as a key component of the Microsoft Cloud Platform. Not only do we want to ensure a consistent platform for customers across on-premises, hosted and Azure, but we understand that customers need help managing the cloud life-cycle as well. That is the premise behind the Cloud Solution Provider (CSP) program which enables Managed Services Providers (MSPs) to provide customers with a wholistic cloud solution, including assessment, enablement and operations. Let’s look at some of the benefits of purchasing Azure from an MSP.

Managed Services

Microsoft doesn’t provide managed services and most customers don’t have the IT staff or expertise to properly operate their cloud environment. Customers can choose to outsource this to an MSP who can protect, monitor, patch, and secure the workload allowing the business to focus on its core priorities.

Accelerated time to market with Cloud Expertise

The cloud encompasses many technologies which can be daunting for customers who try to go it alone. Leveraging the expertise of an MSP ensures that you are not only architecting your application efficiently for cloud but also that you are taking advantage of everything cloud has to offer.

Familiar Support Resources

Sometimes things go wrong and you need support. MSP’s can provide a more meaningful and customized support experience for customers who can’t afford a dedicated support contract from Microsoft.

Automation and custom solutions

The public cloud can be compared to a large box of legos. Building an environment for your application can take time and may have unique requirements. MSP’s have built automation and customized solutions for cloud that can help bring your application to life.

Custom Agreements

Cloud is a utility by nature which may not suit the needs of businesses who want certainty and consistency. An MSP can provide custom terms, SLA’s, and a single invoice for cloud computing and services costs.

Hybrid Solutions

Public cloud provides numerous technical advantages but is not best for all workloads. Some components will need to live in a datacenter and for customers who want to stop operating a datacenter, an MSP fills that need by hosting workloads in their datacenter while securely connecting them to cloud assets.

Multi-tenant Azure Site Recovery E2A using Virtual Machine Manager

Azure Site Recovery (ASR) is simple, automated protection and disaster recovery service delivered from the cloud. It enables replication and failover of workloads between datacenters, and from on-premises to Azure. ASR supports physical machines, VMWare and Hyper-V environments. ASR integrates with Windows Azure Pack (WAP) enabling service providers to offer managed disaster recovery for IaaS workloads through the Cloud Solution Provider (CSP) program. I’ll run through configuring ASR to support your multi-tenant cloud, and point out several important caveats in the configuration.

The CSP program enables service providers to resell Microsoft first-party cloud services like Azure, while owning the customer relationship and enabling value-add services. Azure subscriptions provisioned under the CSP program are single-tenant, which presents a challenge when configuring ASR with WAP and Virtual Machine Manager (SCVMM). In order to enable ASR, you must first register a SCVMM server with a Recovery Services vault within an Azure subscription. This will allow ASR to query the SCVMM server and retrieve metadata such as names of virtual machines and networks. In most service provider configurations, a single SCVMM server supports multiple tenants, and as such, you need to register SCVMM to a “master” vault in a subscription owned by the service provider. SCVMM can only be registered to a single vault, which also means that if you are using Azure as a DR target, you can only fail VM’s to a single Azure region. While the SCVMM server can only be registered to a single subscription, we can configure per-cloud protection policies specifying compute and storage targets in other subscriptions. This is an important distinction, as it means that the service provider will need to create separate clouds in VMM (and therefore separate plans in WAP) for EACH tenant. This enables a hoster to provide managed disaster recovery for IaaS workloads in a multi-tenant SCVMM environment. The topology is illustrated below.

Multitenant-ASR

While the initial configuration of the Recovery Services vault can now be done in the Azure portal, configuration of ASR to support multi-tenancy requires using powershell. You’ll need at least version 0.8.10 of Azure Powershell, but I recommend using Web Platform Installer to get the latest.

First,  if you are using the Recovery Services cmdlets for the first time in your subscription, you should register the Azure provider for Recovery Services. Before you can do this, first enable access to the Recovery Services provider on your subscription, by running the following commands. **NOTE: It may take up to an hour to enable access to Recovery Services on your subscription. Attempts to register the provider might fail in the interim.

Register-AzureRmProviderFeature -FeatureName betaAccess -ProviderNamespace Microsoft.RecoveryServices
Register-AzureRmResourceProvider -ProviderNamespace Microsoft.RecoveryServices

Then, let’s setup some constants we’ll use later.

$vaultRgName = "WAPRecoveryGroup"
$location = "westus"
$vaultName = "WAPRecoveryVault"
$vmmCloud = "AcmeCorp Cloud"
$policyName = "AcmeCorp-Policy"
$serverName = "VMM01.contoso.int"
$networkName = "YellowNetwork"
$vmName = "VM01"

Next, connect to your service provider subscription (this can be any direct subscription – EA/Open/PAYG).

$UserName = "user@provider.com"
$Password = "password"
$SecurePassword = ConvertTo-SecureString -AsPlainText $Password -Force
$Cred = New-Object System.Management.Automation.PSCredential -ArgumentList $UserName, $SecurePassword
Login-AzureRmAccount -Credential $Cred

If you have access to multiple subscriptions, you’ll need to set the subscription context.

#Switch to the service provider's subscription
Select-AzureRmSubscription -TenantId 00000000-0000-0000-0000-000000000000 -SubscriptionId 00000000-0000-0000-0000-000000000000

Now we can create the resource group and vault.

#Create the Resource Group for the vault
New-AzureRmResourceGroup -Name $vaultRgName -Location $location
#Create the Recovery Services vault
$vault = New-AzureRmRecoveryServicesVault -Name $vaultName -ResourceGroupName $vaultRgName -Location $location
#Set the vault context
Set-AzureRmSiteRecoveryVaultSettings -ARSVault $vault
#Download vault settings file
Get-AzureRmRecoveryServicesVaultSettingsFile -Vault $vault

At this point, you’ll need to download the Azure Site Recovery provider and run the installation on your SCVMM server, then register the SCVMM server with the vault using the settings file you just downloaded. Additionally, you’ll need to install (but do not configure) the Microsoft Azure Site Recovery agent on each of the Hyper-V servers. Screenshots can be found here.

Now that SCVMM has been registered with the vault, and the agents have been installed, we can create the storage account and virtual network in the tenant subscription.

#Switch to the tenant's subscription
Select-AzureRmSubscription -TenantId 00000000-0000-0000-0000-000000000000 -SubscriptionId 00000000-0000-0000-0000-000000000000
#Storage account must be in the same region as the vault
$storageAccountName = "drstorageacct1"
$tenantRgName =  "AcmeCorpRecoveryGroup" 
#Create the resource group to hold the storage account and virtual network
New-AzureRmResourceGroup -Name $tenantRgName -Location $location
#Create the storage account
$recoveryStorageAccount = New-AzureRmStorageAccount -ResourceGroupName $tenantRgName -Name $storageAccountName -Type "Standard_GRS" -Location $location
#Create the virtual network and subnet
$subnet1 = New-AzureRmVirtualNetworkSubnetConfig -Name "Subnet1" -AddressPrefix "10.0.1.0/24"
$vnet = New-AzureRmVirtualNetwork -Name $networkName -ResourceGroupName $tenantRgName -Location $location -AddressPrefix "10.0.0.0/16" -Subnet $subnet1

We’re ready to create the protection policy and associate it to the SCVMM cloud.

#Switch to the service provider's subscription
Select-AzureRmSubscription -TenantId 00000000-0000-0000-0000-000000000000 -SubscriptionId 00000000-0000-0000-0000-000000000000
#Create the policy referencing the storage account id from the tenant's subscription
$policyResult = New-AzureRmSiteRecoveryPolicy -Name $policyName -ReplicationProvider HyperVReplicaAzure -ReplicationFrequencyInSeconds 900 -RecoveryPoints 1 -ApplicationConsistentSnapshotFrequencyInHours 1 -RecoveryAzureStorageAccountId $recoveryStorageAccount.Id
$policy = Get-AzureRmSiteRecoveryPolicy -FriendlyName $policyname
#Associate the policy with the SCVMM cloud
$container = Get-AzureRmSiteRecoveryProtectionContainer -FriendlyName $vmmCloud
Start-AzureRmSiteRecoveryPolicyAssociationJob -Policy $policy -PrimaryProtectionContainer $container

Once the policy has been associated with the cloud, we can configure network mapping.

#Retrieve the on-premises network
$server = Get-AzureRmSiteRecoveryServer -FriendlyName $serverName
$network = Get-AzureRmSiteRecoveryNetwork -Server $server -FriendlyName $networkName
#Create the network mapping referencing the virtual network in the tenant's subscritpion
New-AzureRmSiteRecoveryNetworkMapping -PrimaryNetwork $network -AzureVMNetworkId $vnet.Id

Lastly, we enable protection on the virtual machine.

#Get the VM metadata
$vm = Get-AzureRmSiteRecoveryProtectionEntity -ProtectionContainer $container -FriendlyName $vmName
#Enable protection. You must specify the storage account again
Set-AzureRmSiteRecoveryProtectionEntity -ProtectionEntity $vm -Protection Enable –Force -Policy $policy -RecoveryAzureStorageAccountId $recoveryStorageAccount.Id

You can monitor protection and perform failovers for a virtual machine in a multi-tenant SCVMM environment to fail over to a tenant’s subscription in Azure from the Recovery Services vault in the provider’s Azure subscription.

Protected-VM01

Adding additional VIP to Azure Load Balancer

Recently, a partner needed guidance on adding an additional VIP to an Azure Load Balancer. This is a typical scenario where multiple SSL-based websites are running on a pair of servers and clients may not have SNI support, necessitating dedicated public IP’s for each website. Azure Load Balancer in Azure Resource Manager does support multiple VIP’s, just not via the portal. Not to worry, Powershell to the rescue. The Azure documentation site has a great article describing the process of deploying a two-node web farm and internet facing load balancer. These commands assume you’ve already deployed the load balancer and are just adding a second VIP:

Login-AzureRmAccount
Select-AzureRmSubscription -SubscriptionId 00000000-0000-0000-0000-000000000000
 
#Get the Resource Group
$rg = Get-AzureRmResourceGroup -Name "MultiVIPLBRG"
 
#Get the Load Balancer
$slb = Get-AzureRmLoadBalancer -Name "MultiVIPLB" -ResourceGroupName $rg.ResourceGroupName
 
#Create new public VIP
$vip2 = New-AzureRmPublicIpAddress -Name "PublicVIP2" -ResourceGroupName $rg.ResourceGroupName -Location $rg.Location -AllocationMethod Dynamic
 
#Create new Frontend IP Configuration using new VIP
$feipconfig2 = New-AzureRmLoadBalancerFrontendIpConfig -Name "MultiVIPLB-FE2" -PublicIpAddress $vip2
$slb | Add-AzureRmLoadBalancerFrontendIpConfig -Name "MultiVIPLB-FE2" -PublicIpAddress $vip2
 
#Get Backend Pool
$bepool = $slb | Get-AzureRmLoadBalancerBackendAddressPoolConfig
 
#Create new Probe
$probe2 = New-AzureRmLoadBalancerProbeConfig -Name "Probe2" -RequestPath "/" -Protocol http -Port 81 -IntervalInSeconds 5 -ProbeCount 2
$slb | Add-AzureRmLoadBalancerProbeConfig -Name "Probe2" -RequestPath "/" -Protocol http -Port 81 -IntervalInSeconds 5 -ProbeCount 2
 
#Create Load Balancing Rule
$slb | Add-AzureRmLoadBalancerRuleConfig -Name Rule2 -FrontendIpConfiguration $feipconfig2 -BackendAddressPool $bepool -Probe $probe2 -Protocol TCP -FrontendPort 80 -BackendPort 81
 
#Save the configuration
$slb | Set-AzureRmLoadBalancer

Azure Pack Connector

In my role as Cloud Technology Strategist with Microsoft over the past 18 months, I’ve been working closely with service providers of all types in making hybrid cloud a reality. Microsoft is uniquely positioned to be able to deliver on the 3 key pillars of cloud – on-premises, hosted, and public – via the Microsoft Cloud Platform. Service providers understand the value of hybrid and, with the release of Azure Pack Connector, have a tool they can use to provide a unified experience for managing public and private cloud.

Azure Pack was released in the fall of 2013 as a free add-on for Windows Server and System Center. It extended the private cloud technology delivered in Virtual Machine Manager to provide self-service multi-tenant Infrastructure as a Service (IaaS) through Hyper-V, in a manner that is consistent with IaaS in public Azure. As more and more enterprises see the value in distributed cloud, service providers are looking to extend their managed services to be able to provision and manage workloads not only running in their data center via Azure Pack, but also IaaS workloads running in public Azure. While Azure Pack ensures the portal and API is consistent, it was still two separate management experiences. Azure Pack Connector bridges that gap by enabling provisioning and management of IaaS in public Azure, through Azure Pack.

Azure Pack Connector

The solution was originally developed by Microsoft IT for internal use to enable various development teams to self-service on public Azure IaaS. Azure Pack Connector was born out of collaboration with the Microsoft Hosting and Cloud Services team to bring the MSIT solution to service providers as open source software released under MIT license. Azure Pack Connector was developed specifically with Cloud Solution Provider partners is in mind, supporting Azure Resource Manager API and including tools to configure Azure subscription provisioned in the CSP portal or CREST API for use with Azure Pack Connector.

The solution consists of 4 main components:

  • Compute Management Service – A windows service that orchestrates the provisioning and de-provisioning of Azure VM’s.
  • Compute Management API – A backend API supporting UI components and enabling management of Azure VM’s.
  • Admin Extension – UI extension for Azure Pack that enables on-boarding and management of Azure subscriptions.
  • Tenant Extension – UI extension for Azure Pack that enables tenant self-service provisioning and management of Azure VM’s.

The Azure Pack Connector subscription model uses a 1-to-1 mapping of Azure Pack plans to Azure Subscriptions, allowing the administrator to control VM operating systems and sizes on a per plan basis and Azure regions globally. Once a user has a subscription to an Azure Pack plan that has an attached Azure subscription, they can provision and manage Azure VM’s through the Azure Pack tenant portal.

Azure Pack Connector Dashboard

This video walkthrough will help explain the features and demonstrate how to use Azure Pack Connector:


The Azure Pack Connector solution is published on GitHub:

https://github.com/Microsoft/Phoenix

Head on over and grab the binaries to expand your Azure Pack installation today!


Windows Azure VPN Walkthrough

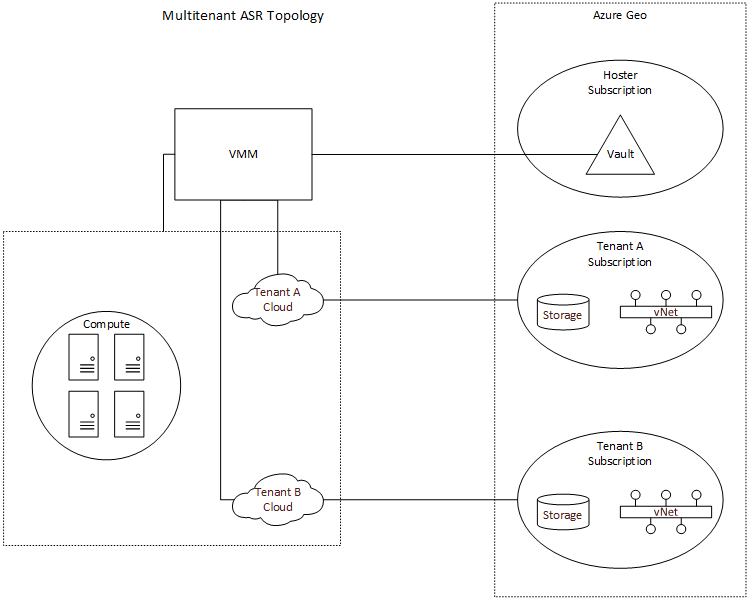
A recent project has us testing out some of the new Windows Azure features. One important configuration step is getting the Windows Azure environment connected to our on-premise network. To do this, we create a site to site VPN tunnel between an Azure virtual network and your existing on-premise corporate environment. Typically, this is done using VPN hardware (such as Cisco, Fortinet, or Juniper) but can also be done using Windows Server. Microsoft has a decent tutorial on how to create an Azure virtual network with cross-premises connectivity, but it lacks some information about the configuration of the remote end.

First, let’s get a virtual network created in Azure.

1. Login to the Azure Preview Portal.

2. In the left-hand column, select Networks, and then click Create on the bottom banner.

3. This will bring up a wizard for creating a virtual network. Give the network a name and either select an existing affinity group if you have one, or create a new one. Virtual Networks must belong to an affinity group and can only be used with VM’s in the same affinity group. Click Next

4. The next screen asks you to define address space and logical subnets. You can use super-netting here to define a large address space (eg. 10.1.0.0/16) and then create logical subnets to group servers (eg. 10.1.1.0/24) for specific server purposes. Define the address space and at least 1 subnet. Click next.

5. On the DNS Servers and Local Network screen, you’ll want to configure a DNS server for this virtual network. For DNS, this will be the DNS server your VM’s in this virtual network use. The Local Network settings require both a Gateway subnet and a Local network. The Gateway network should be a logical subnet of the address space you previously defined (ie. 10.1.0.0/24) and is used only for to run necessary gateway services. The Local network should be networks configured in your on-premise environment. Select Create New Local Network and click next.

6. On the Create New Local Network Screen you’ll need to assign a name to the Local Network, define the VPN endpoint in your on-premise environment and one or more subnets in the Address Space (eg. 10.4.0.0/16) corresponding to local networks configured in your on-premise environment. Click the check mark to create the virtual network.

Now that a virtual network has been created, we need to create a VPN gateway for the network.

1. From the Azure portal, select Networks and then click the name of the virtual network you just created.

2. You should see an indicator that a Gateway has not yet been created. Click the Create Gateway icon in the bottom banner. Click the Yes check mark that appears in the bottom banner to start the Create Gateway job.

3. It may take up to 15 minutes for the Gateway to be created. A message should appear that the Gateway creation has started.

4. Once completed, a Gateway IP Address will be displayed along with incoming and outgoing data metrics. You’ll need the pre-shared key information to configure the tunnel on your end. Click the View Key button in the bottom banner.

Lastly, you’ll need to configure the site to site VPN tunnel on your VPN hardware device on your on-premise equipment. The following is an example of the necessary information:

Phase 1 (IKE)
Remote Endpoint/Peer IP: Virtual Network Gateway address (this is the Gateway IP Address listed for the virtual network in the Azure portal)
Authentication Method: Pre-shared key
Pre-shared Key: <value from View Key in Azure portal>
Phase 1 Proposal: Encryption AES-128 (or AES-128-CBC), Authentication SHA1
Phase 1 Keylife: 28800s
Phase 1 DH Group: 2

Phase 2 (IPsec)**
Local Network: Local corporate subnet (this is the Local Network you configured when setting up the Azure virtual network)
Remote Network: Azure Virtual network (this is the Address Space you configured when setting up the Azure virtual network)
Phase 2 Proposal: Encryption AES-128 (or AES-128-CBC), Authentication SHA1 (or SHA1-HMAC-96)
Phase 2 Keylife: 3600s AND 102400000 KBytes
Phase 2 DH Group (PFS): Disabled

**Note: Normally, you use the defined subnets in Phase 2. However, I’ve found in practice that the Azure gateway uses 0.0.0.0/0 for Phase2:

2013-05-01 11:33:21 ike 1:OW-Azure:13537:6612914: peer: type=7/7, local=0:0.0.0.0-255.255.255.255:0, remote=0:0.0.0.0-255.255.255.255:0
2013-05-01 11:33:21 ike 1:OW-Azure:13537:6612914: mine: type=7/7, local=0:10.4.0.0-10.4.255.255:0, remote=0:10.1.0.0-10.1.255.255:0
2013-05-01 11:33:21 ike 1:OW-Azure:13537:6612914: no matching phase2 found
2013-05-01 11:33:21 ike 1:OW-Azure:13537::6612914: failed to get responder proposal
2013-05-01 11:33:21 ike 1:OW-Azure:13537: failed to create child SA
2013-05-01 11:33:21 ike 1:OW-Azure:13537: sending error response

If the subnets do not match on both ends, the tunnel will not establish, so you’ll want to use 0.0.0.0/0 for your Phase 2 subnets in the VPN configuration.

You can download a sample configuration script for Cisco ASA, ASR, and ISR or Juniper SRX, J, ISG or SSG systems from the Azure portal by clicking the Download link in the bottom banner (next to the View Key button). You’ll need to modify the script with the proper networks and key. That being said, the scripts assume some things about your configuration so it’s best to configure your end of the VPN tunnel manually. For instance, the script may try to may try to adjust the maximum segment size to 1350 on your VPN device’s external interface which could impact your other configured tunnels. It’s also important to note that firewall and NAT rules are typically required on most VPN hardware devices.

To test connectivity, simply initiate traffic from either side of the tunnel (ie. ping 10.1.1.10 from 10.4.1.10). It helps to have debug trace messages enabled on your VPN hardware device in case of issues. Happy tunneling!