Use CSP’s AOBO to manage Azure subscriptions from other channels

Microsoft’s Cloud Solution Provider program is a great option for service providers that provide managed services on Azure. It enables the partner to provide a single bill encompassing both cloud services costs and managed services costs to the customer. There are scenarios where the customer may have purchased Azure through another licensing channel and wants the service provider to take over management of the environment. For CSP partners, they can leverage the existing identity model that CSP provides to manage Azure subscriptions provisioned through other licensing channels. This is enabled by establishing a reseller relationship with the existing tenant and then assigning permissions to the appropriate group in the partner’s AAD tenant.

  1. Log in to Partner Center using your admin CSP credentials and generate a link to establish a reseller relationship from Dashboard > CSP > Customers > Request reseller relationship.
  2. Send the link to the customer to have them accept the invitation and authorize the CSP relationship.
  3. Once authorized, the customer can see the Partner in Admin Center under Partner Relationships
  4. As a partner, you will now find the customer in your Customer List in Partner Center under Dashboard > CSP > Customers.
  5. Open the Azure Active Directory Admin Center, browse Groups and select the group you want to have access to the customer’s subscription (note: You must select either AdminAgents or HelpdeskAgents groups). Copy the Object ID of the group.
  6. Using PowerShell, an existing admin in the customer’s subscription will need to grant the partner’s group permissions to the subscription using the New-AzureRmRoleAssignment cmdlet. Permissions can use any Role Definition (ie. Reader, Contributor, Owner) in the customer’s subscription and can be scoped appropriately (ie. Subscription, Resource Group, Resource).
    New-AzureRmRoleAssignment -ObjectId 50c74629-d946-40cb-9123-819ae3ddd105 -RoleDefinitionName Reader -Scope /subscriptions/bbd470a5-a7be-41c4-a1f2-fd9c776a977d

  7. The partner can now use the link to the Azure portal from Partner Center to manage the customer’s subscription.

  8. The partner can also manage the subscription using PowerShell by using the TenantId parameter.
    Login-AzureRmAccount -TenantId 7d82b0b6-a196-46ec-9f36-5afe127177a2

Enforcing MFA for partner AAD tenant in CSP

The Cloud Solution Provider program from Microsoft is a great way for partners to bundles their managed services with Microsoft first-party cloud services like Azure. CSP partners use Partner Center to manage their customers by logging in using identities in their Azure AD tenant. This happens using a concept of Admin-on-behalf-of in CSP which allows them to manage their customer’s cloud services. Given that these identities have access to multiple customers, they are prime targets for bad actors. As such, partners frequently want to enable multi-factor authentication to help secure these identities. Azure AD supports this natively, however, there is some additional configuration necessary to ensure it is enforced when managing customer’s Azure environments. Follow these steps to enable MFA on a partner AAD tenant and enforce it when managing a customer’s AAD subscription.

Configure an AAD user for MFA

  1. To configure MFA on the partner’s AAD tenant, go to https://aad.portal.azure.com. Click on Azure Active Directory from the menu and then select Users. From the Menu bar, select Multi-factor Authentication.
  2. This will open a new window to MFA settings for users. You can enable a specific user by finding them from the list and selecting enable, or using the bulk update link at the top.
  3. Review the deployment guide, and select the enable multi-factor auth button when prompted.
  4. The next time the user logs in, they will be prompted to configure MFA.
  5. The user can choose to receive a phone call, SMS text message or use the Mobile Application for multi-factor auth.
  6. Now when the user logs in to Partner Center they will be prompted for multi-factor authentication and receive a notification per their preferred MFA settings.

Enforce MFA on a customer’s tenant

Even though we have configured MFA for the partner’s AAD user, we need to ensure it is enforced when managing the customer’s Azure subscription. This gets tricky with CSP and Admin-on-behalf-of – because the user will be managing a customer’s Azure environment, it’s the customer’s MFA settings that will decide whether MFA is necessary for logins. This means we need to create a conditional access policy in the customer’s Azure subscription in order for MFA to be applied to partner’s users. To set this up for the customer, they need at least 1 license of Azure AD Premium provisioned for their tenant.

  1. To configure the customer’s tenant, login to the Azure portal for the customer: https://portal.azure.com/tenant.onmicrosoft.com. Click on Azure Active Directory from the menu and then Conditional access.
  2. Next, we’ll create a policy that enforces MFA for all users when managing Azure. Select New Policy.
  3. Configure the policy to apply to All users, select the Microsoft Azure Management cloud application and Require multi-factor authentication under Grant access. Switch the policy On under Enable Policy, then click Create.

Now, MFA will be enforced any time a user attempts to manage Azure – including a partner’s AAD users. Note that the partner’s users can use the shortcut URL (https://portal.azure.com/tenant.onmicrosoft.com) only if they have already authenticated using MFA. If they have not authenticated using MFA and attempt to access the portal or PowerShell on behalf of the customer, the sign-in will fail.

Benefits of buying public cloud through a Managed Services Provider

At Microsoft, we see Hosting and Managed Services Providers as a key component of the Microsoft Cloud Platform. Not only do we want to ensure a consistent platform for customers across on-premises, hosted and Azure, but we understand that customers need help managing the cloud life-cycle as well. That is the premise behind the Cloud Solution Provider (CSP) program which enables Managed Services Providers (MSPs) to provide customers with a wholistic cloud solution, including assessment, enablement and operations. Let’s look at some of the benefits of purchasing Azure from an MSP.

Managed Services

Microsoft doesn’t provide managed services and most customers don’t have the IT staff or expertise to properly operate their cloud environment. Customers can choose to outsource this to an MSP who can protect, monitor, patch, and secure the workload allowing the business to focus on its core priorities.

Accelerated time to market with Cloud Expertise

The cloud encompasses many technologies which can be daunting for customers who try to go it alone. Leveraging the expertise of an MSP ensures that you are not only architecting your application efficiently for cloud but also that you are taking advantage of everything cloud has to offer.

Familiar Support Resources

Sometimes things go wrong and you need support. MSP’s can provide a more meaningful and customized support experience for customers who can’t afford a dedicated support contract from Microsoft.

Automation and custom solutions

The public cloud can be compared to a large box of legos. Building an environment for your application can take time and may have unique requirements. MSP’s have built automation and customized solutions for cloud that can help bring your application to life.

Custom Agreements

Cloud is a utility by nature which may not suit the needs of businesses who want certainty and consistency. An MSP can provide custom terms, SLA’s, and a single invoice for cloud computing and services costs.

Hybrid Solutions

Public cloud provides numerous technical advantages but is not best for all workloads. Some components will need to live in a datacenter and for customers who want to stop operating a datacenter, an MSP fills that need by hosting workloads in their datacenter while securely connecting them to cloud assets.

Google Fiber Review

In early 2015, Google announced they would be blanketing Charlotte, NC in fiber to support their Google Fiber internet and TV service. Since moving to Charlotte, NC, I had been a Time Warner Cable (now Charter) internet customer, and a happy Dish Network customer for the last 15 years. Having moved from New England, I desperately needed to be able to watch the Red Sox and Bruins, something being a Dish “mover” allowed me to do. Working from home, it was imperative that I had solid internet service, and the combined cost of  Time Warner Cable’s internet service and Dish Network had me thinking about making the switch when Google Fiber became available. Within a month of Google’s announcement, Time Warner announced the launch of their MAXX service in my area bumping speeds to 300/20 for which I promptly signed up. And, not surprisingly, AT&T also ran their Fiber service shortly after Google Fiber was installed in our area.

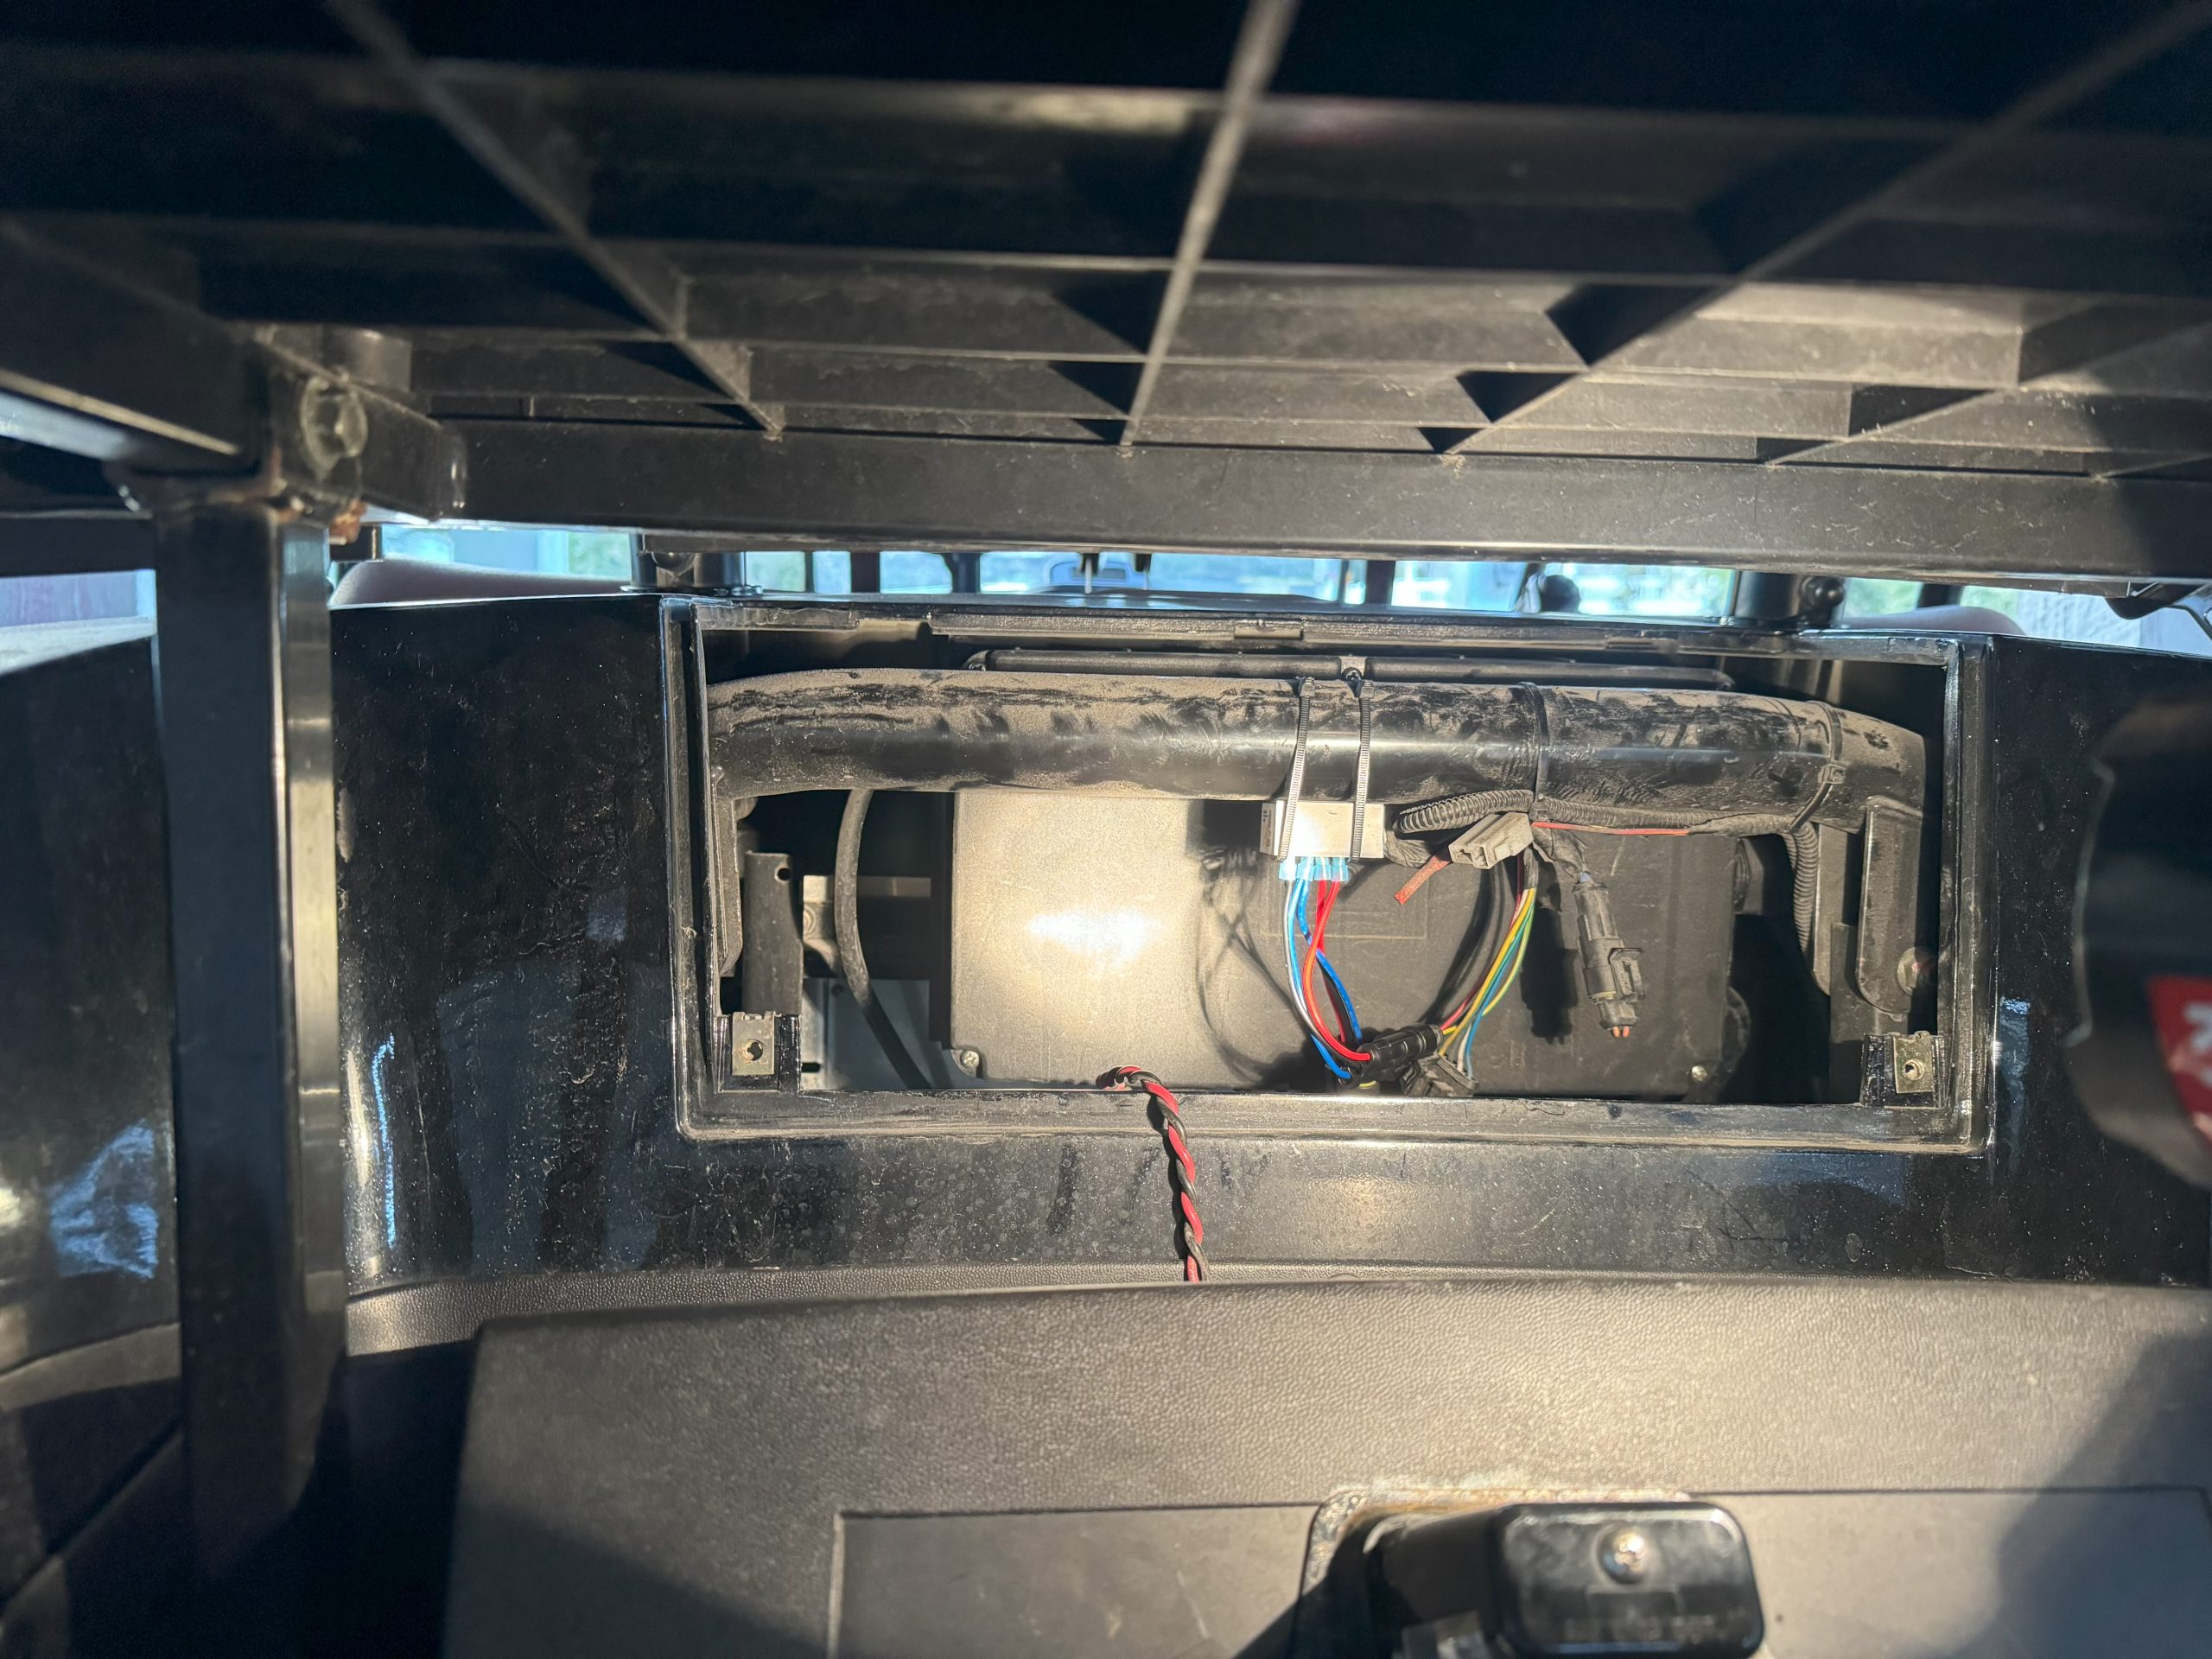
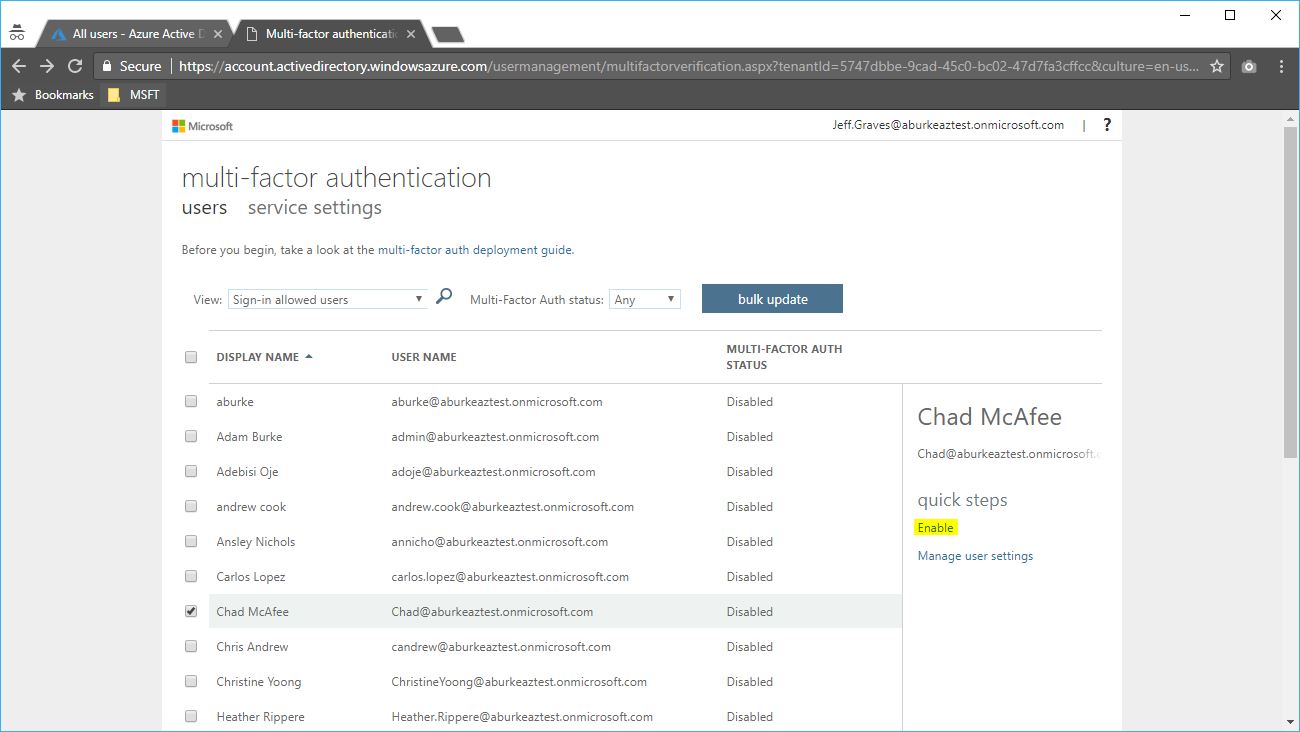
Construction made quite a mess of the neighborhood – we still have paint from the utility labeling throughout the development – and it was almost a year that we had to wait between when they buried the cable, and when they announced service availability. The day Google announced they’d be accepting new installations, I signed up for installation of both TV and internet service. Soon after, a team came and installed the network demarcation point (NDP). It was then another few weeks before they started scheduling installations, but I was able to get the installation scheduled on the day after they started in my area. Installation was fairly smooth – the installer placed this fiber jack in my home office next to the incoming RG6 cable from TWC. He also ran a new RG6 cable back to the TV distribution panel outside the house for TV service.

Google Fiber Jack

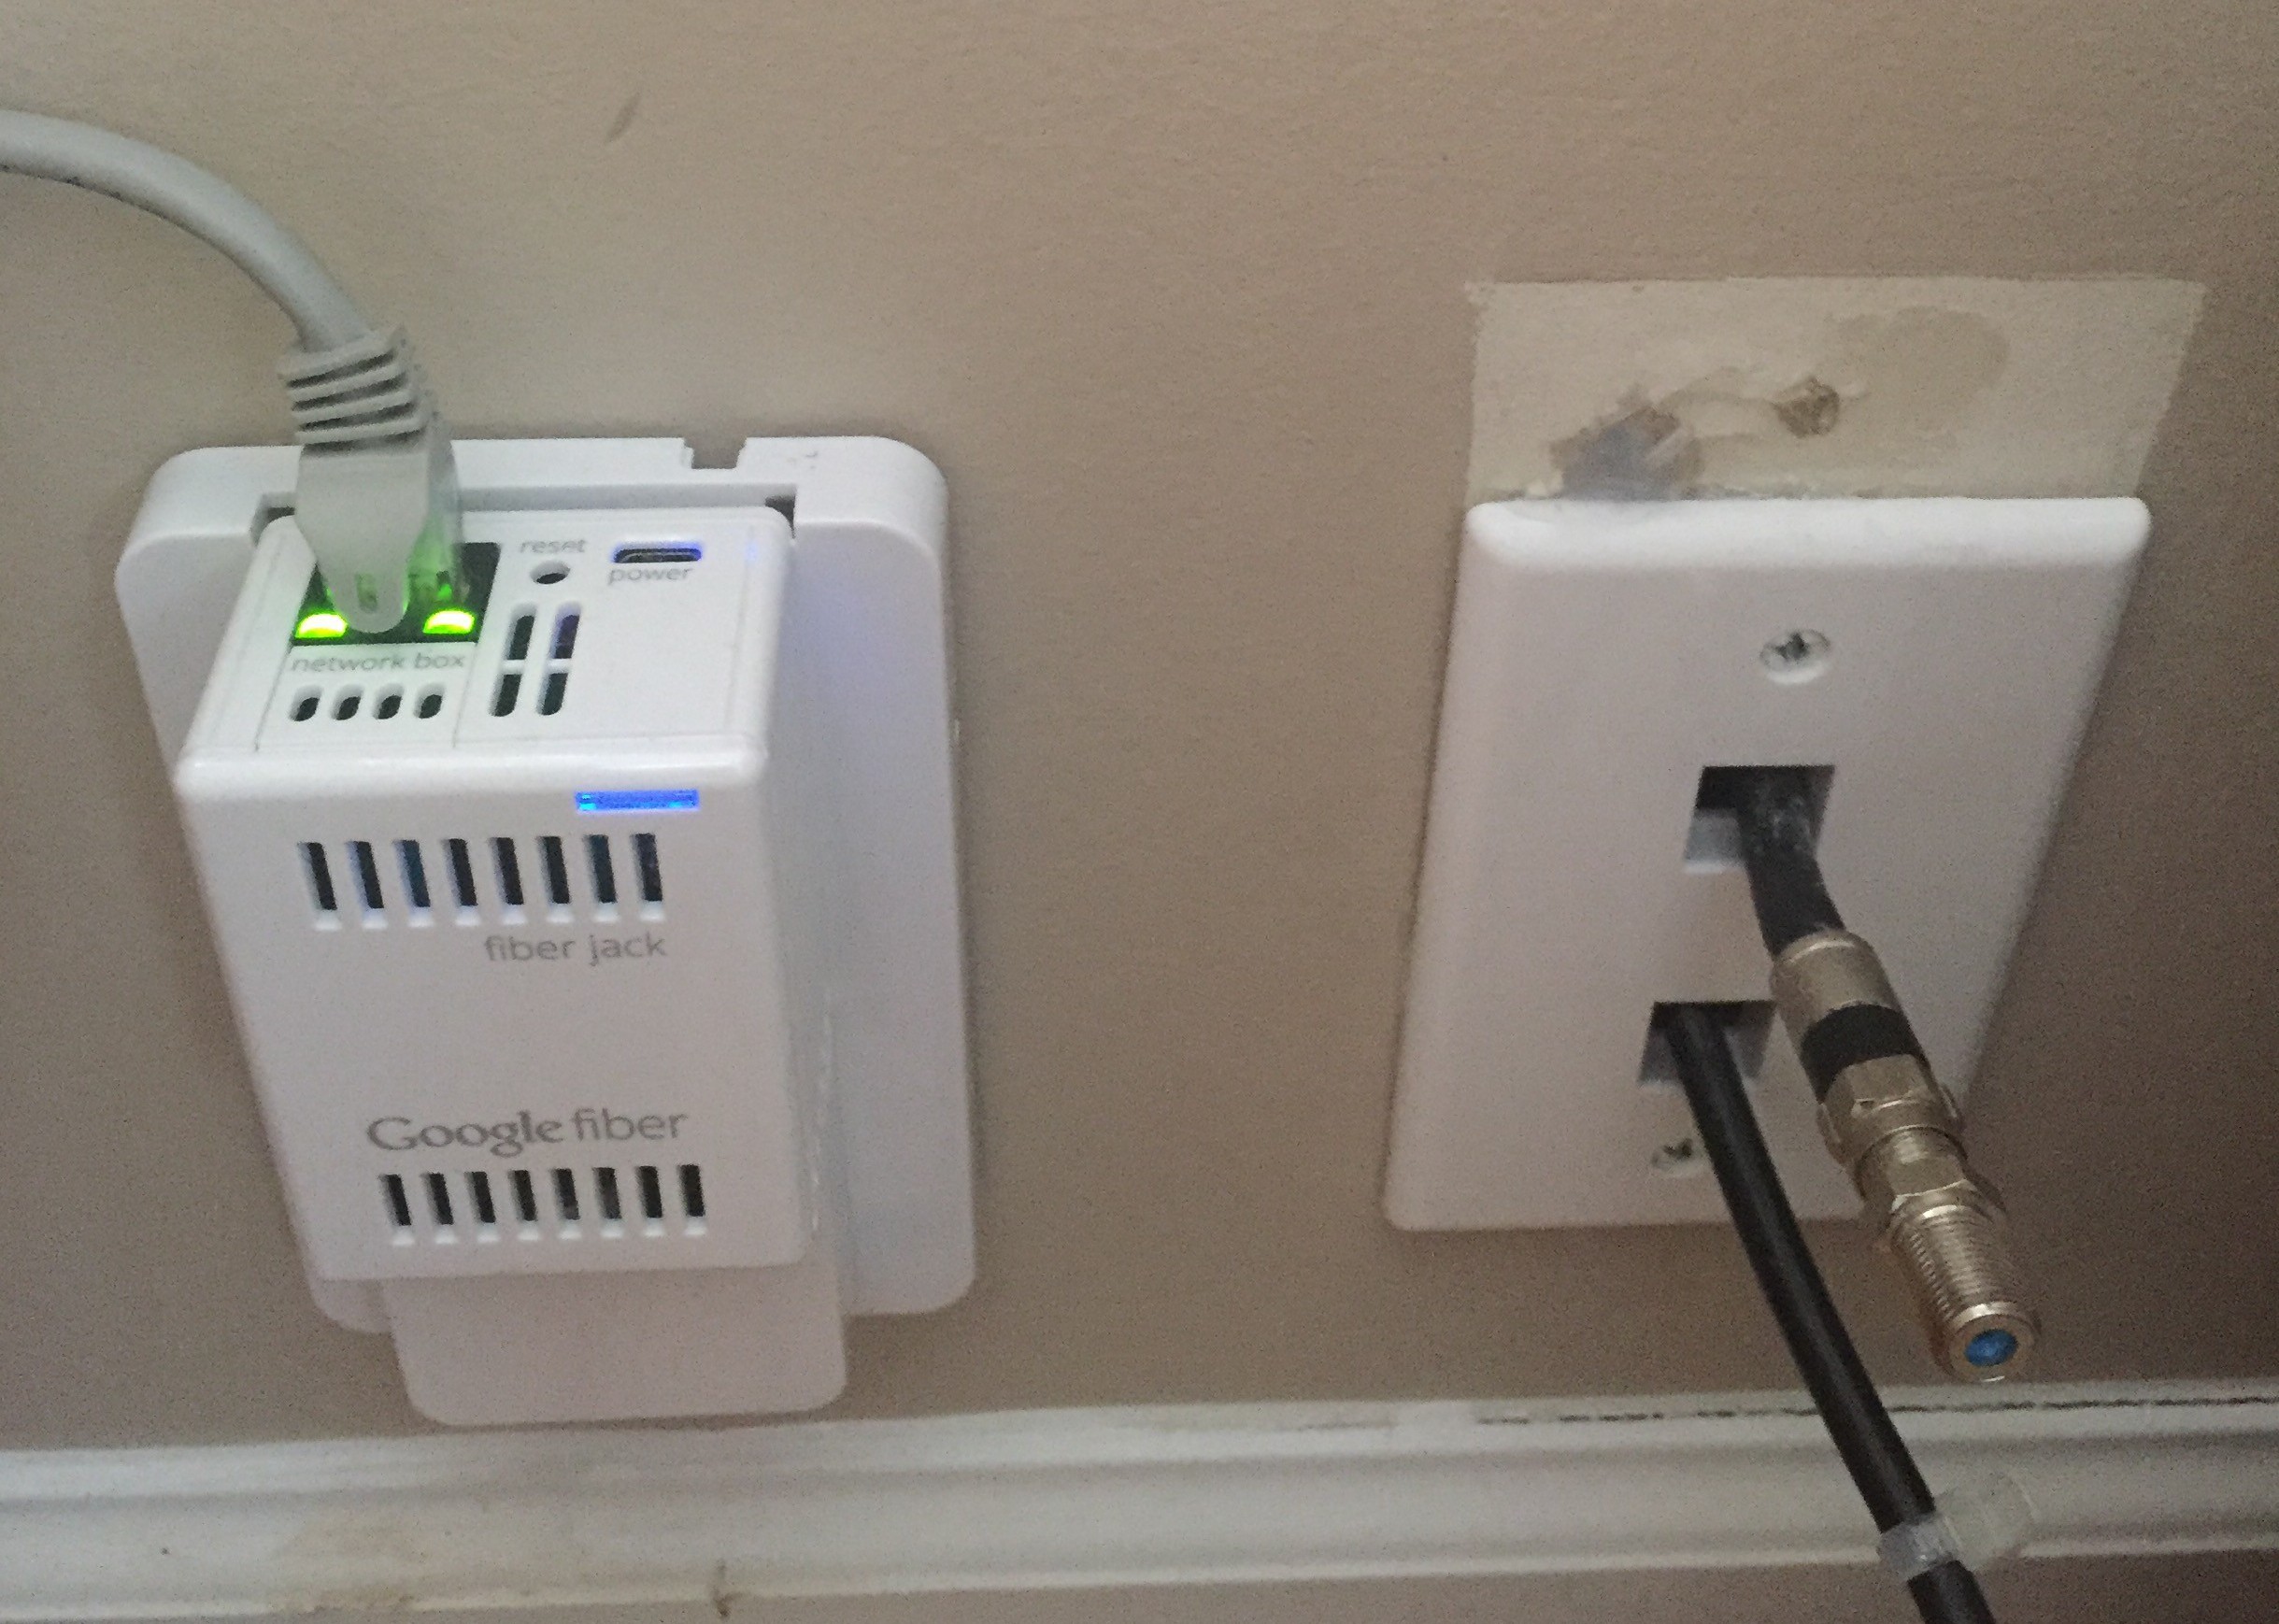
Google Fiber Jack, RG6 run to TV panel, old TWC connection

A CAT5e cable connects the fiber jack to the Network+ Box which has RG6 output to the TV boxes at each TV location (MoCA). A straight RG6 run is necessary to each TV box – no splitters after the TV distribution panel. The Network+ Box provides DVR storage and acts as a wireless router, and each TV box can extend the wireless network for larger homes. You can find specifications about the devices here.

Service Review

TV Service

I loved the interface on my Dish Network ViP 722k. The guide was clean and easy to understand, allowed for customization, and had quick access to all the menu’s I used. I absolutely despised the Time Warner Cable interface and guide and always found it very difficult to use anytime I visited a friend’s house. In fact, we have Charter Spectrum service at a vacation rental property with the same interface, and it’s terrible. Switching to a new interface was going to be a challenge, but after a day or two using Google’s latest interface for Fiber TV, I like it at least as much as Dish Network’s. There is still some small room for improvement, but overall, it’s easy to understand and the guide works well. The interface is quick to load after powering up and shows pictures shared via Google+ as a screen saver when not in use. The learning remote is a combination Bluetooth and IR transmitter, with very basic TV controls (on/off, volume, input) – it does not have additional device modes, but it was able to learn the IR codes to control the volume on my Samsung sound bar.

The Network+ Box has an embedded 2TB hard disk that can store up to 500 hours of programming and enables watching or recording of up to 8 shows at once. The same basic DVR options for setting scheduled or one-time recordings are present as with my Dish Network ViP 722k and with 8 streams, setting buffers doesn’t cause conflicts.

While not as common as the cable providers would have you believe, my Dish Network service did cut out from time to time in the absolute worst weather, but I no longer have to worry about this with Google Fiber. The HD picture quality is outstanding on both 52″ 1080p and 32″ 720p TV’s though it was with Dish Network as well. I’ve had no stuttering or picture issues with the IPTV – changing stations is as fast as cable or satellite.

I had the reasonably priced Dish Network Top 200 package while Google has a single TV service tier that includes all of those channels, plus some additional I did not have previously. Google Fiber’s on-demand selection is excellent and priced about the same as what I had with Dish Network and Charter Spectrum. As with other services, you’ll pay for additional TV’s and premium channel add-ons but there’s no additional fee for DVR service – it’s included.

Internet Service

Having worked from home for the last 10 years, I’ve become extremely dependent on fast, reliable internet service. While Time Warner Cable MAXX was decent, I did have several service interruptions and issues that required visits to replace modems or outside cables over the years. On average, I’d say there was about a service interruption every 3-6 months. Time Warner Cable speeds were always as advertised, and sometimes even faster. Latency hovered between 20-30ms for most major sites with Time Warner Cable and is slightly better at 10-20ms with Google Fiber.

TWC Speed Test

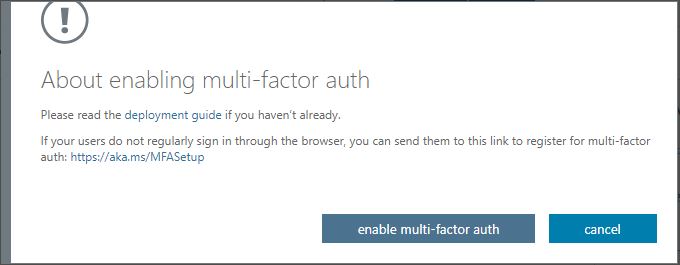
TWC Speed Test (300/20)

Google Fiber Speed Test

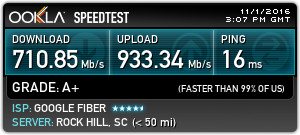
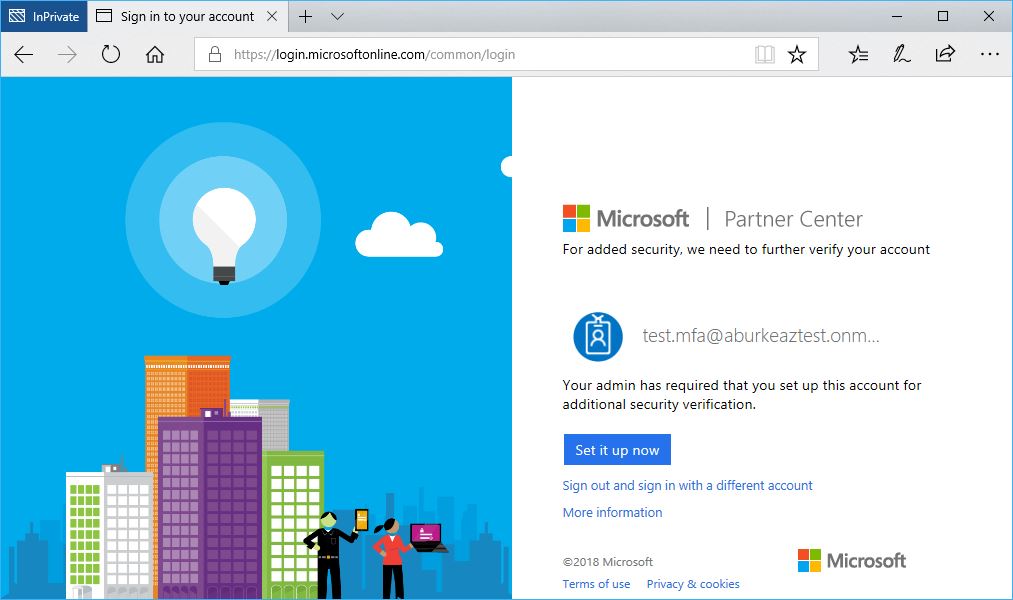
Google Fiber Speed Test (1000/1000)


The IPTV service uses some of that bandwidth, so you’ll have a hard time getting the full 1Gbps in a speed test, but it lives up to the hype. Except for later that day of installation which the tech had warned me about, I have not had a single service interruption with Google Fiber. Additionally, Google Fiber is fully IPv6 enabled which my Time Warner Cable service was IPv4 only.

The configuration of the Network+ Box is done via a web service: http://fiber.google.com. I had been using an ASUS RT-AC88U router connected to a Motorola SURFboard SB6141 cable modem which allowed for a variety of advanced networking features. The Google Network+ Box supports configuration of DHCP settings, basic wifi settings, port forwarding and dynamic DNS, but lacks any QoS, VPN or other advanced configuration. The Network+ Box has four 1Gbps ports and supports 2.4GHz 802.11b/g/n and 5GHz 802.11a/n/ac. The TV boxes support the same wireless protocols and have a single 1Gbps port for nearby devices.

Cost

To recap, I had the Time Warner Cable MAXX service which was running about $112/mo with taxes modem fees, and the Dish Network Top 200 package with a ViP 722k DVR that I had purchased outright bringing my monthly bill to just under $100/mo. The Google Fiber 1000 + TV package includes 1000 Mbps internet, 220+ channels with HD & DVR ($130/mo) and I’ve added a 2nd TV box ($5/mo) which brings my bill to $140/mo with taxes. I have lost access to NESN though, so I’m forced to catch the Red Sox and Bruins when they’re on ESPN, MLBTV, NBCSN and NHLN. Overall, I’m very happy with the switch and would definitely recommend Google Fiber TV and Internet service.

Multi-tenant Azure Site Recovery E2A using Virtual Machine Manager

Azure Site Recovery (ASR) is simple, automated protection and disaster recovery service delivered from the cloud. It enables replication and failover of workloads between datacenters, and from on-premises to Azure. ASR supports physical machines, VMWare and Hyper-V environments. ASR integrates with Windows Azure Pack (WAP) enabling service providers to offer managed disaster recovery for IaaS workloads through the Cloud Solution Provider (CSP) program. I’ll run through configuring ASR to support your multi-tenant cloud, and point out several important caveats in the configuration.

The CSP program enables service providers to resell Microsoft first-party cloud services like Azure, while owning the customer relationship and enabling value-add services. Azure subscriptions provisioned under the CSP program are single-tenant, which presents a challenge when configuring ASR with WAP and Virtual Machine Manager (SCVMM). In order to enable ASR, you must first register a SCVMM server with a Recovery Services vault within an Azure subscription. This will allow ASR to query the SCVMM server and retrieve metadata such as names of virtual machines and networks. In most service provider configurations, a single SCVMM server supports multiple tenants, and as such, you need to register SCVMM to a “master” vault in a subscription owned by the service provider. SCVMM can only be registered to a single vault, which also means that if you are using Azure as a DR target, you can only fail VM’s to a single Azure region. While the SCVMM server can only be registered to a single subscription, we can configure per-cloud protection policies specifying compute and storage targets in other subscriptions. This is an important distinction, as it means that the service provider will need to create separate clouds in VMM (and therefore separate plans in WAP) for EACH tenant. This enables a hoster to provide managed disaster recovery for IaaS workloads in a multi-tenant SCVMM environment. The topology is illustrated below.

Multitenant-ASR

While the initial configuration of the Recovery Services vault can now be done in the Azure portal, configuration of ASR to support multi-tenancy requires using powershell. You’ll need at least version 0.8.10 of Azure Powershell, but I recommend using Web Platform Installer to get the latest.

First,  if you are using the Recovery Services cmdlets for the first time in your subscription, you should register the Azure provider for Recovery Services. Before you can do this, first enable access to the Recovery Services provider on your subscription, by running the following commands. **NOTE: It may take up to an hour to enable access to Recovery Services on your subscription. Attempts to register the provider might fail in the interim.

Register-AzureRmProviderFeature -FeatureName betaAccess -ProviderNamespace Microsoft.RecoveryServices
Register-AzureRmResourceProvider -ProviderNamespace Microsoft.RecoveryServices

Then, let’s setup some constants we’ll use later.

$vaultRgName = "WAPRecoveryGroup"
$location = "westus"
$vaultName = "WAPRecoveryVault"
$vmmCloud = "AcmeCorp Cloud"
$policyName = "AcmeCorp-Policy"
$serverName = "VMM01.contoso.int"
$networkName = "YellowNetwork"
$vmName = "VM01"

Next, connect to your service provider subscription (this can be any direct subscription – EA/Open/PAYG).

$UserName = "user@provider.com"
$Password = "password"
$SecurePassword = ConvertTo-SecureString -AsPlainText $Password -Force
$Cred = New-Object System.Management.Automation.PSCredential -ArgumentList $UserName, $SecurePassword
Login-AzureRmAccount -Credential $Cred

If you have access to multiple subscriptions, you’ll need to set the subscription context.

#Switch to the service provider's subscription
Select-AzureRmSubscription -TenantId 00000000-0000-0000-0000-000000000000 -SubscriptionId 00000000-0000-0000-0000-000000000000

Now we can create the resource group and vault.

#Create the Resource Group for the vault
New-AzureRmResourceGroup -Name $vaultRgName -Location $location
#Create the Recovery Services vault
$vault = New-AzureRmRecoveryServicesVault -Name $vaultName -ResourceGroupName $vaultRgName -Location $location
#Set the vault context
Set-AzureRmSiteRecoveryVaultSettings -ARSVault $vault
#Download vault settings file
Get-AzureRmRecoveryServicesVaultSettingsFile -Vault $vault

At this point, you’ll need to download the Azure Site Recovery provider and run the installation on your SCVMM server, then register the SCVMM server with the vault using the settings file you just downloaded. Additionally, you’ll need to install (but do not configure) the Microsoft Azure Site Recovery agent on each of the Hyper-V servers. Screenshots can be found here.

Now that SCVMM has been registered with the vault, and the agents have been installed, we can create the storage account and virtual network in the tenant subscription.

#Switch to the tenant's subscription
Select-AzureRmSubscription -TenantId 00000000-0000-0000-0000-000000000000 -SubscriptionId 00000000-0000-0000-0000-000000000000
#Storage account must be in the same region as the vault
$storageAccountName = "drstorageacct1"
$tenantRgName =  "AcmeCorpRecoveryGroup" 
#Create the resource group to hold the storage account and virtual network
New-AzureRmResourceGroup -Name $tenantRgName -Location $location
#Create the storage account
$recoveryStorageAccount = New-AzureRmStorageAccount -ResourceGroupName $tenantRgName -Name $storageAccountName -Type "Standard_GRS" -Location $location
#Create the virtual network and subnet
$subnet1 = New-AzureRmVirtualNetworkSubnetConfig -Name "Subnet1" -AddressPrefix "10.0.1.0/24"
$vnet = New-AzureRmVirtualNetwork -Name $networkName -ResourceGroupName $tenantRgName -Location $location -AddressPrefix "10.0.0.0/16" -Subnet $subnet1

We’re ready to create the protection policy and associate it to the SCVMM cloud.

#Switch to the service provider's subscription
Select-AzureRmSubscription -TenantId 00000000-0000-0000-0000-000000000000 -SubscriptionId 00000000-0000-0000-0000-000000000000
#Create the policy referencing the storage account id from the tenant's subscription
$policyResult = New-AzureRmSiteRecoveryPolicy -Name $policyName -ReplicationProvider HyperVReplicaAzure -ReplicationFrequencyInSeconds 900 -RecoveryPoints 1 -ApplicationConsistentSnapshotFrequencyInHours 1 -RecoveryAzureStorageAccountId $recoveryStorageAccount.Id
$policy = Get-AzureRmSiteRecoveryPolicy -FriendlyName $policyname
#Associate the policy with the SCVMM cloud
$container = Get-AzureRmSiteRecoveryProtectionContainer -FriendlyName $vmmCloud
Start-AzureRmSiteRecoveryPolicyAssociationJob -Policy $policy -PrimaryProtectionContainer $container

Once the policy has been associated with the cloud, we can configure network mapping.

#Retrieve the on-premises network
$server = Get-AzureRmSiteRecoveryServer -FriendlyName $serverName
$network = Get-AzureRmSiteRecoveryNetwork -Server $server -FriendlyName $networkName
#Create the network mapping referencing the virtual network in the tenant's subscritpion
New-AzureRmSiteRecoveryNetworkMapping -PrimaryNetwork $network -AzureVMNetworkId $vnet.Id

Lastly, we enable protection on the virtual machine.

#Get the VM metadata
$vm = Get-AzureRmSiteRecoveryProtectionEntity -ProtectionContainer $container -FriendlyName $vmName
#Enable protection. You must specify the storage account again
Set-AzureRmSiteRecoveryProtectionEntity -ProtectionEntity $vm -Protection Enable –Force -Policy $policy -RecoveryAzureStorageAccountId $recoveryStorageAccount.Id

You can monitor protection and perform failovers for a virtual machine in a multi-tenant SCVMM environment to fail over to a tenant’s subscription in Azure from the Recovery Services vault in the provider’s Azure subscription.

Protected-VM01

Adding additional VIP to Azure Load Balancer

Recently, a partner needed guidance on adding an additional VIP to an Azure Load Balancer. This is a typical scenario where multiple SSL-based websites are running on a pair of servers and clients may not have SNI support, necessitating dedicated public IP’s for each website. Azure Load Balancer in Azure Resource Manager does support multiple VIP’s, just not via the portal. Not to worry, Powershell to the rescue. The Azure documentation site has a great article describing the process of deploying a two-node web farm and internet facing load balancer. These commands assume you’ve already deployed the load balancer and are just adding a second VIP:

Login-AzureRmAccount
Select-AzureRmSubscription -SubscriptionId 00000000-0000-0000-0000-000000000000
 
#Get the Resource Group
$rg = Get-AzureRmResourceGroup -Name "MultiVIPLBRG"
 
#Get the Load Balancer
$slb = Get-AzureRmLoadBalancer -Name "MultiVIPLB" -ResourceGroupName $rg.ResourceGroupName
 
#Create new public VIP
$vip2 = New-AzureRmPublicIpAddress -Name "PublicVIP2" -ResourceGroupName $rg.ResourceGroupName -Location $rg.Location -AllocationMethod Dynamic
 
#Create new Frontend IP Configuration using new VIP
$feipconfig2 = New-AzureRmLoadBalancerFrontendIpConfig -Name "MultiVIPLB-FE2" -PublicIpAddress $vip2
$slb | Add-AzureRmLoadBalancerFrontendIpConfig -Name "MultiVIPLB-FE2" -PublicIpAddress $vip2
 
#Get Backend Pool
$bepool = $slb | Get-AzureRmLoadBalancerBackendAddressPoolConfig
 
#Create new Probe
$probe2 = New-AzureRmLoadBalancerProbeConfig -Name "Probe2" -RequestPath "/" -Protocol http -Port 81 -IntervalInSeconds 5 -ProbeCount 2
$slb | Add-AzureRmLoadBalancerProbeConfig -Name "Probe2" -RequestPath "/" -Protocol http -Port 81 -IntervalInSeconds 5 -ProbeCount 2
 
#Create Load Balancing Rule
$slb | Add-AzureRmLoadBalancerRuleConfig -Name Rule2 -FrontendIpConfiguration $feipconfig2 -BackendAddressPool $bepool -Probe $probe2 -Protocol TCP -FrontendPort 80 -BackendPort 81
 
#Save the configuration
$slb | Set-AzureRmLoadBalancer

Azure Pack Connector

In my role as Cloud Technology Strategist with Microsoft over the past 18 months, I’ve been working closely with service providers of all types in making hybrid cloud a reality. Microsoft is uniquely positioned to be able to deliver on the 3 key pillars of cloud – on-premises, hosted, and public – via the Microsoft Cloud Platform. Service providers understand the value of hybrid and, with the release of Azure Pack Connector, have a tool they can use to provide a unified experience for managing public and private cloud.

Azure Pack was released in the fall of 2013 as a free add-on for Windows Server and System Center. It extended the private cloud technology delivered in Virtual Machine Manager to provide self-service multi-tenant Infrastructure as a Service (IaaS) through Hyper-V, in a manner that is consistent with IaaS in public Azure. As more and more enterprises see the value in distributed cloud, service providers are looking to extend their managed services to be able to provision and manage workloads not only running in their data center via Azure Pack, but also IaaS workloads running in public Azure. While Azure Pack ensures the portal and API is consistent, it was still two separate management experiences. Azure Pack Connector bridges that gap by enabling provisioning and management of IaaS in public Azure, through Azure Pack.

Azure Pack Connector

The solution was originally developed by Microsoft IT for internal use to enable various development teams to self-service on public Azure IaaS. Azure Pack Connector was born out of collaboration with the Microsoft Hosting and Cloud Services team to bring the MSIT solution to service providers as open source software released under MIT license. Azure Pack Connector was developed specifically with Cloud Solution Provider partners is in mind, supporting Azure Resource Manager API and including tools to configure Azure subscription provisioned in the CSP portal or CREST API for use with Azure Pack Connector.

The solution consists of 4 main components:

  • Compute Management Service – A windows service that orchestrates the provisioning and de-provisioning of Azure VM’s.
  • Compute Management API – A backend API supporting UI components and enabling management of Azure VM’s.
  • Admin Extension – UI extension for Azure Pack that enables on-boarding and management of Azure subscriptions.
  • Tenant Extension – UI extension for Azure Pack that enables tenant self-service provisioning and management of Azure VM’s.

The Azure Pack Connector subscription model uses a 1-to-1 mapping of Azure Pack plans to Azure Subscriptions, allowing the administrator to control VM operating systems and sizes on a per plan basis and Azure regions globally. Once a user has a subscription to an Azure Pack plan that has an attached Azure subscription, they can provision and manage Azure VM’s through the Azure Pack tenant portal.

Azure Pack Connector Dashboard

This video walkthrough will help explain the features and demonstrate how to use Azure Pack Connector:


The Azure Pack Connector solution is published on GitHub:

https://github.com/Microsoft/Phoenix

Head on over and grab the binaries to expand your Azure Pack installation today!


True Cloud Storage – Storage Spaces Direct

Let me start off by saying this is one of the most exciting new features in the next version of Windows Server. Prior to joining Microsoft, as a customer, I had been begging for this feature for years. Well, the product team has delivered – and in a big way. All of the testing I have performed on this has shown that this is a solid technology, with minimal performance overhead. You can expect to see near line-rate network speeds and full utilization of disk performance. It is as resilient as you would expect, and as flexible as you will need. Recently announced at Ignite 2015, Storage Spaces Direct (S2D) is available in the Server 2016.

The previous version of storage spaces relied on a shared SAS JBOD being connected to all storage nodes. While this helps reduce the cost of storage by replacing expensive SANs with less expensive SAS JBOD’s, it still is a higher cost than leveraging DAS for a few reasons: Dual-port SAS drives are required in order to provide redundant connectivity to the SAS backplane, the JBOD itself has additional cost, and the datacenter costs associated with the rack space, power, and cabling for the JBOD shelf. Storage Spaces Direct overcomes these hurdles by leveraging local disks in server chassis, thereby creating cloud storage out of the lowest cost hardware. You can finally leverage SATA SSD’s with Storage Spaces and still maintain redundancy and failover capabilities. Data is synchronously replicated to disks on other nodes of the cluster leveraging SMB3, meaning you can take advantage of SMB Multichannel and RDMA capable nics for maximum performance.

Here’s a quick look at a Storage Spaces Direct deployment in my lab:

Shared Nothing Storage Spaces

Storage Spaces Direct

Clustering creates virtual enclosures using the local disks in each storage node. Data is the automatically replicated and tiered according to the policy of the virtual disk. There are several recommendations for this release:

  • A minimum of 4 nodes is recommended to ensure availability of data in servicing and failure scenarios
  • 10Gbps network with RDMA is the recommended backplane between nodes
  • Three-way mirrored virtual disks are recommended
  • The server HBA must be capable of pass-through or JBOD mode

All of the other features you know and love about Storage Spaces work in conjunction with this feature. So how do we configure this? Powershell of course. Standard cluster configuration applies, and it’s assumed you have a working cluster, network configured, and disks ready to go. The process of configuring S2D has been streamlined to a single command in Server 2016: Enable-ClusterS2D. This command will scan all available storage on cluster nodes, add the physical disks to a new storage pool, and create two storage tiers based on the disk characteristics. Alternatively, you can manually create the storage pool and tiers by skipping the eligibility checks when enabling S2D.

Enable-ClusterS2D

We can confirm S2D has been enabled by looking at the cluster properties:

Get-Cluster | fl S2D*

Storage Spaces Direct Cluster Properties

And that enclosures have been created, and all disks are recognized by the cluster:

Disks and Enclosures

Disks and Enclosures

The storage pool and tiers should also now be visible, I chose to create mine manually (see my post on SSD’s and Storage Spaces Performance).

S2D Storage Pool

Storage Spaces Direct Storage Pool

If the media type of your disks shows up as “Unspecified” which can happen with a guest cluster on a 3rd party hypervisor like ESXi, you can set them manually to HDD/SSD now that there are in a storage pool like so:

Get-StoragePool pool1 | Get-PhysicalDisk | Set-PhysicalDisk -MediaType SSD

The enclosures, disks and storage pool will now appear in Failover Cluster Manager:

S2D-Failover-Cluster-Manager

Failover Cluster Manager Enclosures and Disks

Lastly, we’ll create a virtual disk (you can do this through the GUI as well). You’ll want to tweak the number of columns for your environment (hint: for number of columns, it’s best not to exceed the number of local disks per virtual enclosure):

New-Volume -StoragePoolFriendlyName “pool1” -FriendlyName “vm-storage1” -PhysicalDiskRedundancy 2 -FileSystem CSVFS_NTFS -ResiliencySettingName Mirror -Size 250GB

Viola! We have a mirrored virtual disk that’s been created using storage spaces direct:

Virtual Disk

Virtual Disk

Rebooting a node will cause the pool and virtual disk to enter a degraded state. When the node comes back online, it will automatically begin a background Regeneration storage job. The fairness algorithm we set earlier will ensure sufficient disk IO access to workloads while regenerating the data as quickly as possible – this will saturate the network bandwidth, which, in this case, is a good thing. You can view the status of the running job by using the Get-StorageJob cmdlet. Disk failures are handled the same there were previously, retire and then remove the disk.

Regarding resiliency, I ran several IO tests while performing various simulated failures:

Node Reboot – 33% performance drop for 20s then full performance, 10% performance drop during regeneration

Node Crash (hard power cycle) – Full IO pause for 20s then full performance, 10% performance drop during regeneration

Disk Surprise Removal – Full IO pause for 4s then full performance, 10% performance drop during regeneration

Note that when using Hyper-V over SMB, the IO pause does not impact running VM’s. They will see increased latency, but the VM’s will continue to run.

Automating VMWare to Hyper-V Migrations using MVMC

There are several tools for migrating VMWare VM’s to Hyper-V. The free tool from Microsoft is called the Microsoft Virtual Machine Converter which allows you to convert from VMWare to Hyper-V or Azure, and from physical to virtual via a GUI or powershell cmdlets for automation. Microsoft also has the Migration Automation Toolkit which can help automate this process. If you have NetApp, definitely check out MAT4SHIFT which is by far the fastest and easiest method for converting VMWare VM’s to Hyper-V. MVMC works fairly well, however, there are a few things the tool doesn’t handle natively when converting from VMWare to Hyper-V.

First, it requires credentials to the guest VM to remove the VMWare Tools. In a service provider environment, you may not have access to the guest OS, so this could be an issue. Second, the migration will inherently cause a change in hardware, which in turn can cause the guest OS to lose its network configuration. This script accounts for that by pulling the network configuration from the guest registry and restoring it after the migration. Lastly, MVMC may slightly alter other hardware specifications (dynamic memory, mac address) and this script aims to keep them as close as possible with the exception of disk configuration due to Gen 1 limitations in Hyper-V booting.

This script relies on several 3rd party components:

You’ll need to install MVMC, HV PS Module, and VMWare PowerCLI on your “helper” server – the server where you’ll be running this script which will perform the conversion. Devcon, the HV IS components, VMWare Tools, and NSSM will need to be extracted into the appropriate folders:

vmware-to-hyper-v-folder-structure

I’ve included a sample kick-off script (migrate.ps1) that will perform a migration:

$esxhost = "192.168.0.10"
$username = "root"
$password = ConvertTo-SecureString "p@ssWord1" -AsPlainText -Force
$cred = New-Object -Typename System.Management.Automation.PSCredential -Argumentlist "root", $password
$viserver = @{Server=$esxhost;Credential=$cred}
 
$destloc = "\\sofs.contoso.int\vm-storage1"
 
$vmhost = "HV03"
 
$vmname = "MYSERVER01"
 
cd C:\vmware-to-hyperv-convert
 
. .\vmware-to-hyperv.ps1 -viserver $viserver -VMHost $vmhost -destLoc $destloc -VerboseMode
 
$vms = VMware.VimAutomation.Core\Get-VM -Server $script:viconnection
 
$vmwarevm = $vms | ?{$_.Name -eq $vmname}
 
$vm = Get-VMDetails $vmwarevm
 
Migrate-VMWareVM $vm

Several notes about MVMC and these scripts:

  • This is an offline migration – the VM will be unavailable during the migration. The total amount of downtime depends on the size of the VMDK(s) to be migrated.
  • The script will only migrate a single server. You could wrap this into powershell tasks to migrate several servers simultaneously.
  • Hyper-V Gen1 servers only support booting from IDE. This script will search for the boot disk and attach it to IDE0, all other disks will be attached to a SCSI controller regardless of the source VM disk configuration.
  • Linux VM’s were not in scope as there are not reliable ways to gain write access to LVM volumes on Windows. Tests of CentOS6, Ubuntu12 and Ubuntu14 were successful. CentOS5 required IS components be pre-installed and modifications made to boot configuration. CentOS7 was unsuccessful due to disk configuration. The recommended way of migrating Linux VM’s is to pre-install IS, remove VMWare Tools, and modify boot configuration before migrating.
  • These scripts were tested running from a Server 2012 R2 VM migrating Server 2003 and Server 2012 R2 VM’s – other versions should work but have not been tested.
  • ESXi 5.5+ requires a connection to a vCenter server as storage SDK service is unavailable on the free version.

Control Scale-Out File Server Cluster Access Point Networks

Scale-out File Server (SOFS) is a feature that allows you to create file shares that are continuously available and load balanced for application storage. Examples of usage are Hyper-V over SMB and SQL over SMB. SOFS works by creating a Distributed Network Name (DNN) that is registered in DNS to all IP’s assigned to the server for which the cluster network is marked as “Cluster and Client” (and if the UseClientAccessNetworksForSharedVolumes is set to 1, then additionally networks marked as “Cluster Only”). DNS natively serves up responses in a round robin fashion and SMB Multichannel ensures link load balancing.

If you’ve followed best practices, your cluster likely has a Management network where you’ve defined the Cluster Name Object (CNO) and you likely want to ensure that no SOFS traffic uses those adapters. If you change the setting of that Management network to Cluster Only or None, registration of the CNO in DNS will fail. So how do you exclude the Management network from use on the SOFS? You could use firewall rules, SMB Multichannel Constraints, or the preferred method – the ExcludeNetworks parameter on the DNN cluster object. Powershell to the rescue.

First, let’s take a look at how the SOFS is configured by default:

Scale-out file server cluster access point

Scale-out file server cluster access point

In my configuration, 192.168.7.0/24 is my management network and 10.0.3.0/24 is my storage network where I’d like to keep all SOFS traffic. The CNO is configured on the 192.168.7.0/24 network and you can see that both networks are currently configured for Cluster and Client use:

Cluster networks

Cluster networks

Next, let’s take a look at the advanced parameters of the object in powershell. “SOFS” is the name of my Scale-out File Server in failover clustering. We’ll use the Get-ClusterResource and Get-ClusterParameter cmdlets to expose these advanced parameters:

Powershell cluster access point

Powershell cluster access point

You’ll notice a string parameter named ExcludeNetworks which is currently empty. We’ll set that to the Id of our management network (use a semicolon to separate multiple Id’s if necessary). First, use the Get-ClusterNetwork cmdlet to get the Id of the “Management” network, and then the Set-ClusterParameter cmdlet to update it:

Powershell cluster set-parameter

Powershell cluster set-parameter

You’ll need to stop and start the resource in cluster manager for it to pick up the change. It should show only the Storage network after doing so:

Scoped cluster access point

Scoped cluster access point

Only IP’s in the Storage network should now be registered in DNS:

PS C:\Users\Administrator.CONTOSO> nslookup sofs
Server:  UnKnown
Address:  192.168.7.21

Name:    sofs.contoso.int
Addresses:  10.0.3.202
10.0.3.201
10.0.3.203