True Cloud Storage – Storage Spaces Direct

Let me start off by saying this is one of the most exciting new features in the next version of Windows Server. Prior to joining Microsoft, as a customer, I had been begging for this feature for years. Well, the product team has delivered – and in a big way. All of the testing I have performed on this has shown that this is a solid technology, with minimal performance overhead. You can expect to see near line-rate network speeds and full utilization of disk performance. It is as resilient as you would expect, and as flexible as you will need. Recently announced at Ignite 2015, Storage Spaces Direct (S2D) is available in the Server 2016.

The previous version of storage spaces relied on a shared SAS JBOD being connected to all storage nodes. While this helps reduce the cost of storage by replacing expensive SANs with less expensive SAS JBOD’s, it still is a higher cost than leveraging DAS for a few reasons: Dual-port SAS drives are required in order to provide redundant connectivity to the SAS backplane, the JBOD itself has additional cost, and the datacenter costs associated with the rack space, power, and cabling for the JBOD shelf. Storage Spaces Direct overcomes these hurdles by leveraging local disks in server chassis, thereby creating cloud storage out of the lowest cost hardware. You can finally leverage SATA SSD’s with Storage Spaces and still maintain redundancy and failover capabilities. Data is synchronously replicated to disks on other nodes of the cluster leveraging SMB3, meaning you can take advantage of SMB Multichannel and RDMA capable nics for maximum performance.

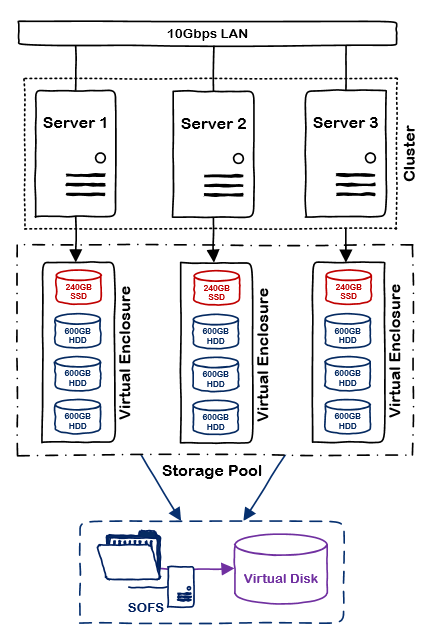
Here’s a quick look at a Storage Spaces Direct deployment in my lab:

Shared Nothing Storage Spaces

Storage Spaces Direct

Clustering creates virtual enclosures using the local disks in each storage node. Data is the automatically replicated and tiered according to the policy of the virtual disk. There are several recommendations for this release:

  • A minimum of 4 nodes is recommended to ensure availability of data in servicing and failure scenarios
  • 10Gbps network with RDMA is the recommended backplane between nodes
  • Three-way mirrored virtual disks are recommended
  • The server HBA must be capable of pass-through or JBOD mode

All of the other features you know and love about Storage Spaces work in conjunction with this feature. So how do we configure this? Powershell of course. Standard cluster configuration applies, and it’s assumed you have a working cluster, network configured, and disks ready to go. The process of configuring S2D has been streamlined to a single command in Server 2016: Enable-ClusterS2D. This command will scan all available storage on cluster nodes, add the physical disks to a new storage pool, and create two storage tiers based on the disk characteristics. Alternatively, you can manually create the storage pool and tiers by skipping the eligibility checks when enabling S2D.

Enable-ClusterS2D

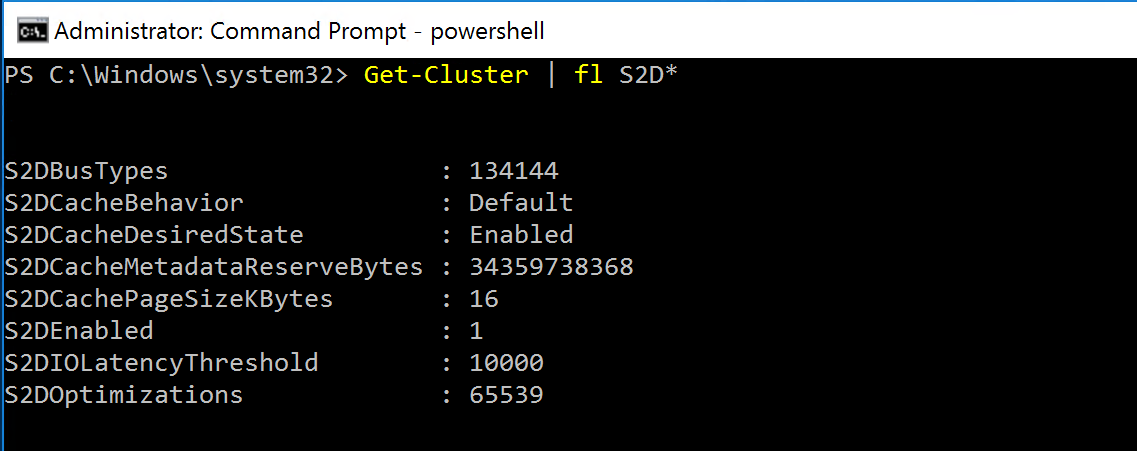
We can confirm S2D has been enabled by looking at the cluster properties:

Get-Cluster | fl S2D*

Storage Spaces Direct Cluster Properties

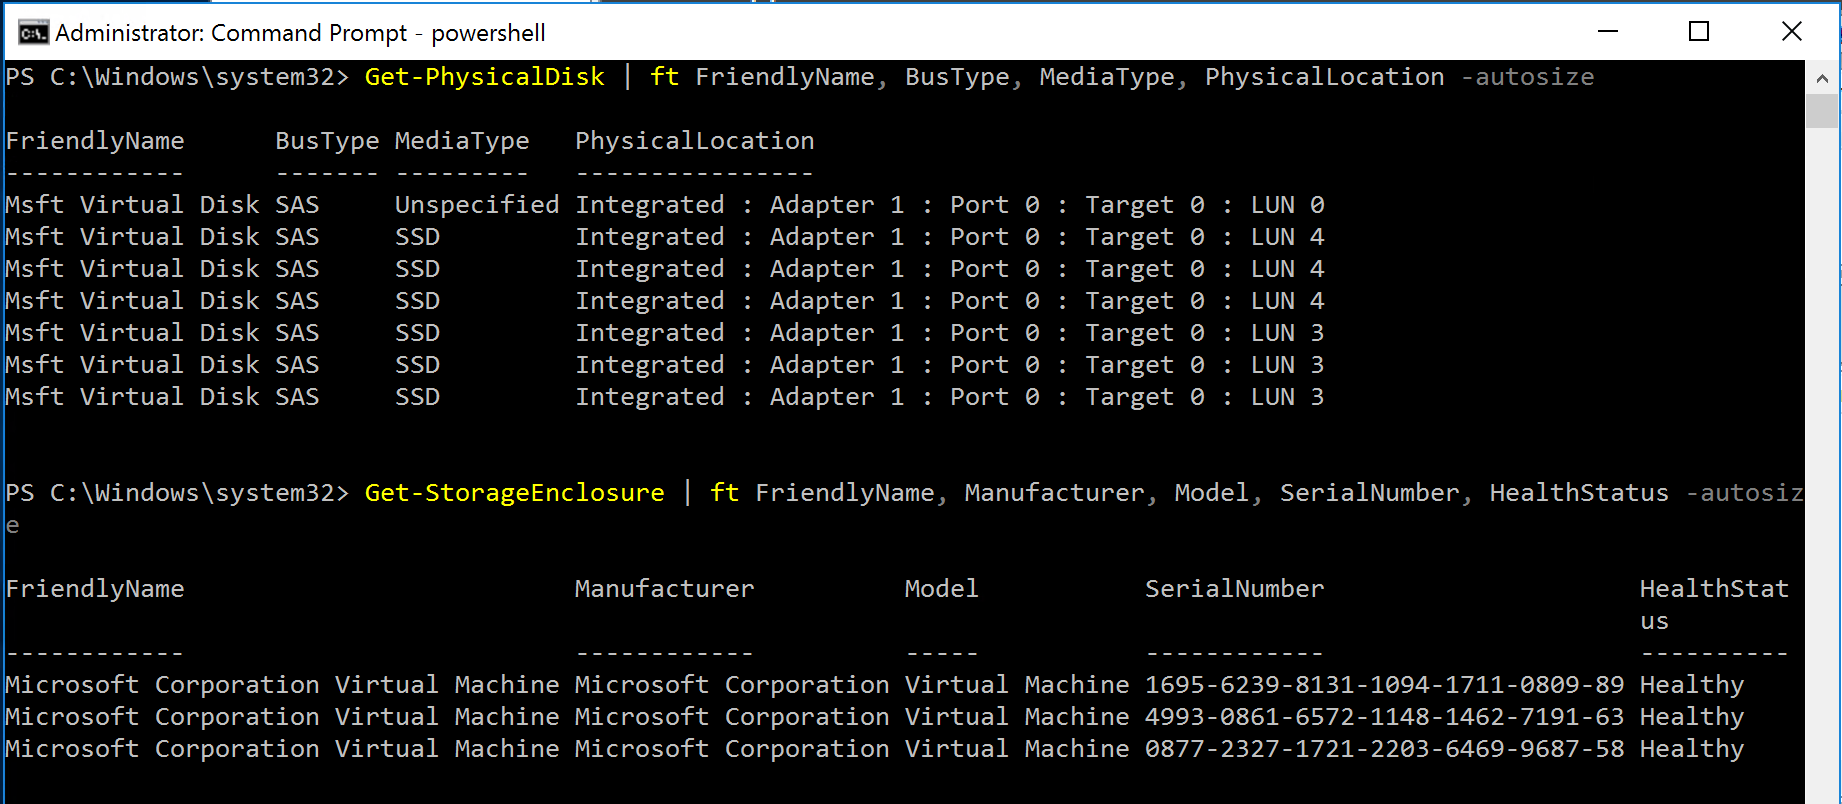
And that enclosures have been created, and all disks are recognized by the cluster:

Disks and Enclosures

Disks and Enclosures

The storage pool and tiers should also now be visible, I chose to create mine manually (see my post on SSD’s and Storage Spaces Performance).

S2D Storage Pool

Storage Spaces Direct Storage Pool

If the media type of your disks shows up as “Unspecified” which can happen with a guest cluster on a 3rd party hypervisor like ESXi, you can set them manually to HDD/SSD now that there are in a storage pool like so:

Get-StoragePool pool1 | Get-PhysicalDisk | Set-PhysicalDisk -MediaType SSD

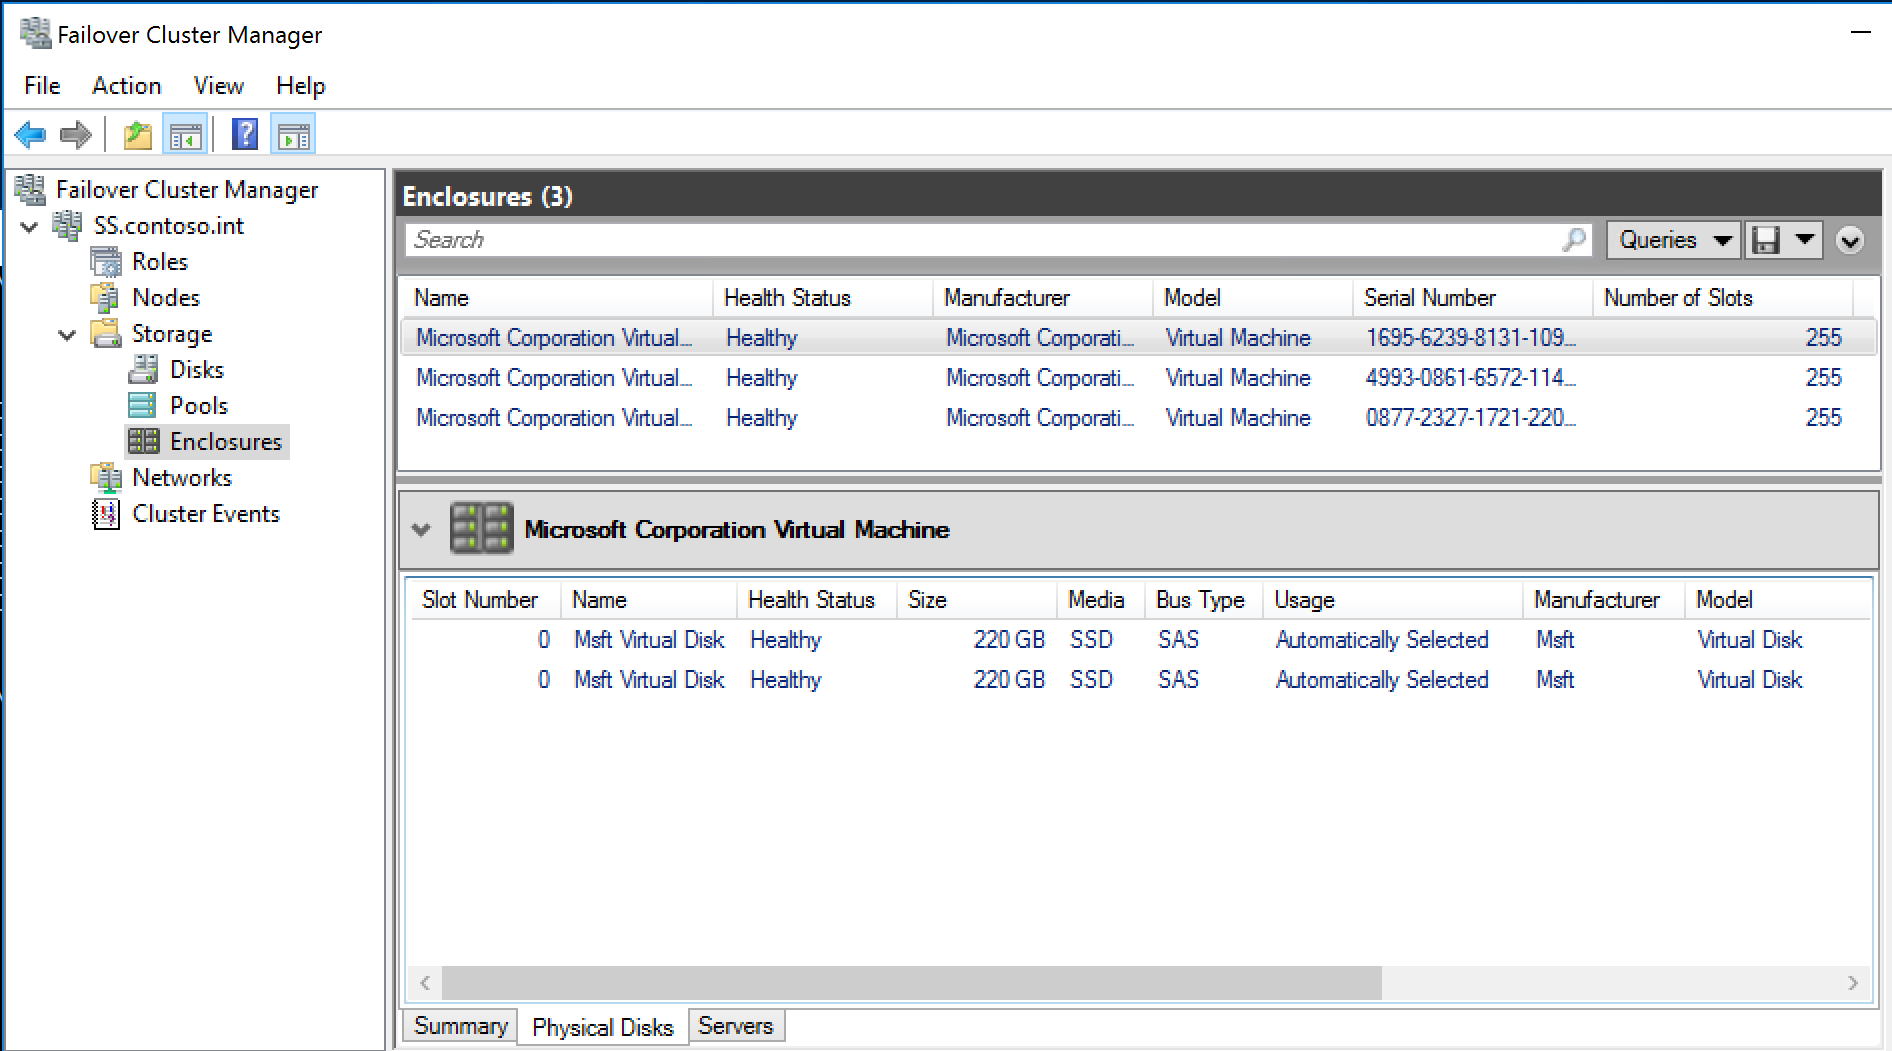
The enclosures, disks and storage pool will now appear in Failover Cluster Manager:

S2D-Failover-Cluster-Manager

Failover Cluster Manager Enclosures and Disks

Lastly, we’ll create a virtual disk (you can do this through the GUI as well). You’ll want to tweak the number of columns for your environment (hint: for number of columns, it’s best not to exceed the number of local disks per virtual enclosure):

New-Volume -StoragePoolFriendlyName “pool1” -FriendlyName “vm-storage1” -PhysicalDiskRedundancy 2 -FileSystem CSVFS_NTFS -ResiliencySettingName Mirror -Size 250GB

Viola! We have a mirrored virtual disk that’s been created using storage spaces direct:

Virtual Disk

Virtual Disk

Rebooting a node will cause the pool and virtual disk to enter a degraded state. When the node comes back online, it will automatically begin a background Regeneration storage job. The fairness algorithm we set earlier will ensure sufficient disk IO access to workloads while regenerating the data as quickly as possible – this will saturate the network bandwidth, which, in this case, is a good thing. You can view the status of the running job by using the Get-StorageJob cmdlet. Disk failures are handled the same there were previously, retire and then remove the disk.

Regarding resiliency, I ran several IO tests while performing various simulated failures:

Node Reboot – 33% performance drop for 20s then full performance, 10% performance drop during regeneration

Node Crash (hard power cycle) – Full IO pause for 20s then full performance, 10% performance drop during regeneration

Disk Surprise Removal – Full IO pause for 4s then full performance, 10% performance drop during regeneration

Note that when using Hyper-V over SMB, the IO pause does not impact running VM’s. They will see increased latency, but the VM’s will continue to run.
Automating VMWare to Hyper-V Migrations using MVMC

There are several tools for migrating VMWare VM’s to Hyper-V. The free tool from Microsoft is called the Microsoft Virtual Machine Converter which allows you to convert from VMWare to Hyper-V or Azure, and from physical to virtual via a GUI or powershell cmdlets for automation. Microsoft also has the Migration Automation Toolkit which can help automate this process. If you have NetApp, definitely check out MAT4SHIFT which is by far the fastest and easiest method for converting VMWare VM’s to Hyper-V. MVMC works fairly well, however, there are a few things the tool doesn’t handle natively when converting from VMWare to Hyper-V.

First, it requires credentials to the guest VM to remove the VMWare Tools. In a service provider environment, you may not have access to the guest OS, so this could be an issue. Second, the migration will inherently cause a change in hardware, which in turn can cause the guest OS to lose its network configuration. This script accounts for that by pulling the network configuration from the guest registry and restoring it after the migration. Lastly, MVMC may slightly alter other hardware specifications (dynamic memory, mac address) and this script aims to keep them as close as possible with the exception of disk configuration due to Gen 1 limitations in Hyper-V booting.

This script relies on several 3rd party components:

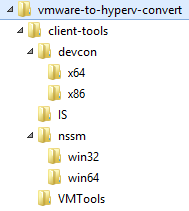
You’ll need to install MVMC, HV PS Module, and VMWare PowerCLI on your “helper” server – the server where you’ll be running this script which will perform the conversion. Devcon, the HV IS components, VMWare Tools, and NSSM will need to be extracted into the appropriate folders:

vmware-to-hyper-v-folder-structure

I’ve included a sample kick-off script (migrate.ps1) that will perform a migration:

$esxhost = "192.168.0.10"
$username = "root"
$password = ConvertTo-SecureString "p@ssWord1" -AsPlainText -Force
$cred = New-Object -Typename System.Management.Automation.PSCredential -Argumentlist "root", $password
$viserver = @{Server=$esxhost;Credential=$cred}
 
$destloc = "\\sofs.contoso.int\vm-storage1"
 
$vmhost = "HV03"
 
$vmname = "MYSERVER01"
 
cd C:\vmware-to-hyperv-convert
 
. .\vmware-to-hyperv.ps1 -viserver $viserver -VMHost $vmhost -destLoc $destloc -VerboseMode
 
$vms = VMware.VimAutomation.Core\Get-VM -Server $script:viconnection
 
$vmwarevm = $vms | ?{$_.Name -eq $vmname}
 
$vm = Get-VMDetails $vmwarevm
 
Migrate-VMWareVM $vm

Several notes about MVMC and these scripts:

  • This is an offline migration – the VM will be unavailable during the migration. The total amount of downtime depends on the size of the VMDK(s) to be migrated.
  • The script will only migrate a single server. You could wrap this into powershell tasks to migrate several servers simultaneously.
  • Hyper-V Gen1 servers only support booting from IDE. This script will search for the boot disk and attach it to IDE0, all other disks will be attached to a SCSI controller regardless of the source VM disk configuration.
  • Linux VM’s were not in scope as there are not reliable ways to gain write access to LVM volumes on Windows. Tests of CentOS6, Ubuntu12 and Ubuntu14 were successful. CentOS5 required IS components be pre-installed and modifications made to boot configuration. CentOS7 was unsuccessful due to disk configuration. The recommended way of migrating Linux VM’s is to pre-install IS, remove VMWare Tools, and modify boot configuration before migrating.
  • These scripts were tested running from a Server 2012 R2 VM migrating Server 2003 and Server 2012 R2 VM’s – other versions should work but have not been tested.
  • ESXi 5.5+ requires a connection to a vCenter server as storage SDK service is unavailable on the free version.

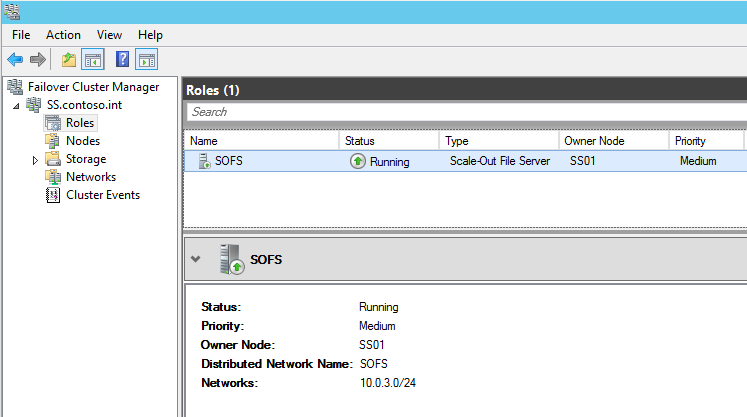
Control Scale-Out File Server Cluster Access Point Networks

Scale-out File Server (SOFS) is a feature that allows you to create file shares that are continuously available and load balanced for application storage. Examples of usage are Hyper-V over SMB and SQL over SMB. SOFS works by creating a Distributed Network Name (DNN) that is registered in DNS to all IP’s assigned to the server for which the cluster network is marked as “Cluster and Client” (and if the UseClientAccessNetworksForSharedVolumes is set to 1, then additionally networks marked as “Cluster Only”). DNS natively serves up responses in a round robin fashion and SMB Multichannel ensures link load balancing.

If you’ve followed best practices, your cluster likely has a Management network where you’ve defined the Cluster Name Object (CNO) and you likely want to ensure that no SOFS traffic uses those adapters. If you change the setting of that Management network to Cluster Only or None, registration of the CNO in DNS will fail. So how do you exclude the Management network from use on the SOFS? You could use firewall rules, SMB Multichannel Constraints, or the preferred method – the ExcludeNetworks parameter on the DNN cluster object. Powershell to the rescue.

First, let’s take a look at how the SOFS is configured by default:

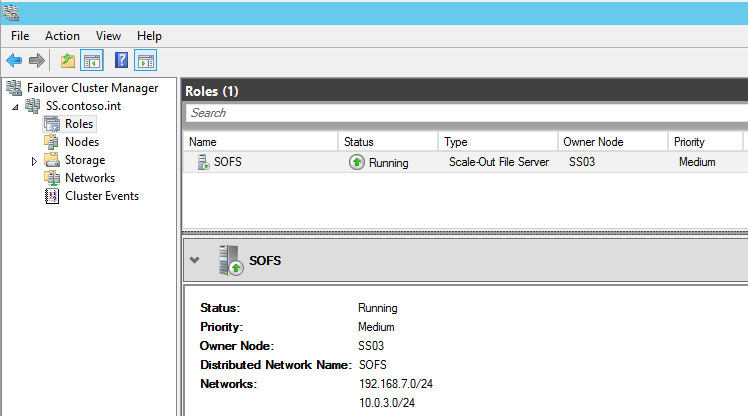
Scale-out file server cluster access point

Scale-out file server cluster access point

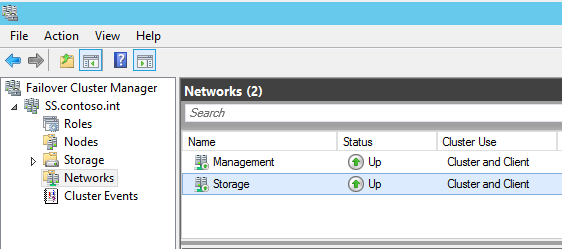
In my configuration, 192.168.7.0/24 is my management network and 10.0.3.0/24 is my storage network where I’d like to keep all SOFS traffic. The CNO is configured on the 192.168.7.0/24 network and you can see that both networks are currently configured for Cluster and Client use:

Cluster networks

Cluster networks

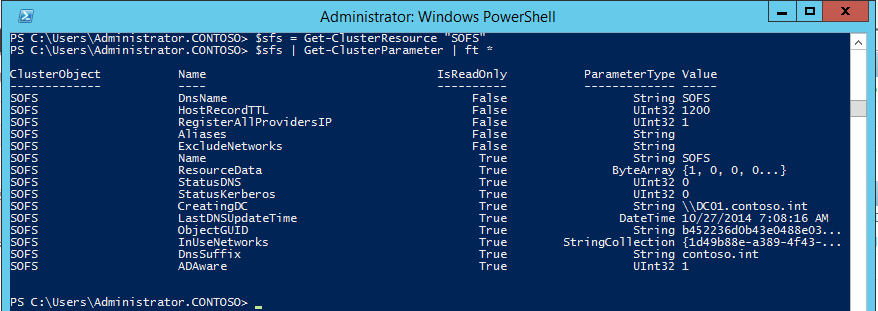
Next, let’s take a look at the advanced parameters of the object in powershell. “SOFS” is the name of my Scale-out File Server in failover clustering. We’ll use the Get-ClusterResource and Get-ClusterParameter cmdlets to expose these advanced parameters:

Powershell cluster access point

Powershell cluster access point

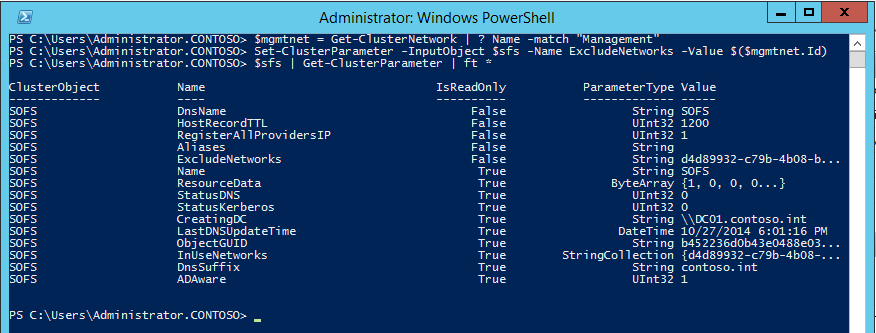
You’ll notice a string parameter named ExcludeNetworks which is currently empty. We’ll set that to the Id of our management network (use a semicolon to separate multiple Id’s if necessary). First, use the Get-ClusterNetwork cmdlet to get the Id of the “Management” network, and then the Set-ClusterParameter cmdlet to update it:

Powershell cluster set-parameter

Powershell cluster set-parameter

You’ll need to stop and start the resource in cluster manager for it to pick up the change. It should show only the Storage network after doing so:

Scoped cluster access point

Scoped cluster access point

Only IP’s in the Storage network should now be registered in DNS:

PS C:\Users\Administrator.CONTOSO> nslookup sofs
Server:  UnKnown
Address:  192.168.7.21

Name:    sofs.contoso.int
Addresses:  10.0.3.202
10.0.3.201
10.0.3.203

Managed Service Accounts in Server 2012 R2

Managed Service Accounts were first introduced in Server 2008 R2. They are a clever way to ensure lifecycle management of user principals of windows services in a domain environment. Passwords for these accounts are maintained in Active Directory and updated automatically. Additionally, they simplify SPN management for the services leveraging these accounts. In Server 2012 and above, these can also be configured as Group Managed Service Accounts which are useful for server farms. A common scenario for using a managed service account may be to run a the SQL Server service in SQL 2012.

There are a few steps involved in creating these managed service accounts on Server 2012 R2. First, there is a dependency on the Key Distribution Service starting with Server 2012 (in order to support group managed service accounts, though it’s now required for all managed service accounts). You must configure a KDS Root Key. In a production environment, you must wait 10 hours for replication to complete after creating the key, but in lab scenarios with single domain controllers, you can force it to take effect immediately:

Add-KdsRootKey -EffectiveTime ((get-date).addhours(-10))

Once the key has been created, you can create a managed service account from a domain controller. You will need to import the AD Powershell module. We’ll create a MSA named SQL01MSSQL in the contoso.int domain for use on a server named SQL01

Import-Module ActiveDirectory

New-ADServiceAccount -Name SQL01MSSQL -Enable $true -DNSHostName SQL01MSSQL.contoso.int

Next, you’ll need to specify which computers have access to the managed service account.

Set-ADServiceAccount -Identity SQL01MSSQL -PrincipalsAllowedToRetrieveManagedPassword SQL01$

Lastly, the account needs to be installed on the computer accessing the MSA. You’ll need to do this as a domain admin and the AD Powershell module installed and loaded there as well:

Enable-WindowsOptionalFeature -FeatureName ActiveDirectory-Powershell -Online -All

Import-Module ActiveDirectory

Install-ADServiceAccount SQL01MSSQL

You can now use the MSA in the format of DOMAINNAME\ACCOUNTNAME$ with a blank password when configuring a service.


WMI Bug with Scale Out File Server

During the build out of our Windows Azure Pack infrastructure, I uncovered what I believe is a bug with WMI and Scale Out File Server. For us, the issue bubbled up in Virtual Machine Manager where deployments of VM templates from a library on a SOFS share would randomly fail with the following error:

Error (12710)

VMM does not have appropriate permissions to access the Windows Remote Management resources on the server ( CLOUD-LIBRARY01.domain.com).

Unknown error (0x80338105)

This issue was intermittent, and rebooting the SOFS nodes always seemed to clear up the problem. Upon tracing the process, I found BITS was getting an Access Denied error when attempting to create the URL in wsman. Furthermore, VMM was effectively saying the path specified did not exist. From the VMM trace:

ConvertUNCPathToPhysicalPath (catch CarmineException) [[(CarmineException#f0912a) { Microsoft.VirtualManager.Utils.CarmineException: The specified path is not a valid share path on CLOUD-LIBRARY01.domain.com.  Specify a valid share path on CLOUD-LIBRARY01.domain.com to the virtual machine to be saved, and then try the operation again.

Further testing, I found I got mixed results when querying cluster share properties via WMI:

PS C:\Users\jeff> gwmi Win32_ClusterShare -ComputerName CLOUD-LIBRARY01

None.

PS C:\Users\jeff> gwmi Win32_ClusterShare -ComputerName CLOUD-LIBRARY01

Name                                    Path                                    Description
—-                                    —-                                    ———–
\\CLOUD-VMMLIB\ClusterStorage$          C:\ClusterStorage                       Cluster Shared Volumes Default Share
\\CLOUD-LIBRARY\ClusterStorage$         C:\ClusterStorage                       Cluster Shared Volumes Default Share
\\CLOUD-VMMLIB\MSSCVMMLibrary           C:\ClusterStorage\Volume1\Shares\MSS…

Finally, while viewing procmon while performing the WMI queries:

A success:

Date & Time:  6/3/2014 3:56:20 PM
Event Class:   File System
Operation:     CreateFile
Result: SUCCESS
Path:   \\CLOUD-VMMLIB\PIPE\srvsvc
TID:    996
Duration:       0.0006634
Desired Access:        Generic Read/Write
Disposition:    Open
Options:        Non-Directory File, Open No Recall
Attributes:     n/a
ShareMode:   Read, Write
AllocationSize: n/a
Impersonating:         S-1-5-21-xxxx
OpenResult:   Opened

A failure:

Date & Time:  6/3/2014 3:56:57 PM
Event Class:   File System
Operation:     CreateFile
Result: ACCESS DENIED
Path:   \\CLOUD-VMMLIB\PIPE\srvsvc
TID:    996
Duration:       0.0032664
Desired Access:        Generic Read/Write
Disposition:    Open
Options:        Non-Directory File, Open No Recall
Attributes:     n/a
ShareMode:   Read, Write
AllocationSize: n/a
Impersonating:         S-1-5-21-xxx

What’s happening here is that WMI is attempting to access the named pipe of the server service on the SOFS cluster object. Because we’re using SOFS, the DNS entry for the SOFS cluster object contains IP’s for every server in the cluster. The WMI call attempts to connect using the cluster object name, but because of DNS round robin, that may or may not be the local node. It would have appropriate access to that named pipe for the local server, but it will not for other servers in the cluster.

There are two workarounds for this issue. First, you can add a local hosts file entry on each of the cluster nodes containing the SOFS cluster object pointing back to localhost, or second, you can add the computer account(s) of each cluster node to the local Administrators group of all other cluster nodes. We chose to implement the first workaround until the issue can be corrected by Microsoft.

SSD’s on Storage Spaces are killing your VM’s performance

We’re wrapping up a project that involved Windows Storage Spaces on Server 2012 R2. I was very excited to get my hands on new SSDs and test out Tiered Storage Spaces with Hyper-V. As it turns out, the newest technology in SSD drives combined with the default configuration of Storage Spaces is killing performance of VM’s.

First, it’s important to understand sector sizes on physical disks, as this is the crux of the issue. The sector size is the amount of data the physical disk controller inside your hard disk actually writes to the storage medium. Since the invention of the hard disk, sector sizes have been 512 bytes for hard drives.  Many other aspects of storage are based on this premise. Up until recently, this did not pose an issue. However, with larger and larger disks, this caused capacity problems. In fact, the 512-byte sector is the reason for the 2.2TB limit with MBR partitions.

Disk manufacturers realized that 512-byte sector drives would not be sustainable at larger capacities, and started introducing 4k sector, aka Advanced Format, disks beginning in 2007. In order to ensure compatibility, they utilized something called 512-byte emulation, aka 512e, where the disk controller would accept reads/writes of 512 bytes, but use a physical sector size of 4k. To do this, internal cache temporarily stores the 4k of data from physical medium and the disk controller manipulates the 512 bytes of data appropriately before writing back to disk or sending the 512 bytes of data to the system. Manufacturers took this additional processing into account when spec’ing performance of drives. There are also 4k native drives which use a physical sector size of 4k and do not support this 512-byte translation in the disk controller – instead they expect the system to send 4k blocks to disk.

The key thing to understand is that since SSD’s were first released, they’ve always had a physical sector size of 4k – even if they advertise 512-bytes. They are by definition either 512e or 4k native drives. Additionally, Windows accommodates 4k native drives by performing these same Read-Modify-Write, aka RMW, functions at the OS level that are normally performed inside the disk controller on 512e disks. This means that if the OS sees you’re using a disk with a 4k sector size, but the system receives a 512b, it will read the full 4k of data from disk into memory, replace the 512 bytes of data in memory, then flush the 4k of data from memory down to disk.

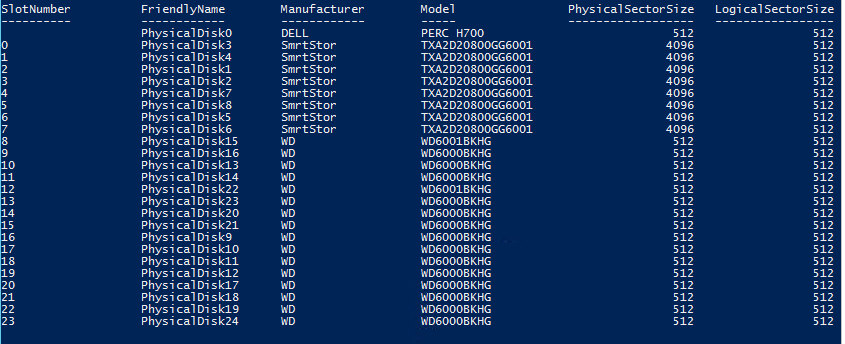
Enter Storage Spaces and Hyper-V. Storage Spaces understands that physical disks may have 512-byte or 4k sector sizes and because it’s virtualizing storage, it too has a sector size associated with the virtual disk. Using powershell, we can see these sector sizes:

Get-PhysicalDisk | sort-object SlotNumber | select SlotNumber, FriendlyName, Manufacturer, Model, PhysicalSectorSize, LogicalSectorSize | ft

Get-PhysicalDisk

Any disk whose PhysicalSectorSize is 4k, but LogicalSectorSize is 512b is a 512e disk, a disk with a PhysicalSectorSize and LogicalSectorSize of 4k is a 4k native disk, and any disk with 512b for both PhysicalSectorSize and LogicalSectorSize is a standard HDD.

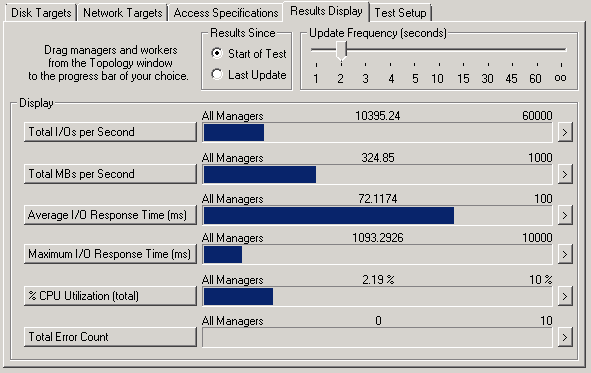
The problem with all of this is that the when creating a virtual disk with Storage Spaces, if you do not specify a LogicalSectorSize via the Powershell cmdlet, the system will create a virtual disk with a LogicalSectorSize equal to the greatest PhysicalSectorSize of any disk in the pool. This means if you have SSD’s in your pool and you created the virtual disk using the GUI, your virtual disk will have a 4k LogicalSectorSize.  If  a 512byte write is sent to a virtual disk with a 4k LogicalSectorSize, it will perform the RMW at the OS level – and if you’re physical disks are actually 512e, then they too will have to perform RMW at the disk controller for each 512-bytes of the 4k write it received from the OS. That’s a bit of a performance hit, and can cause you to see about 1/4th of the advertised write speeds and 8x the IO latency.

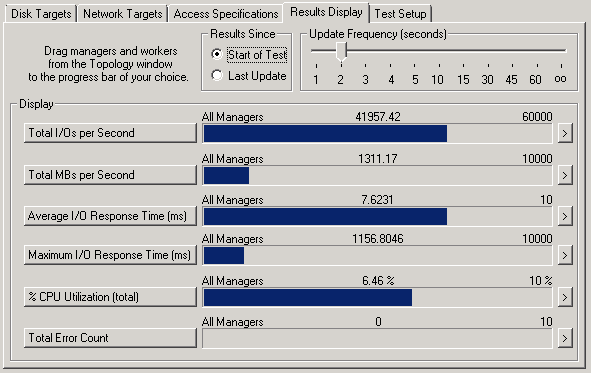
Why this matters with Hyper-V? Unless you’ve specifically formatted your VHDx files using 4k sectors, they are likely using 512-byte sectors, meaning every write to a VHDx storage on a Storage Spaces virtual disk is performing this RMW operation in memory at the OS and then again at the disk controller. The proof is in the IOMeter tests:

32K Request, 65% Read, 65% Random

Virtual Disk 4k LogicalSectorSize

RMW-IOMeter

Virtual Disk 512b LogicalSectorSize

512-IOMeter


Modifying IE Compatibility View Settings with Powershell

I recently upgraded my workstation to Windows 8.1 and as such, am now using Internet Explorer 11. While there are some welcomed improvements, there are several changes that have made day-to-day administration activities a bit challenging. For instance, all of the Dell hardware we use has a Remote Access Controller installed that allows us to perform various remote administration tasks. Unfortunately, the current version of firmware for these DRACs is not compatible with IE 11. However, running in IE 7 compatibility mode allows the UI of the DRACs to function properly.

The problem is, we access all of these directly by private IP and adding hundreds of IP addresses to the IE compatibility view settings on multiple workstations is a bit of a pain. Thankfully, these compatibility view exceptions can be set with Group Policy, but the workstations I use are in a Workgroup and do not belong to a domain. I set out to find a way to programmatically add these exceptions using powershell.

First, it’s important to note that the registry keys that control this behavior changed in IE 11. In previous versions of IE, the setting was exclusively maintained under HKCU(HKLM)\Software\[Wow6432Node]\Policies\Microsoft\Internet Explorer\BrowserEmulation\PolicyList. Starting with IE 11, there’s an additional key under HKCU\Software\Microsoft\Internet Explorer\BrowserEmulation\ClearableListData\UserFilter that controls compatibility view settings. Unfortunately, this new key is stored in binary format and there’s not much information regarding it. I was able to find a stackoverflow post where a user attempted to decipher the data, but I found that some of the assumptions they made did not hold true. Via a process of trial-and-error, I was able to come up with a script that can set this value. However, because IE 11 still supports the previous registry key, I HIGHLY recommend using the other method described later in this post. While this seems to work, there are several values I was not able to decode.

The script will pipe the values in the $domains array into the UserFilter registry key. It accepts either top-level domains, IP addresses or Subnets in CIDR notation.

$key = "HKCU:\Software\Microsoft\Internet Explorer\BrowserEmulation\ClearableListData"
$item = "UserFilter"
 
. .\Get-IPrange.ps1
$cidr = "^((25[0-5]|2[0-4]\d|1\d\d|[1-9]?\d)\.){3}(25[0-5]|2[0-4]\d|1\d\d|[1-9]?\d)/(3[0-2]|[1-2]?[0-9])$"
 
[byte[]] $regbinary = @()
 
#This seems constant
[byte[]] $header = 0x41,0x1F,0x00,0x00,0x53,0x08,0xAD,0xBA
 
#This appears to be some internal value delimeter
[byte[]] $delim_a = 0x01,0x00,0x00,0x00
 
#This appears to separate entries
[byte[]] $delim_b = 0x0C,0x00,0x00,0x00
 
#This is some sort of checksum, but this value seems to work
[byte[]] $checksum = 0xFF,0xFF,0xFF,0xFF
 
#This could be some sort of timestamp for each entry ending with 0x01, but setting to this value seems to work
[byte[]] $filler = 0x00,0x00,0x00,0x00,0x00,0x00,0x00,0x01
 
#Examples: mydomain.com, 192.168.1.0/24
$domains = @("google.com","192.168.1.0/24")
 
function Get-DomainEntry($domain) {
[byte[]] $tmpbinary = @()
 
[byte[]] $length = [BitConverter]::GetBytes([int16]$domain.Length)
[byte[]] $data = [System.Text.Encoding]::Unicode.GetBytes($domain)
 
$tmpbinary += $delim_b
$tmpbinary += $filler
$tmpbinary += $delim_a
$tmpbinary += $length
$tmpbinary += $data
 
return $tmpbinary
}
 
if($domains.Length -gt 0) {
[int32] $count = $domains.Length
 
[byte[]] $entries = @()
 
foreach($domain in $domains) {
if($domain -match $cidr) {
$network = $domain.Split("/")[0]
$subnet = $domain.Split("/")[1]
$ips = Get-IPrange -ip $network -cidr $subnet
$ips | %{$entries += Get-DomainEntry $_}
$count = $count - 1 + $ips.Length
}
else {
$entries += Get-DomainEntry $domain
}
}
 
$regbinary = $header
$regbinary += [byte[]] [BitConverter]::GetBytes($count)
$regbinary += $checksum
$regbinary += $delim_a
$regbinary += [byte[]] [BitConverter]::GetBytes($count)
$regbinary += $entries
}
 
Set-ItemProperty -Path $key -Name $item -Value $regbinary

You’ll need the Get-IPrange.ps1 script from the technet gallery and you can download the above script here: IE11_CV

IE 11 still supports the older registry key, therefore it is the preferred method not only because the above is a hack, but also because the data is stored in the registry as strings and it supports specific hosts instead of only top-level domains. Again, this script supports hosts, domains, IP Addresses and Subnets in CIDR notation.

 
$key = "HKLM:\SOFTWARE\Wow6432Node\Policies\Microsoft"
 
if(-Not (Test-Path "$key\Internet Explorer")) {
New-Item -Path $key -Name "Internet Explorer" | Out-Null
}
 
if(-Not (Test-Path "$key\Internet Explorer\BrowserEmulation")) {
New-Item -Path "$key\Internet Explorer" -Name "BrowserEmulation" | Out-Null
}
 
if(-Not (Test-Path "$key\Internet Explorer\BrowserEmulation\PolicyList")) {
New-Item -Path "$key\Internet Explorer\BrowserEmulation" -Name "PolicyList" | Out-Null
}
 
. .\Get-IPrange.ps1
$cidr = "^((25[0-5]|2[0-4]\d|1\d\d|[1-9]?\d)\.){3}(25[0-5]|2[0-4]\d|1\d\d|[1-9]?\d)/(3[0-2]|[1-2]?[0-9])$"
 
#Examples: mydomain.com, 192.168.1.0/24
$domains = @("google.com","192.168.1.0/24")
 
$regkey = "$key\Internet Explorer\BrowserEmulation\PolicyList"
 
foreach($domain in $domains) {
if($domain -match $cidr) {
$network = $domain.Split("/")[0]
$subnet = $domain.Split("/")[1]
$ips = Get-IPrange -ip $network -cidr $subnet
$ips | %{$val = New-ItemProperty -Path $regkey -Name $_ -Value $_ -PropertyType String | Out-Null}
$count = $count - 1 + $ips.Length
}
else {
New-ItemProperty -Path $regkey -Name $domain -Value $domain -PropertyType String | Out-Null
}
}

Again, you’ll need the Get-IPrange.ps1 script from the technet gallery and you can download the above script here: IE_CV

VMM 2012 R2 service crashes on start with exception code 0xe0434352

Was working on a new VMM 2012 R2 install for a Windows Azure Pack POC and spent the better part of a day dealing with a failing VMM Service. SQL 2012 SP1 had been installed on the same server and during install, VMM was configured to run under the local SYSTEM account and use the local SQL instance. Installation completed successfully, but the VMM service would not start, logging the following errors in the Application log in Event Viewer:

Log Name: Application
Source: .NET Runtime
Date: 12/31/2013 12:43:27 PM
Event ID: 1026
Task Category: None
Level: Error
Keywords: Classic
User: N/A
Computer: AZPK01
Description:
Application: vmmservice.exe
Framework Version: v4.0.30319
Description: The process was terminated due to an unhandled exception.
Exception Info: System.AggregateException
Stack:
at Microsoft.VirtualManager.Engine.VirtualManagerService.WaitForStartupTasks()
at Microsoft.VirtualManager.Engine.VirtualManagerService.TimeStartupMethod(System.String, TimedStartupMethod)
at Microsoft.VirtualManager.Engine.VirtualManagerService.ExecuteRealEngineStartup()
at Microsoft.VirtualManager.Engine.VirtualManagerService.TryStart(System.Object)
at System.Threading.ExecutionContext.RunInternal(System.Threading.ExecutionContext, System.Threading.ContextCallback, System.Object, Boolean)
at System.Threading.ExecutionContext.Run(System.Threading.ExecutionContext, System.Threading.ContextCallback, System.Object, Boolean)
at System.Threading.TimerQueueTimer.CallCallback()
at System.Threading.TimerQueueTimer.Fire()
at System.Threading.TimerQueue.FireNextTimers()

Log Name: Application
Source: Application Error
Date: 12/31/2013 12:43:28 PM
Event ID: 1000
Task Category: (100)
Level: Error
Keywords: Classic
User: N/A
Computer: AZPK01
Description:
Faulting application name: vmmservice.exe, version: 3.2.7510.0, time stamp: 0x522d2a8a
Faulting module name: KERNELBASE.dll, version: 6.3.9600.16408, time stamp: 0x523d557d
Exception code: 0xe0434352
Fault offset: 0x000000000000ab78
Faulting process id: 0x10ac
Faulting application start time: 0x01cf064fc9e2947a
Faulting application path: C:\Program Files\Microsoft System Center 2012 R2\Virtual Machine Manager\Bin\vmmservice.exe
Faulting module path: C:\windows\system32\KERNELBASE.dll
Report Id: 0e0178f3-7243-11e3-80bb-001dd8b71c66
Faulting package full name:
Faulting package-relative application ID:

I attempted re-installing VMM 2012 R2 and selected a domain account during installation, but had the same result. I enabled VMM Tracing to collect debug logging and was seeing various SQL exceptions:

[0]0BAC.06EC::‎2013‎-‎12‎-‎31 12:46:04.590 [Microsoft-VirtualMachineManager-Debug]4,2,Catalog.cs,1077,SqlException [ex#4f] caught by scope.Complete !!! (catch SqlException) [[(SqlException#62f6e9) System.Data.SqlClient.SqlException (0x80131904): Could not obtain information about Windows NT group/user ‘DOMAIN\jeff’, error code 0x5.

I was finally able to find a helpful error message in the standard VMM logs located under C:\ProgramData\VMMLogs\SCVMM.\report.txt (probably should have looked their first):

System.AggregateException: One or more errors occurred. —> Microsoft.VirtualManager.DB.CarmineSqlException: The SQL Server service account does not have permission to access Active Directory Domain Services (AD DS).
Ensure that the SQL Server service is running under a domain account or a computer account that has permission to access AD DS. For more information, see “Some applications and APIs require access to authorization information on account objects” in the Microsoft Knowledge Base at http://go.microsoft.com/fwlink/?LinkId=121054.

My local SQL instance was configured to run under a local user account, not a domain account. I re-checked the VMM installation requirements, and this requirement is not documented anywhere. Sure enough, once I reconfigured SQL to run as a domain account (also had to fix a SPN issue: http://softwarelounge.co.uk/archives/3191) and restarted the SQL service, the VMM service started successfully.

How DBPM affects guest VM performance

Dell introduced a feature in their 11G servers called demand-based power management (DBPM). Other platforms refer to this feature as “power management” or “power policy” whereby the system adjusts power used by various system components like CPU, RAM, and fans. In today’s green-pc world, it’s a nice idea, but the reality with cloud-based environments is that we are already consolidating systems to fewer physical machines to increase density and power policies often interfere with the resulting performance.

We recently began seeing higher than normal READY times on our VM’s. Ready time refers to the amount of time a process needed CPU time, but had to wait because no processors were available. In the case of virtualization, this means a VM had some work to do, but it could not find sufficient free physical cores that matched the number of vCPU’s assigned to the VM. VMWare has a decent guide for troubleshooting VM performance issues which led to some interesting analysis. Specifically, our overall CPU usage was only around 50%, but some VM’s were seeing ready times of more than 20%.

This high CPU ready with low CPU utilization could be due to several factors. Most commonly in cloud environments, it suggests the ratio of vCPU’s (virtual CPU’s) to pCPU’s (physical CPU’s) is too high, or that you’ve sized your VM’s improperly with too many vCPU’s. One important thing to understand with virtual environments, is that a VM with multiple cores needs to wait for that number of cores to become free across the system. Assuming you have a single host with 4 cores running 4 VM’s, 3 VM’s with 1vCPU and 1 VM with 4vCPU’s, the 3 single vCPU VM’s could be scheduled to run concurrently while the fourth would have to wait for all pCPU’s to become idle.

Naturally, the easiest way to fix this is to add additional physical CPU’s into the fold. We accomplished this by upgrading all of our E5620 processors (4-core) in our ESXi hosts to E5645 processors (6-core) thereby adding 28 additional cores to the platform. However, this did not help with CPU READY times. vSphere DRS was still reporting trouble delivering CPU resources to VM’s:

DRS-before-dbpm

After many hours of troubleshooting, we were finally about to find a solution – disabling DBPM. One of the hosts consistently showed lower CPU ready times even though it had higher density. We were able to find that this node had a different hardware power management policy than the other nodes. You can read more about what this setting does in the Host Power Management whitepaper from VMWare. By default, this policy is automatically set as a result of ACPI CPU C-States, Intel Speedstep and the hardware’s power management settings on the system.

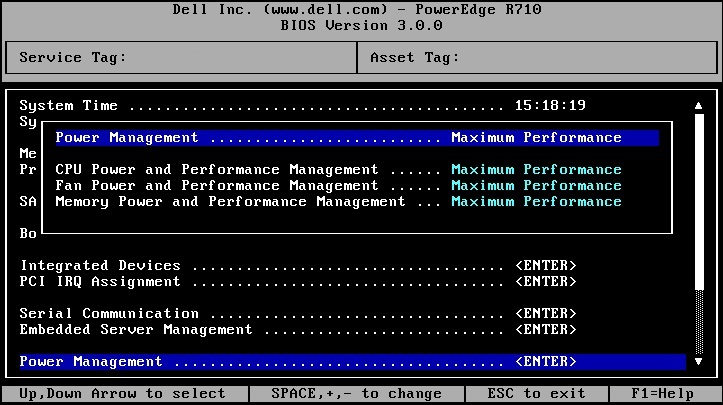
On our Dell Poweredge R610 host systems, the DBPM setting was under Power Management in the BIOS. Once we changed all systems from Active Power Controller to Maximum Performance, CPU ready times dropped to normal levels.

dell-r610-bios-power-management-settings

Information on the various options can be found in this Power and Cooling wiki from Dell. Before settling on this solution, we attempted disabling C-States altogether and C1E specifically in the BIOS, but neither had an impact. We found that we could also specify OS Control for this setting to allow vSphere to set the policy, though we ultimately decided that Maximum Performance was the best setting for our environment. Note that this isn’t specific to vSphere – the power management setting applies equally to all virtualization platforms.

Skip header with bash sort

Recently needed to sort output from a unix command but wanted to leave the 3 line header intact. Seems like a much more difficult thing to do than it should be, but was finally able to come up with a command that worked. The output from the command I was running had 3 header lines I wanted to leave intact and used fixed width, so this command worked:

... | (for i in $(seq 3); do read -r; printf "%s\n" "$REPLY"; done; sort -rk1.47,1.66)

To explain what this is doing – first, I’m piping the output of the command into a sub-command which allows me to perform multiple functions on it. The for loop is needed because the read command will read a single line from stdin. Since I needed the first 3 lines excluded, I used the for loop (change the $(seq 3) to any number for your output). Inside the for loop, I’m using printf which effectively just prints the line that was read. Lastly, we’re running sort on the remaining data. The data output was fixed width, so I’m using the character position in F[.C] notation (see sort –help or the sort man page for more info). The -r flag for sort is sorting that column in descending order. Several possible solutions involved using head & tail commands, but I couldn’t find the proper syntax because my source was output from a stdin instead of a file and the result was dropping a significant number of rows from the output. If my source was in a file, I could have done the same thing with:

head -n 3 && tail -n +4  | sort -rk1.47,1.66