A recent project has us testing out some of the new Windows Azure features. One important configuration step is getting the Windows Azure environment connected to our on-premise network. To do this, we create a site to site VPN tunnel between an Azure virtual network and your existing on-premise corporate environment. Typically, this is done using VPN hardware (such as Cisco, Fortinet, or Juniper) but can also be done using Windows Server. Microsoft has a decent tutorial on how to create an Azure virtual network with cross-premises connectivity, but it lacks some information about the configuration of the remote end.
First, let’s get a virtual network created in Azure.
1. Login to the Azure Preview Portal.
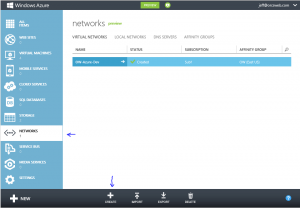
2. In the left-hand column, select Networks, and then click Create on the bottom banner.

3. This will bring up a wizard for creating a virtual network. Give the network a name and either select an existing affinity group if you have one, or create a new one. Virtual Networks must belong to an affinity group and can only be used with VM’s in the same affinity group. Click Next
4. The next screen asks you to define address space and logical subnets. You can use super-netting here to define a large address space (eg. 10.1.0.0/16) and then create logical subnets to group servers (eg. 10.1.1.0/24) for specific server purposes. Define the address space and at least 1 subnet. Click next.
5. On the DNS Servers and Local Network screen, you’ll want to configure a DNS server for this virtual network. For DNS, this will be the DNS server your VM’s in this virtual network use. The Local Network settings require both a Gateway subnet and a Local network. The Gateway network should be a logical subnet of the address space you previously defined (ie. 10.1.0.0/24) and is used only for to run necessary gateway services. The Local network should be networks configured in your on-premise environment. Select Create New Local Network and click next.
6. On the Create New Local Network Screen you’ll need to assign a name to the Local Network, define the VPN endpoint in your on-premise environment and one or more subnets in the Address Space (eg. 10.4.0.0/16) corresponding to local networks configured in your on-premise environment. Click the check mark to create the virtual network.
Now that a virtual network has been created, we need to create a VPN gateway for the network.
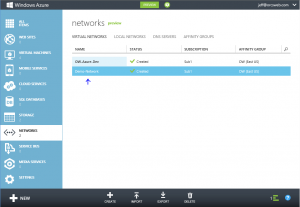
1. From the Azure portal, select Networks and then click the name of the virtual network you just created.

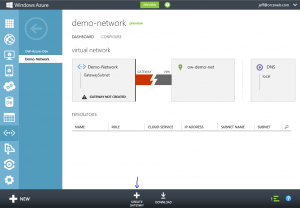
2. You should see an indicator that a Gateway has not yet been created. Click the Create Gateway icon in the bottom banner. Click the Yes check mark that appears in the bottom banner to start the Create Gateway job.

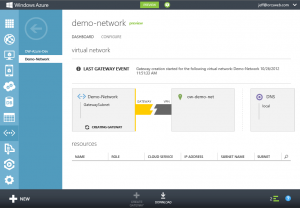
3. It may take up to 15 minutes for the Gateway to be created. A message should appear that the Gateway creation has started.

4. Once completed, a Gateway IP Address will be displayed along with incoming and outgoing data metrics. You’ll need the pre-shared key information to configure the tunnel on your end. Click the View Key button in the bottom banner.
Lastly, you’ll need to configure the site to site VPN tunnel on your VPN hardware device on your on-premise equipment. The following is an example of the necessary information:
Phase 1 (IKE)
Remote Endpoint/Peer IP: Virtual Network Gateway address (this is the Gateway IP Address listed for the virtual network in the Azure portal)
Authentication Method: Pre-shared key
Pre-shared Key: <value from View Key in Azure portal>
Phase 1 Proposal: Encryption AES-128 (or AES-128-CBC), Authentication SHA1
Phase 1 Keylife: 28800s
Phase 1 DH Group: 2
Phase 2 (IPsec)**
Local Network: Local corporate subnet (this is the Local Network you configured when setting up the Azure virtual network)
Remote Network: Azure Virtual network (this is the Address Space you configured when setting up the Azure virtual network)
Phase 2 Proposal: Encryption AES-128 (or AES-128-CBC), Authentication SHA1 (or SHA1-HMAC-96)
Phase 2 Keylife: 3600s AND 102400000 KBytes
Phase 2 DH Group (PFS): Disabled
**Note: Normally, you use the defined subnets in Phase 2. However, I’ve found in practice that the Azure gateway uses 0.0.0.0/0 for Phase2:
2013-05-01 11:33:21 ike 1:OW-Azure:13537:6612914: peer: type=7/7, local=0:0.0.0.0-255.255.255.255:0, remote=0:0.0.0.0-255.255.255.255:0
2013-05-01 11:33:21 ike 1:OW-Azure:13537:6612914: mine: type=7/7, local=0:10.4.0.0-10.4.255.255:0, remote=0:10.1.0.0-10.1.255.255:0
2013-05-01 11:33:21 ike 1:OW-Azure:13537:6612914: no matching phase2 found
2013-05-01 11:33:21 ike 1:OW-Azure:13537::6612914: failed to get responder proposal
2013-05-01 11:33:21 ike 1:OW-Azure:13537: failed to create child SA
2013-05-01 11:33:21 ike 1:OW-Azure:13537: sending error response
If the subnets do not match on both ends, the tunnel will not establish, so you’ll want to use 0.0.0.0/0 for your Phase 2 subnets in the VPN configuration.
You can download a sample configuration script for Cisco ASA, ASR, and ISR or Juniper SRX, J, ISG or SSG systems from the Azure portal by clicking the Download link in the bottom banner (next to the View Key button). You’ll need to modify the script with the proper networks and key. That being said, the scripts assume some things about your configuration so it’s best to configure your end of the VPN tunnel manually. For instance, the script may try to may try to adjust the maximum segment size to 1350 on your VPN device’s external interface which could impact your other configured tunnels. It’s also important to note that firewall and NAT rules are typically required on most VPN hardware devices.
To test connectivity, simply initiate traffic from either side of the tunnel (ie. ping 10.1.1.10 from 10.4.1.10). It helps to have debug trace messages enabled on your VPN hardware device in case of issues. Happy tunneling!