Azure Site Recovery (ASR) is simple, automated protection and disaster recovery service delivered from the cloud. It enables replication and failover of workloads between datacenters, and from on-premises to Azure. ASR supports physical machines, VMWare and Hyper-V environments. ASR integrates with Windows Azure Pack (WAP) enabling service providers to offer managed disaster recovery for IaaS workloads through the Cloud Solution Provider (CSP) program. I’ll run through configuring ASR to support your multi-tenant cloud, and point out several important caveats in the configuration.
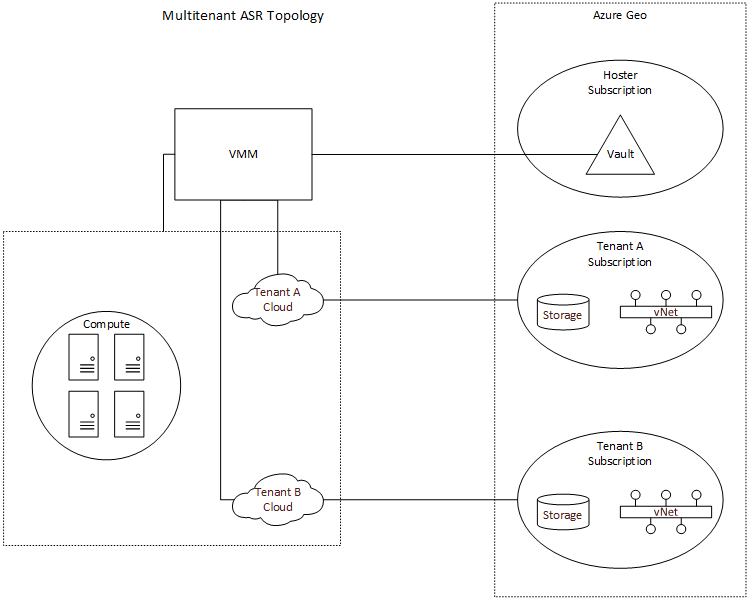
The CSP program enables service providers to resell Microsoft first-party cloud services like Azure, while owning the customer relationship and enabling value-add services. Azure subscriptions provisioned under the CSP program are single-tenant, which presents a challenge when configuring ASR with WAP and Virtual Machine Manager (SCVMM). In order to enable ASR, you must first register a SCVMM server with a Recovery Services vault within an Azure subscription. This will allow ASR to query the SCVMM server and retrieve metadata such as names of virtual machines and networks. In most service provider configurations, a single SCVMM server supports multiple tenants, and as such, you need to register SCVMM to a “master” vault in a subscription owned by the service provider. SCVMM can only be registered to a single vault, which also means that if you are using Azure as a DR target, you can only fail VM’s to a single Azure region. While the SCVMM server can only be registered to a single subscription, we can configure per-cloud protection policies specifying compute and storage targets in other subscriptions. This is an important distinction, as it means that the service provider will need to create separate clouds in VMM (and therefore separate plans in WAP) for EACH tenant. This enables a hoster to provide managed disaster recovery for IaaS workloads in a multi-tenant SCVMM environment. The topology is illustrated below.
While the initial configuration of the Recovery Services vault can now be done in the Azure portal, configuration of ASR to support multi-tenancy requires using powershell. You’ll need at least version 0.8.10 of Azure Powershell, but I recommend using Web Platform Installer to get the latest.
First, if you are using the Recovery Services cmdlets for the first time in your subscription, you should register the Azure provider for Recovery Services. Before you can do this, first enable access to the Recovery Services provider on your subscription, by running the following commands. **NOTE: It may take up to an hour to enable access to Recovery Services on your subscription. Attempts to register the provider might fail in the interim.
Register-AzureRmProviderFeature -FeatureName betaAccess -ProviderNamespace Microsoft.RecoveryServices Register-AzureRmResourceProvider -ProviderNamespace Microsoft.RecoveryServices |
Then, let’s setup some constants we’ll use later.
$vaultRgName = "WAPRecoveryGroup" $location = "westus" $vaultName = "WAPRecoveryVault" $vmmCloud = "AcmeCorp Cloud" $policyName = "AcmeCorp-Policy" $serverName = "VMM01.contoso.int" $networkName = "YellowNetwork" $vmName = "VM01" |
Next, connect to your service provider subscription (this can be any direct subscription – EA/Open/PAYG).
$UserName = "user@provider.com" $Password = "password" $SecurePassword = ConvertTo-SecureString -AsPlainText $Password -Force $Cred = New-Object System.Management.Automation.PSCredential -ArgumentList $UserName, $SecurePassword Login-AzureRmAccount -Credential $Cred |
If you have access to multiple subscriptions, you’ll need to set the subscription context.
#Switch to the service provider's subscription Select-AzureRmSubscription -TenantId 00000000-0000-0000-0000-000000000000 -SubscriptionId 00000000-0000-0000-0000-000000000000 |
Now we can create the resource group and vault.
#Create the Resource Group for the vault New-AzureRmResourceGroup -Name $vaultRgName -Location $location #Create the Recovery Services vault $vault = New-AzureRmRecoveryServicesVault -Name $vaultName -ResourceGroupName $vaultRgName -Location $location #Set the vault context Set-AzureRmSiteRecoveryVaultSettings -ARSVault $vault #Download vault settings file Get-AzureRmRecoveryServicesVaultSettingsFile -Vault $vault |
At this point, you’ll need to download the Azure Site Recovery provider and run the installation on your SCVMM server, then register the SCVMM server with the vault using the settings file you just downloaded. Additionally, you’ll need to install (but do not configure) the Microsoft Azure Site Recovery agent on each of the Hyper-V servers. Screenshots can be found here.
Now that SCVMM has been registered with the vault, and the agents have been installed, we can create the storage account and virtual network in the tenant subscription.
#Switch to the tenant's subscription Select-AzureRmSubscription -TenantId 00000000-0000-0000-0000-000000000000 -SubscriptionId 00000000-0000-0000-0000-000000000000 #Storage account must be in the same region as the vault $storageAccountName = "drstorageacct1" $tenantRgName = "AcmeCorpRecoveryGroup" #Create the resource group to hold the storage account and virtual network New-AzureRmResourceGroup -Name $tenantRgName -Location $location #Create the storage account $recoveryStorageAccount = New-AzureRmStorageAccount -ResourceGroupName $tenantRgName -Name $storageAccountName -Type "Standard_GRS" -Location $location #Create the virtual network and subnet $subnet1 = New-AzureRmVirtualNetworkSubnetConfig -Name "Subnet1" -AddressPrefix "10.0.1.0/24" $vnet = New-AzureRmVirtualNetwork -Name $networkName -ResourceGroupName $tenantRgName -Location $location -AddressPrefix "10.0.0.0/16" -Subnet $subnet1 |
We’re ready to create the protection policy and associate it to the SCVMM cloud.
#Switch to the service provider's subscription Select-AzureRmSubscription -TenantId 00000000-0000-0000-0000-000000000000 -SubscriptionId 00000000-0000-0000-0000-000000000000 #Create the policy referencing the storage account id from the tenant's subscription $policyResult = New-AzureRmSiteRecoveryPolicy -Name $policyName -ReplicationProvider HyperVReplicaAzure -ReplicationFrequencyInSeconds 900 -RecoveryPoints 1 -ApplicationConsistentSnapshotFrequencyInHours 1 -RecoveryAzureStorageAccountId $recoveryStorageAccount.Id $policy = Get-AzureRmSiteRecoveryPolicy -FriendlyName $policyname #Associate the policy with the SCVMM cloud $container = Get-AzureRmSiteRecoveryProtectionContainer -FriendlyName $vmmCloud Start-AzureRmSiteRecoveryPolicyAssociationJob -Policy $policy -PrimaryProtectionContainer $container |
Once the policy has been associated with the cloud, we can configure network mapping.
#Retrieve the on-premises network $server = Get-AzureRmSiteRecoveryServer -FriendlyName $serverName $network = Get-AzureRmSiteRecoveryNetwork -Server $server -FriendlyName $networkName #Create the network mapping referencing the virtual network in the tenant's subscritpion New-AzureRmSiteRecoveryNetworkMapping -PrimaryNetwork $network -AzureVMNetworkId $vnet.Id |
Lastly, we enable protection on the virtual machine.
#Get the VM metadata $vm = Get-AzureRmSiteRecoveryProtectionEntity -ProtectionContainer $container -FriendlyName $vmName #Enable protection. You must specify the storage account again Set-AzureRmSiteRecoveryProtectionEntity -ProtectionEntity $vm -Protection Enable –Force -Policy $policy -RecoveryAzureStorageAccountId $recoveryStorageAccount.Id |
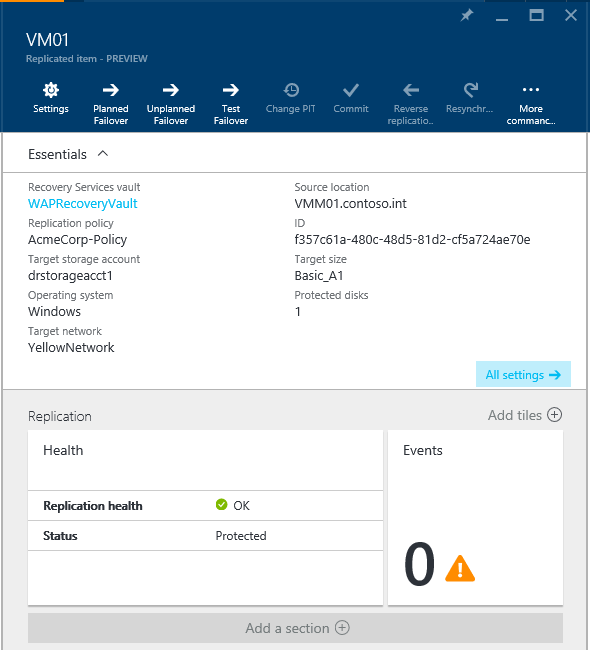
You can monitor protection and perform failovers for a virtual machine in a multi-tenant SCVMM environment to fail over to a tenant’s subscription in Azure from the Recovery Services vault in the provider’s Azure subscription.

