“VixDiskLibVim: Not licensed to use this function” message with vSphere 5.5

We recently upgraded our environment to vSphere 5.5. The environment is protected by Veeam Backup & Recovery 7.0 R2 which supports vSphere 5.5. Prior to the vSphere 5.5 upgrade, backups were working without issue. Sure enough, after the upgrade, backup jobs started failing. The error message logged in C:\ProgramData\Veeam\Backup\<Job_Name>\Agent.VddkHelper.log was:

VixDiskLibVim: Not licensed to use this function

You may see this same error with any other vSphere backup product as well. Most solutions tell you that you either do not have vStorage API’s licensed for the host, or that the user connecting to vCenter does not have Administrator permissions. Trouble was that this same configuration was working prior to the vSphere 5.5 upgrade. I confirmed that the ESXi hosts did indeed have Enterprise Plus licenses assigned and that “Storage APIs” was listed under licensed features for each host. I also confirmed that the vCenter user account the backup product uses had Administrator permissions assigned at the datacenter level in vCenter – the same as prior to the upgrade.

After opening a support case with Veeam and testing several things, I tried adding the Administrator permission for the vCenter user at the top vCenter level instead of the datacenter (one level down). Sure enough, backups started working. So it seems that your vCenter user needs this permission directly at the vCenter server level in vSphere 5.5

Roaming Profiles in a mixed OS environment

**UPDATE: Microsoft recently released hotfixes for Windows 8/2012 and Windows 8.1/2012 R2 to address the roaming profile compatibility issue. The hotfix and regkey is outlined in Step 1 this technet article: http://technet.microsoft.com/en-us/library/jj649079.aspx. Note that there is no hotfix for Windows 7/2008 R2, so you’ll still need the procedure outlined below if you are trying to roam from Vista/2008 to newer versions.

Hotfixes
Windows 8/Server 2012 (KB 2887239)
Windows 8.1/Server 2012 R2 (KB 2887595)

I love mandatory roaming profiles. With the hundreds of servers I manage daily, it’s important I have to same settings on each system to maximize efficiency. Anything I do on one system is available on all systems – for the most part. Each version of Windows comes with a slightly different user profile and they’re not always compatible. For instance, the profile in use with Windows XP/2003 was vastly different from Windows Vista/2008 which was also different from Windows 7/2008 R2. This becomes an issue with roaming profiles since the path to the profile is set on the AD user account with no regard to the actual operating system you’ll be logging into. We support systems ranging from Windows Server 2003 to Windows Server 2012 R2, so I need the ability to roam on any platform.

Microsoft addressed this in the jump from XP to Vista by automatically appending a .V2 to profile names, so you actually had different profiles for XP and Vista. However, that’s as far as they went. Every version of Windows since Vista uses that .V2 profile, but they are not fully compatible. Make a change to the profile in Windows 8 and you’ll lose your Windows Vista desktop. Similarly, modify the start menu in Windows 8.1 and you won’t see the same layout on your Windows 8 systems.

The directory services team provided a workaround by creating multiple GPO’s with WMI filters that apply only to a specific operating system thereby allowing you to set an environment variable on every system to use the in the profile path of users. To me, that was too much clutter and too many GPO’s applying to all domain servers slowing down startup and login. A better solution is a single GPO with item level targeting. Item level targeting basically allows you to apply a preference only if certain criteria are met – in this case, the Operating System version.

To accomplish this, we’ll use a GPO to set an environment variable named PROFILEVER, and then use that variable in the user profile settings in AD. We’ll use the following values for each OS:

v1 = Windows XP/2003/2003 R2
v2 = Windows Vista/2008
v3 = Windows 7/2008 R2
v3.1 = Windows 8/2012
v3.2 = Windows 8.1/2012 R2

  1. Create a new Group Policy Object.
  2. Under Computer Configuration > Preferences > Windows Settings > Environment, create a new Environment Variable named PROFILEVER.
  3. Set the Action to Update, the name to PROFILEVER, the Value to v1.
  4. On the Common tab, select the check box for Item-Level targeting and click the Targeting button.
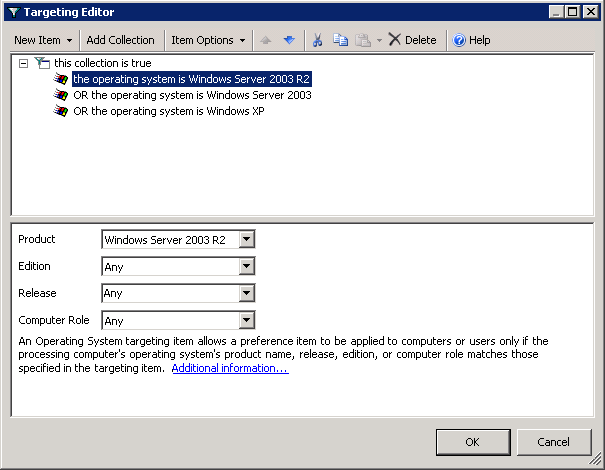
  5. We want this to apply to multiple Operating Systems, so first add a collection.
  6. Next, select New Item > Operating System, and then select Windows XP from the Product drop-down.*
  7. Drag the Operating System object under the collection.
  8. Repeat step 6 adding entries for Windows Server 2003 and Windows Server 2003 R2.
    ILT
  9. Repeat steps 2 through 8 for each profile version you wish to support using the proper value and Operating Systems.
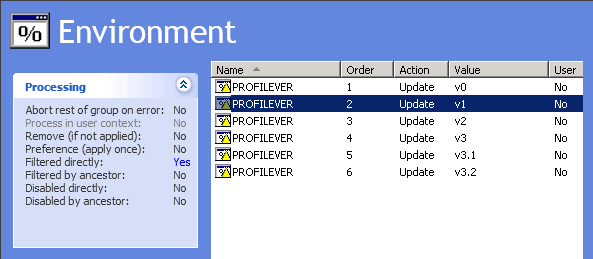
    PROFILEVER Environment Variable
  10. As a fail-safe, I’ve added a v0 with no item-level targeting set. Because items are applied sequentially, PROFILEVER should be overwritten by one of the item-level targeted preferences.
  11. Be sure to update AD Profile path to use the new environment variable:
    \\server\share\profiles\%PROFILEVER%\%username%
  12. You’ll need to logoff any existing sessions and run a gpupdate /force on systems (or reboot) for the setting to take effect.

*Note: In order to properly select Operating System versions, you need to perform this from the highest OS you wish to support. For instance, you’ll only be able to select Windows 8.1/Server 2012 R2 if you are editing the GPO on a Windows 8.1/Server 2012 R2 system.


Using same remote SQL 2012 SP1 instance for DPM 2012 SP1 and DPM 2012 R2

We recently began to deploy DPM 2012 R2 into our environment. For ease of management, we use a single remote SQL instance for all of our DPM installations. Naturally, we decided to use the same remote SQL 2012 SP1 instance for new DPM 2012 R2 installs.

One of the first steps requires that you run the DPM Remote SQL Prep on the SQL server. When we ran this from the DPM 2012 R2 installation media, it upgraded the existing DPM 2012 SP1 Remote SQL Prep files causing all of the existing jobs on the DPM 2012 SP1 servers to fail. The errors were not evident in the DPM console, rather they were logged to in the SQL Agent on the remote SQL instance:

Message
Executed as user: DOMAIN\sqlservice. The process could not be created for step 1 of job 0x8ADCFE6FE202F04F8C7A11C240E42059 (reason: The system cannot find the file specified). The step failed.

The resolution was to re-run the DPM Remote SQL Prep install from the DPM 2012 SP1 media AFTER the DPM Remote SQL Prep install was run from the DPM 2012 R2 media on the remote SQL server. This restored the necessary files on disk and jobs began running again immediately.

Replace noisy power supply fan in HP Proliant Gen7 Microserver

My 3.5 year old HP Proliant Gen7 MicroServer’s power supply fan starting getting noisy, so I set out to find a replacement. I had a similar issue with the GPU fan on my Sapphire Radeon HD 5770 about a year ago, and I remember from that project, finding a specialty replacement fan isn’t easy.

I scoured forums for hours trying to find a drop-in replacement, but wasn’t very successful. Most people seem to prefer swapping out the stock PSU for a PicoPSU. That moves the transformer outside of the case (like a laptop power supply) but leaves an ugly hole in the back of the system with wires sticking out. I prefer keeping to stock designs when I can, so I wanted to narrow down at least a replacement fan that would fit the stock PSU.

The HP ProLiant MicroServer owners’ thread on Hardforum.com was one of the best resources. Specifically, post 896 from bluefull gave several possible drop-in replacements for the stock T&T 4020HH12S-ND1 fan. Additionally, there was some great information in the HP ProLiant MicroServer N40L Owner’s Thread *Part 5* on avforums.com. Shawry, beginning in post #558, describes the main issue with these fans – even though they are rated for 12V, the PSU is actually only putting out 5V. One fan in particular caught my eye, the Noiseblock BlackSilent Pro series. According to the specifications on the overclockers.co.uk site, the fan had a starting voltage of 5V and an operating voltage of 5-13.2V which I had hoped would work as a drop-in replacement. I was able to find the NB BlackSilent Pro PM-2 40mm in the US at frozencpu.com and ordered one.

The fan uses a standard 3-pin Molex connector with a signaling cable, but the stock fan uses a smaller 2-pin 4mm mini-Molex connector. Unfortunately, I forgot to order a 2-pin to 3-pin adapter, so I had to resort to cutting the old connector from the stock fan and splicing it onto the new fan’s power cable. I wasn’t overly concerned with doing this as the NB BlackSilent Pro is ingeniously designed with a break-away power connector for using different length power cables and the fan comes with both a 20cm and 50cm cable. At any rate, the fan fits perfectly into the psu, but I wasn’t able to get it to spin up by connecting it to the fan header inside the PSU. Not to worry, the design of the fan and the PSU lends itself to allowing you to connect the fan to a standard 4-pin Molex power connector while still ensuring proper fit into the case.

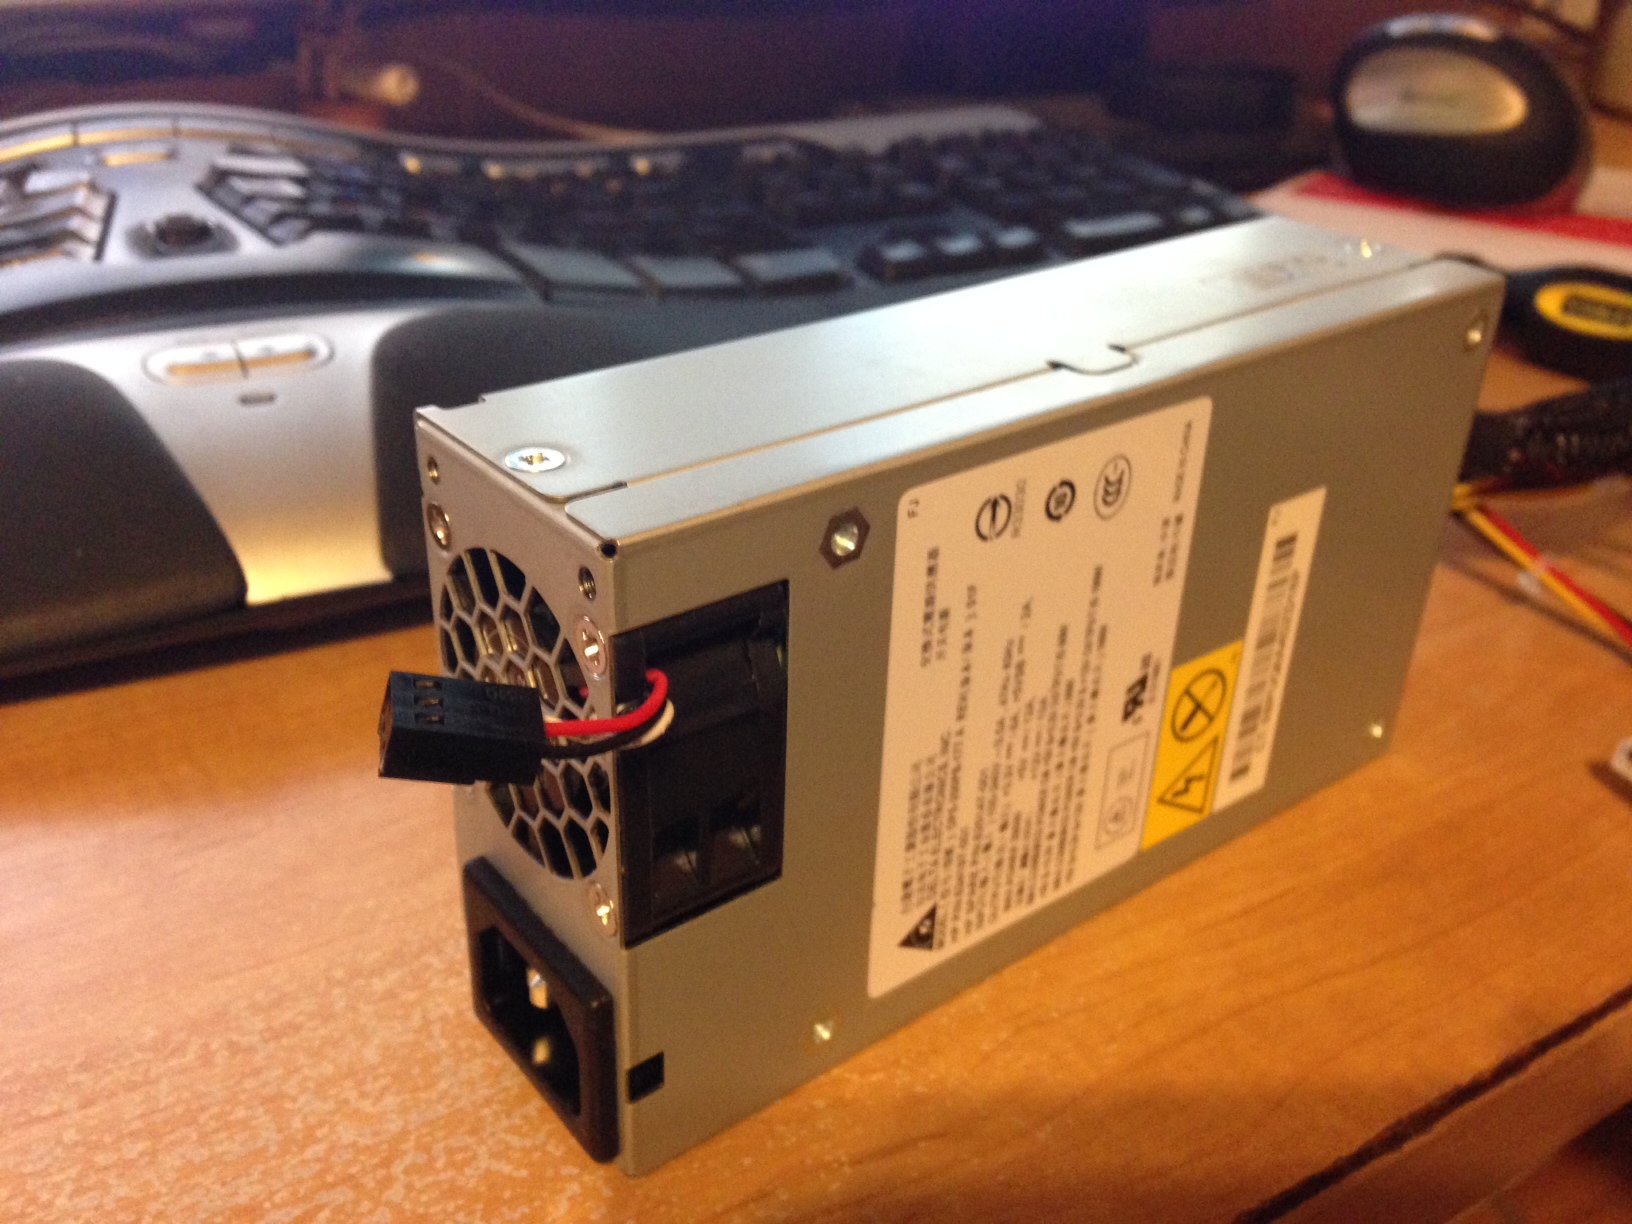
I installed the fan so the power connector would route outside of the power supply like so:

The HP Proliant MicroServer psu with the replacement NoiseBlocker BlackSilent Pro PM-2 fan

The Proliant MicroServer PSU with the replacement NoiseBlocker BlackSilent Pro fan

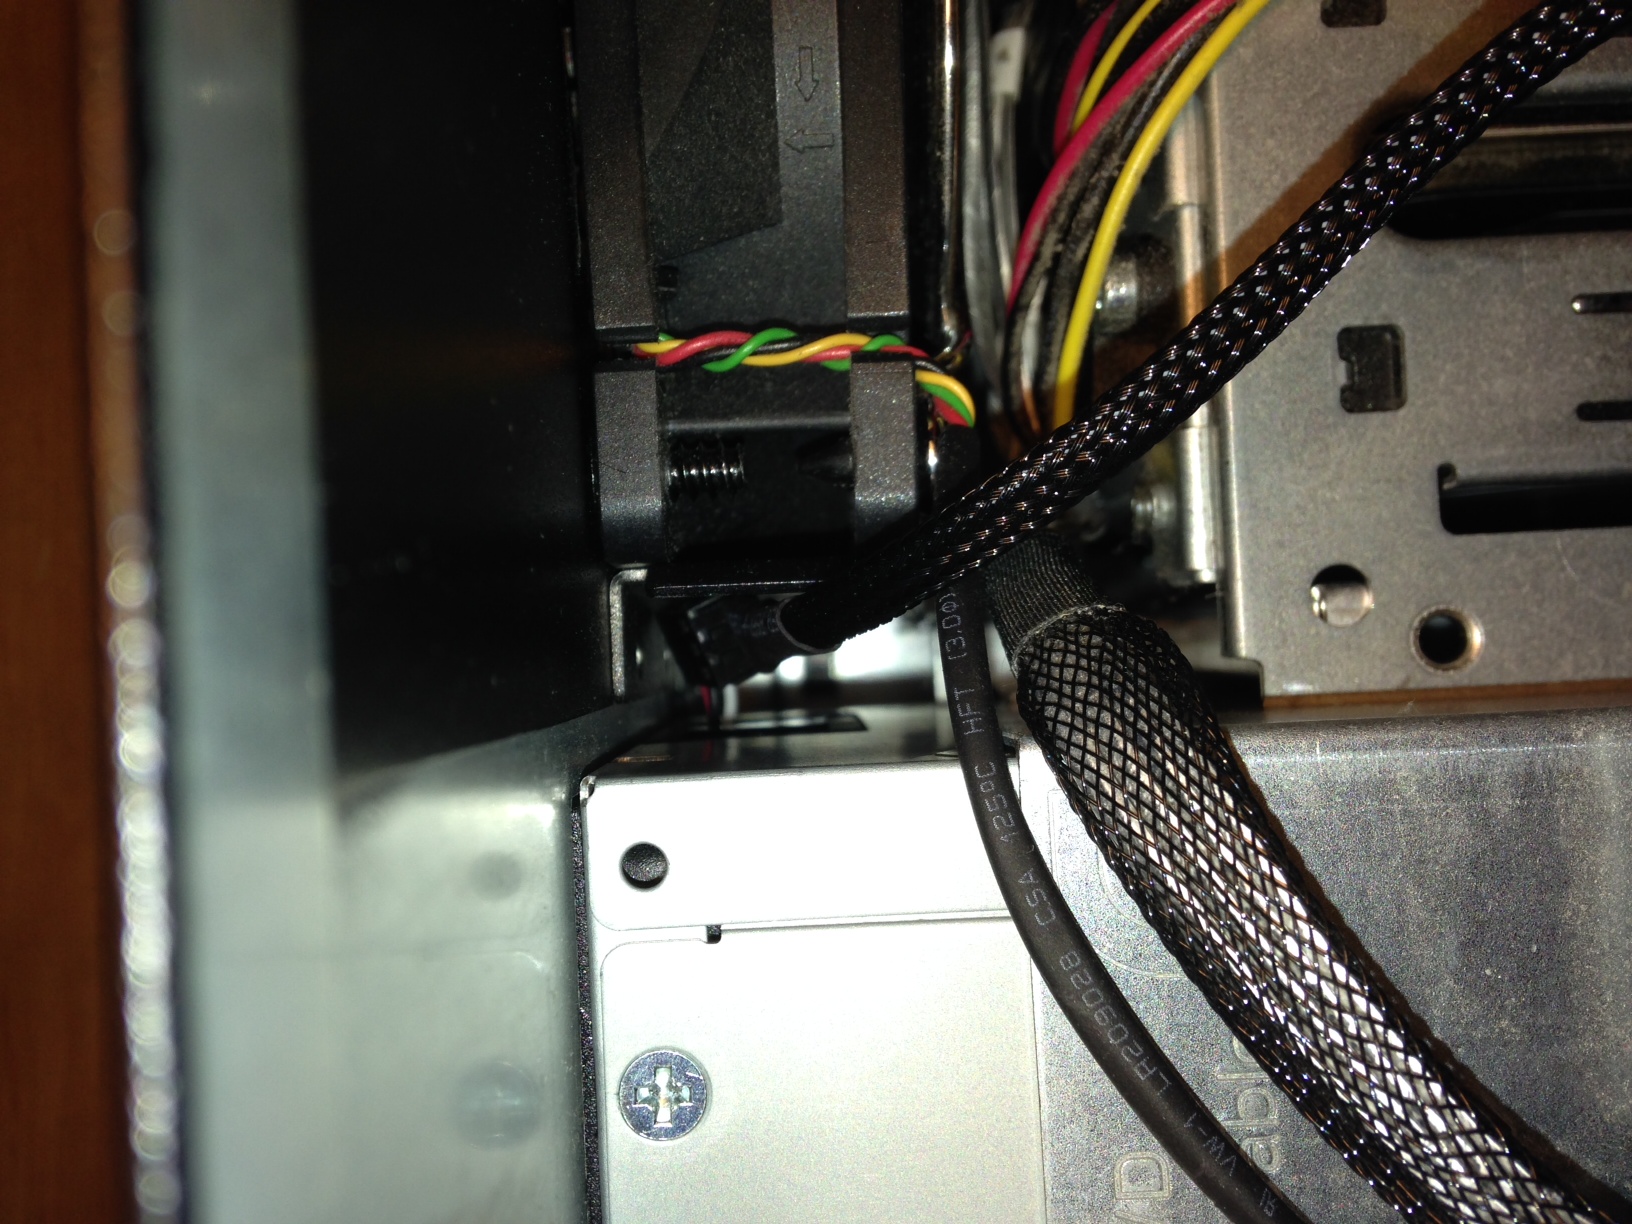
I was able to easily slide the power supply back into place, and the connector was then accessible between the PSU and case fan:

The CPU power cable next to the MicroServer case fan

The CPU power cable next to the MicroServer case fan

I then used a standard 4-pin to 3-pin adapter to piggy back off the optical drive power connector:

The PSU power cable connected to a 3-pin to 4-pin Molex adapter.

The PSU power cable connected to a 3-pin to 4-pin Molex adapter

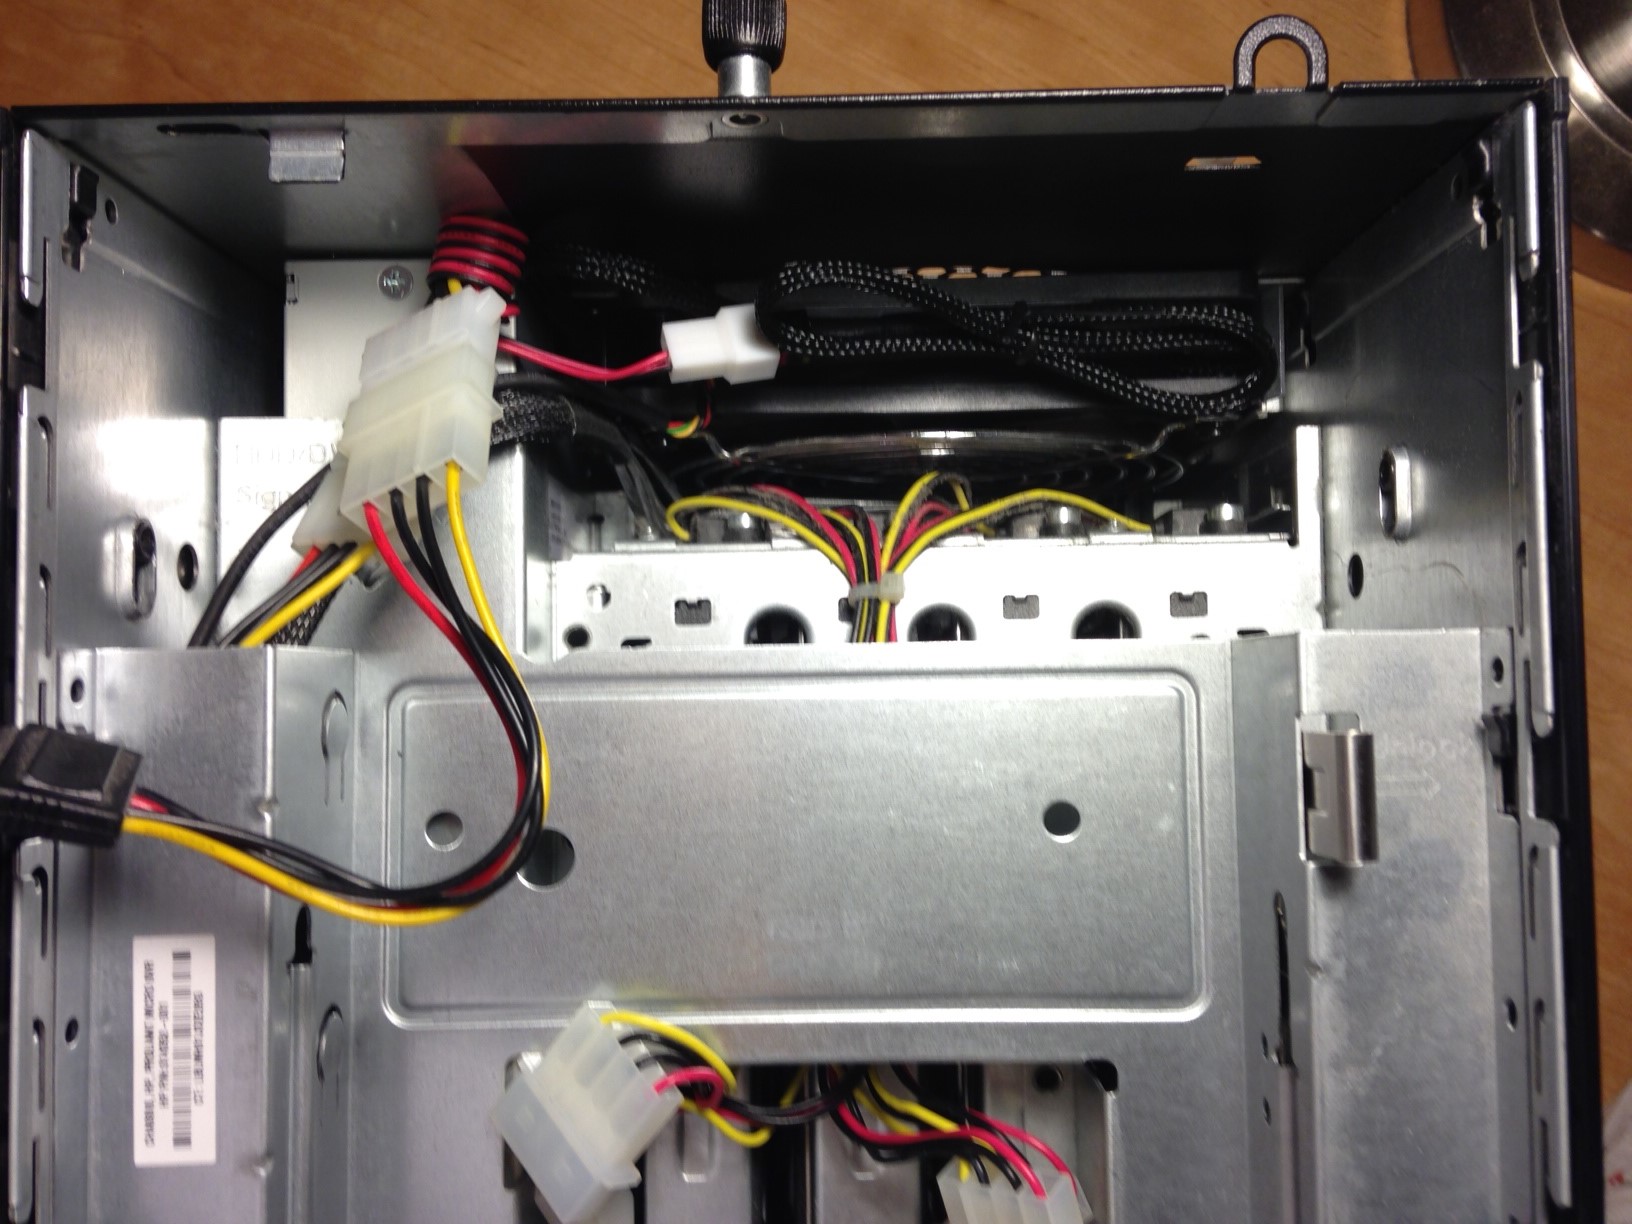
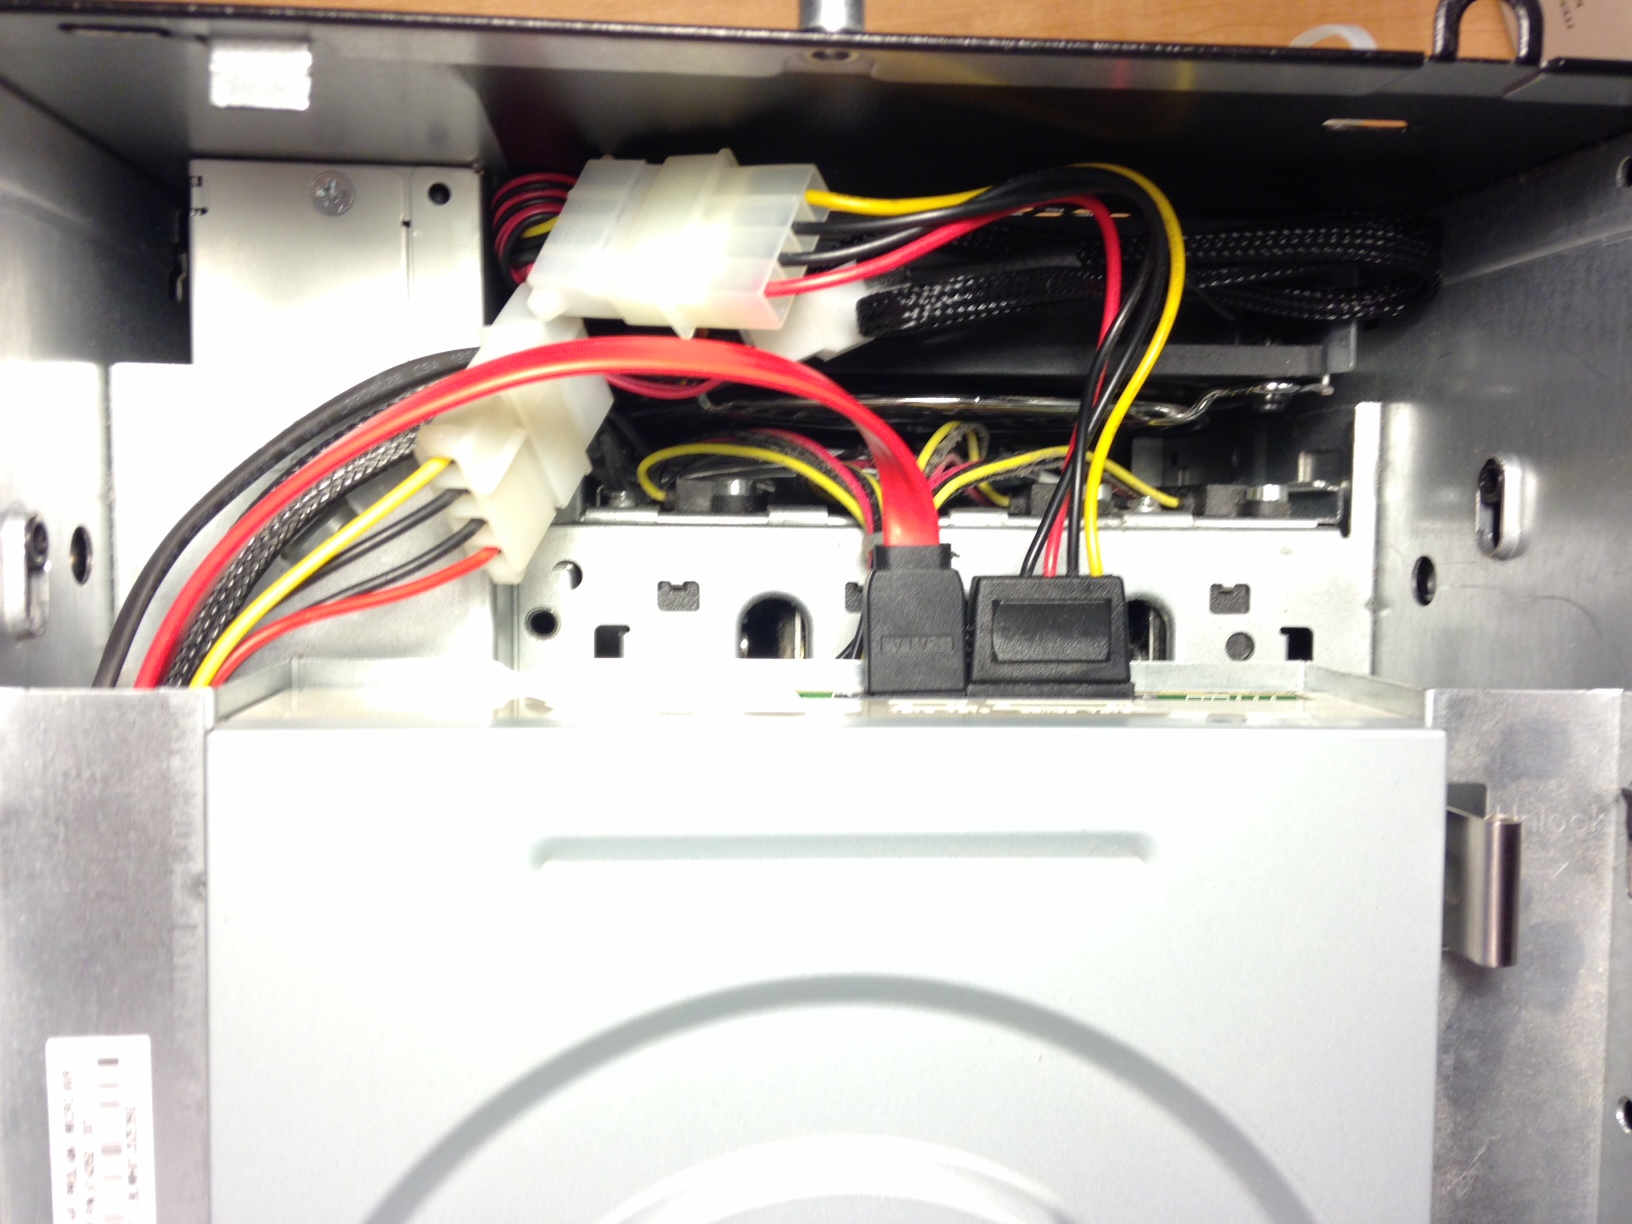
Everything fits nicely in the space behind the optical drive:

HP Proliant Microserver


Fan spun up without issue once the server was powered on.

A side note, I had originally thought the noise was coming from the case fan and went through the effort of ordering a Cougar Vortex CF-V12HPB PWM fan as a replacement, only to find out the HP MicroServer fan header uses a custom pinout. The server will not boot if it does not properly detect the case fan, so if replacing the case fan, you’ll need to swap the conductor pins to the proper slots.

Resolving error 0x8007007e Cannot cannect to wmi provider

Recently, I had to troubleshoot a problem with SQL backups via Microsoft Data Protection Manager 2012 SP1 for a SQL Server 2008 system. DPM was alerting us that database auto-protection failed with error code ID 32511. The detailed errors showed that DPM could not enumerate SQL Server instances using Windows Management Instrumentation on the protected computer. This error was detailed in the DPMRACurr.errlog on the production server:

WARNING Failed: Hr: = [0x8007007e] : unable to execute the WQL query: SELECT * FROM ServerSettings

This pointed to a problem with the underlying WMI configuration for SQL, so I used wbemtest.exe from the remote DPM server to test WMI connectivity. If you are unsure of exactly what WMI namespaces are in use or what queries are being run, you can use WMI Tracing to see what’s happening under the hood.

Log Name: Microsoft-Windows-WMI-Activity/Trace
Source: Microsoft-Windows-WMI-Activity
Date: 10/22/2013 3:59:39 PM
Event ID: 1
Task Category: None
Level: Information
Keywords:
User: SYSTEM
Computer: SERVERNAME
Description:
GroupOperationId = 9283379; OperationId = 9300341; Operation = Start IWbemServices::ExecQuery – SELECT * FROM ServerSettings; ClientMachine = DPMSERVER; User = jeff; ClientProcessId = 2540; NamespaceName = \\.\root\Microsoft\SqlServer\ComputerManagement10

Once wbemtest is open, connect to the appropriate namespace:

SQL 2005
\\SERVERNAME\root\Microsoft\SqlServer\ComputerManagement

SQL 2008 & 2008 R2
\\SERVERNAME\root\Microsoft\SqlServer\ComputerManagement10

SQL 2012
\\SERVERNAME\root\Microsoft\SqlServer\ComputerManagement11

Once connected, try executing the WQL query that your application is using – in my case, it was SELECT * FROM ServerSettings. Doing this resulted in the error:

Number: 0x8007007e
Facility: Win32
Description: The specified module could not be found.

Some quick research shows this can most often be resolved by recompiling the WMI template for SQL with mofcomp:

http://support.microsoft.com/kb/956013

On 64-bit Windows with SQL 2008, the command is:

mofcomp “C:\Program Files (x86)\Microsoft SQL Server\100\Shared\sqlmgmproviderxpsp2up.mof”

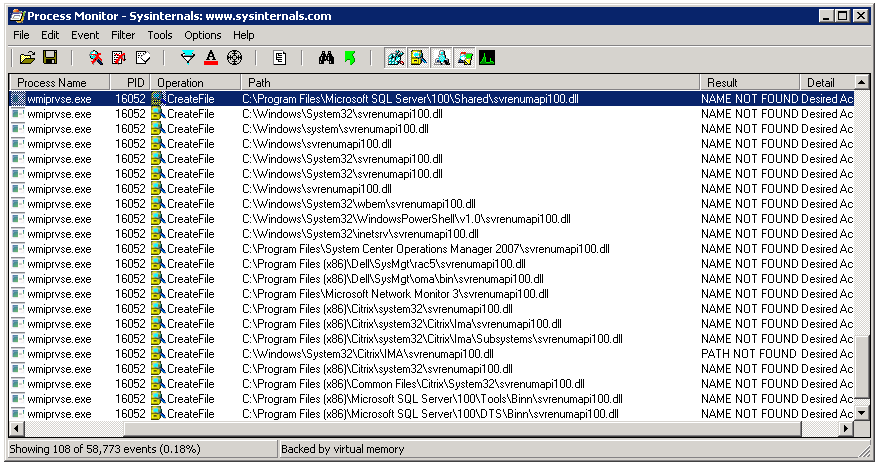
You may need to adjust the command for bitness and version of SQL and then restart the WMI service for the changes to take effect. However, this did not resolve the issue on the specific system where I was encountering the problem. The same error was returned when trying to run a query in wbemtest after recompiling and restarting the service, the DPM console also displayed the same error when attempting to enumerate SQL instances. The 0x8007007e error typically means a DLL or registration is missing. Time to break out procmon and see what’s happening under the covers. Using filters to include only the wmiprvse.exe process and excluding entries with a SUCCESS result, I could see that there was a file it seemed to be looking for, but could not find:

Procmon WMI SQL


It seemed to be scouring the path looking for sqlmgmprovider.dll and svrenumapi100.dll. I checked on disk, and sure enough, neither of those files existed under the path C:\Program Files\Microsoft SQL Server\100\Shared, however, their 32-bit counterparts were located under C:\Program Files\Microsoft SQL Server\100\Shared. Checking another  64-bit SQL 2008 server, I was able to find those files under that first path. After copying them from a known working system, the error was resolved. Also, the second file was only listed in procmon once I copied the first to the server and retested, so it make take several passes to completely resolve.

Note that this resolved this specific error for me, though it may not be the best solution. The reason those files were not on the server is because there was only a 32-bit instance of SQL Server on the system. By adding those two files and re-running wbemtest, an error was no longer returned, but the query also did not show any instances of SQL Server because it was querying for 64-bit instances.

Powershell Remoting

One of the most powerful features of Powershell is the ability to issue commands to remote systems, better known as Powershell remoting. This further lessens the need for console or remote desktop access to administer systems. Powershell remoting was introduced in v2 and relies on the Windows Remote Management service (WinRM) to issue commands to remote systems.

Enabling PowerShell remoting is fairly simple. For a single system on a domain, you can run the Enable-PSRemoting -Force cmdlet which will perform necessary configuration steps. You can also ensure WinRM is configured properly using the quickconfig command:

winrm quickconfig

You can use Group Policy if you need to enable remoting on multiple systems. Do this by automatically configuring the WinRM service:

Computer Configuration\Policies\Administrative Templates\Windows Components\Windows Remote Management (WinRM)\WinRM Service\Allow automatic configuration of listeners

Enable this GPO setting and use * for IPv4 and IPv6 filters (unless you wish to limit WinRM requests to specific source IP ranges). In a non-domain environment, you will need to add the remote system to the TrustedHosts list on the client system:

winrm s winrm/config/client ‘@{TrustedHosts=”RemoteSystem”}’

Alternatively, for non-domain environments, you can configure WinRM to allow SSL connections. You will need a “Server Authentication” certificate installed in the local computer certificate store, with a CN matching the hostname that is not expired, revoked, or self-signed. WinRM then needs to be configured for HTTPS using the certificate:

winrm quickconfig -transport:https

To check the current WinRM configuration, use the get command:

winrm get winrm/config

Once WinRM is configured properly, ensure there is a firewall rule in the local Windows Firewall allowing inbound traffic on port 5985 (and port 5986 for SSL). If WinRM is not properly configured, or there is a firewall blocking traffic, you will likely see an error similar to this:

[RemoteSystem] Connecting to remote server RemoteSystem failed with the following error message : WinRM cannot complete the operation. Verify that the specified computer name is valid, that the computer is accessible over the network, and that a firewall exception for the WinRM service is enabled and allows access from this computer. By default, the WinRM firewall exception for public profiles limits access to remote computers within the same local subnet. For more information, see the about_Remote_Troubleshooting Help topic.
+ CategoryInfo : OpenError: (RemoteSystem:String) [], PSRemotingTransportException
+ FullyQualifiedErrorId : WinRMOperationTimeout,PSSessionStateBroken

Test Powershell remoting with the Test-WSMan cmdlet:

Test-WSMan -Computer RemoteSystem

Which will output something similar to this:

wsmid : http://schemas.dmtf.org/wbem/wsman/identity/1/wsmanidentity.xsd
ProtocolVersion : http://schemas.dmtf.org/wbem/wsman/1/wsman.xsd
ProductVendor : Microsoft Corporation
ProductVersion : OS: 0.0.0 SP: 0.0 Stack: 2.0

Now that WinRM is configured properly, we can open a remote powershell session from the client system:

Enter-PSSession -ComputerName RemoteSystem -Credential username

The credential parameter is optional on domain-joined systems but can be used to open a remote Powershell session as a specific user. If the remote system cannot authenticate the client because it is not domain joined and you have not added it to the TrustedHosts list, you will receive an error similar to this:

Enter-PSSession : Connecting to remote server RemoteSystem failed with the following error message : The WinRM client cannot process the request. If the authentication scheme is different from Kerberos, or if the client computer is not joined to a domain, then HTTPS transport must be used or the destination machine must be added to the TrustedHosts configuration setting. Use winrm.cmd to configure TrustedHosts. Note that computers in the TrustedHosts list might not be authenticated. You can get more information about that by running the following command: winrm help config. For more information, see the about_Remote_Troubleshooting Help topic.
At line:1 char:1
+ Enter-PSSession -ComputerName RemoteSystem -Credential jeff
+ ~~~~~~~~~~~~~~~~~~~~~~~~~~~~~~~~~~~~~~~~~~~~~~~~~~~~~~~~
+ CategoryInfo : InvalidArgument: (RemoteSystem:String) [Enter-PSSession], PSRemotingTransportException
+ FullyQualifiedErrorId : CreateRemoteRunspaceFailed

You can also run commands on several remote systems simultaneously (this example will force a checkin with the WSUS server):

Invoke-Command -ComputerName RemoteSystem1, RemoteSystem2 -ScriptBlock {wuauclt /reportnow}

Happy Remoting!
Resolving 404 error using Web Deploy on IIS

I recently used Web Platform Installer to install Web Deploy 3 on IIS 8 so I could remotely develop a PHP site in WebMatrix. After installing and setting up a publishing profile in WebMatrix, a quick test showed a 404 returned by IIS error when attempting to connect with Web Deploy. I confirmed that the IIS Web Management Service (WMSvc) was started and configured properly. I also confirm proper IIS Manager permissions for the user I was using to connect with Web Deploy. WMSvc tracing showed IIS was returning a 404 error code when attempting to access https://servername:8172/MsDeploy.axd – the Web Deploy handler in IIS. After much troubleshooting, I stumbled across a stackoverflow post that described the fix. Even though I had installed Web Deploy via the Web Platform Installer, it appears it didn’t actual install the Web Deploy Handler. To resolve this, I manually ran the MSI installer for Web Deploy and selected the appropriate components. After a restart of WMSvc, I was able to successfully connect to IIS from WebMatrix via Web Deploy.

The Web Deploy Windows Installer can be downloaded here:

http://technet.microsoft.com/en-us/library/dd569059(v=ws.10).aspx

Using CheckSUR to repair Windows file corruption

Microsoft has developed a System Update Readiness tool which can identify and repair Windows system file corruption that could prevent other updates from being installed. The tool is available for all editions of Windows since Vista/Server 2008 and is published under KB947821. The utility installs as a MSU package on older platforms, and is baked in for Windows 8 and Server 2012 with the DISM utility. This utility is often referred to as CheckSUR – short for Check System Update Readiness.

Once installed, a log is generated under %windir%\Logs\CBS\CheckSUR.log. If CheckSUR is able to automatically repair files, it will do so and report this in the log file. For any corruption which cannot be automatically repaired, we can still use this utility to manually fix these items. You will find the KB article number of files that cannot be repaired in the CheckSUR log file:

=================================
Checking System Update Readiness.
Binary Version 6.1.7601.21645
Package Version 15.0
2012-07-06 13:57

Checking Windows Servicing Packages

Checking Package Manifests and Catalogs
(f)    CBS MUM Corrupt    0x00000000    servicing\Packages\Package_2_for_KB2685939~31bf3856ad364e35~amd64~~6.1.1.2.mum        Expected file name Microsoft-Windows-Foundation-Package~31bf3856ad364e35~amd64~~6.1.7600.16385.mum does not match the actual file name

Checking Package Watchlist
Checking Component Watchlist
Checking Packages
Checking Component Store

Summary:
Seconds executed: 109
Found 1 errors
CBS MUM Corrupt Total count: 1

Unavailable repair files:    servicing\packages\Package_2_for_KB2685939~31bf3856ad364e35~amd64~~6.1.1.2.mum   servicing\packages\Package_2_for_KB2685939~31bf3856ad364e35~amd64~~6.1.1.2.cat

From this log, we can see the corrupt files are part of KB2685939. To repair, you can follow these instructions.

1. Download the appropriate update package for KB2685939 for the target system from the Microsoft Download Center.

2. Expand the package using the expand command (this assumes the package was downloaded to C:\temp and that we’re expanding to C:\temp\KB2685939):

expand C:\temp\Windows6.1-KB2685939-x64.msu /f:* C:\temp\KB2685939

3. Expand the cab files to the same directory:

expand C:\temp\Windows6.1-KB2685939-x64.cab /f:* C:\temp\KB2685939

4. Copy the expanded *.mum and *.cat files to %windir%\Temp\CheckSUR\servicing\packages:

copy C:\temp\KB2685939\*.mum %windir%\Temp\CheckSUR\servicing\packages\
copy C:\temp\KB2685939\*.cat %windir%\Temp\CheckSUR\servicing\packages\

5. Re-run the System Update Readiness tool which will use the files in the %windir%\Temp\CheckSUR\servicing\packages folder to repair the corrupt or missing files.

Configure VMM 2012 SP1 Network Virtualization for use with Service Management Portal

With the RTM release of the Service Management Portal from Microsoft, hosters can configure VMM 2012 SP1 to allow self-service tenants to create NVGRE networks for use with VM’s deployed through the portal. The VMM Engineering Blog has a great post that provides a basis for understanding how Network Virtualization is configured in VMM 2012 SP1.

The process can be summarized as follows:

  1. Create a Logical Network with a Network Site & Subnet for use as the Provider Address.
  2. Create an IP Pool on the Logical Network for the Provider Address space.
  3. Create a Host Port Profile linked to the Network Site created in step 1.
  4. Optional: Create a port classification and profile for the virtual adapter. This will allow you to enable DHCP and Router guard on your templates and hardware profiles.
  5. Create the Logical Switch referencing the Host Port Profile (and Virtual Port Classification and Profile if you created them).
  6. Assign the Logical Switch to your Hyper-V hosts.
  7. Assign the Logical Network to your Cloud.
  8. Create a default VM Network for use with templates and hardware profiles.

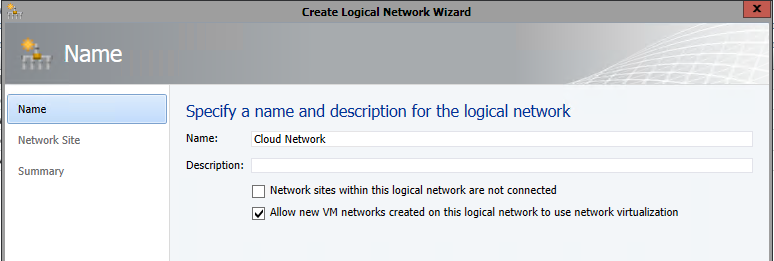
To create the logical network, in VMM, go to Fabric > Networking > Logical Network and select Create Logical Network from the ribbon menu. Give the network a name (this is what will appear in the Katal portal) and select the “Allow new VM networks created on this logical network to use network virtualization” checkbox, then click Next.Create Logical Network

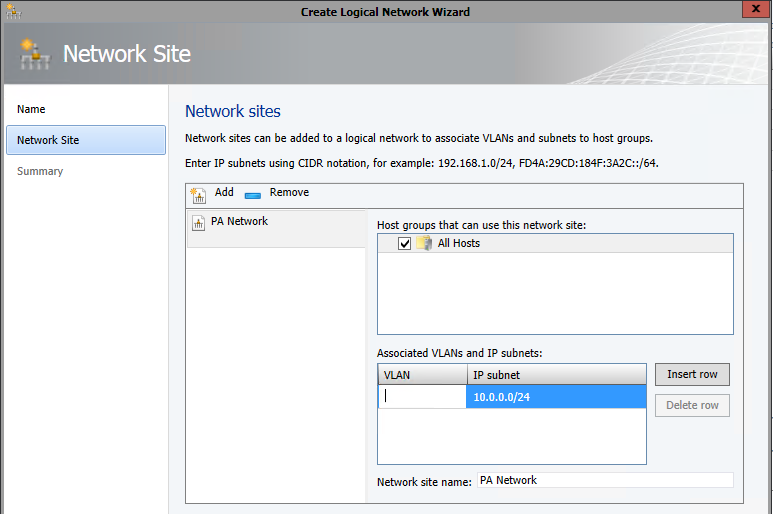
Add a new network site to be used as the Provider Address network. This is what the Hyper-V hosts will use to communicate with one another.Create Network Site

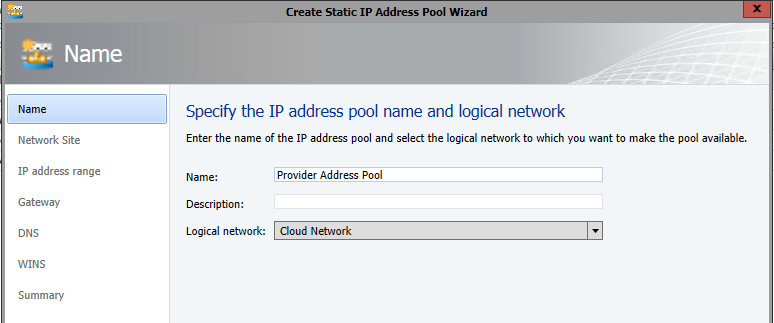
Now that a Logical Network and Site have been created, we’ll need to create an IP Pool for the Provider Addresses. Right-click on your logical network, and select Create IP Pool. Create IP Pool

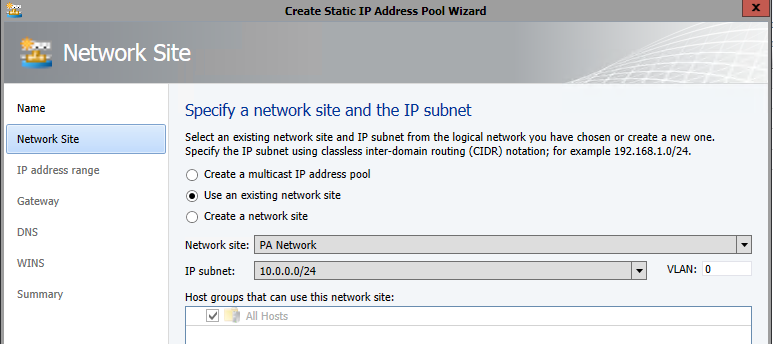
Associate the Pool with the Network Site we created in the previous step.Associate Pool with Network Site

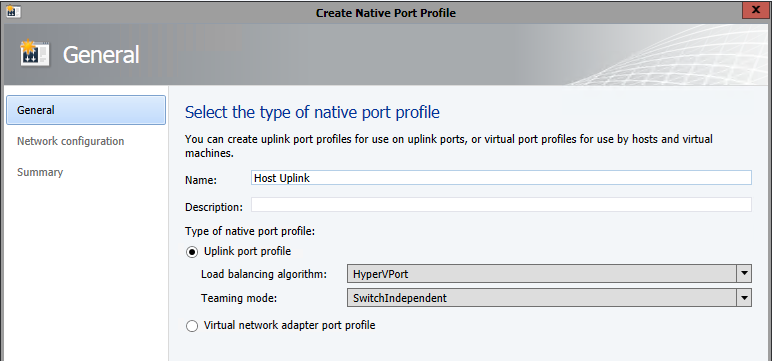
You can leave the default range and specify gateway and DNS settings if your Hyper-V hosts span multiple subnets. Next, we’ll want to create a Host Port Profile and associate it with the network site. Right-click Fabric > Networking > Native Port Profiles and select Create Native Port Profile. Name it appropriately and change the type to Uplink port profile.Create Host Port Profile

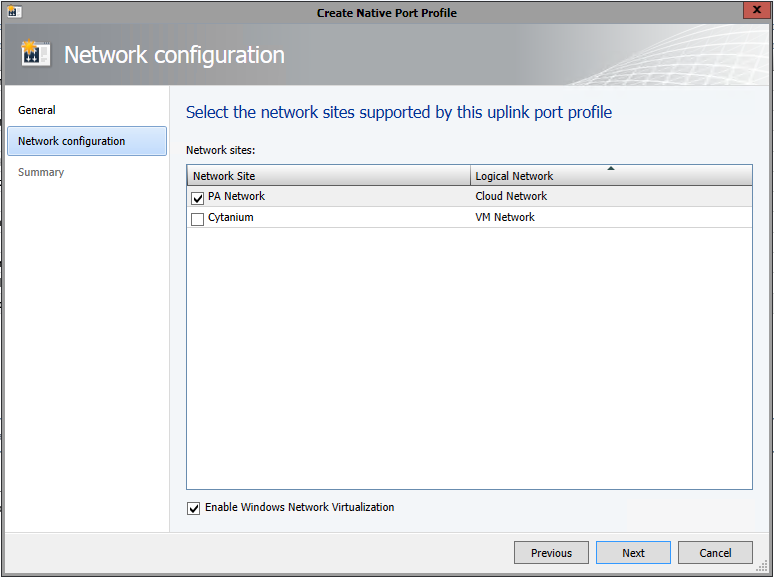
Associate the Port Profile with the Network Site we created on the Logical Switch and check the checkbox to Enable Windows Network Virtualization. Click Next and Finish.Associate Network Site with Uplink Port Profile

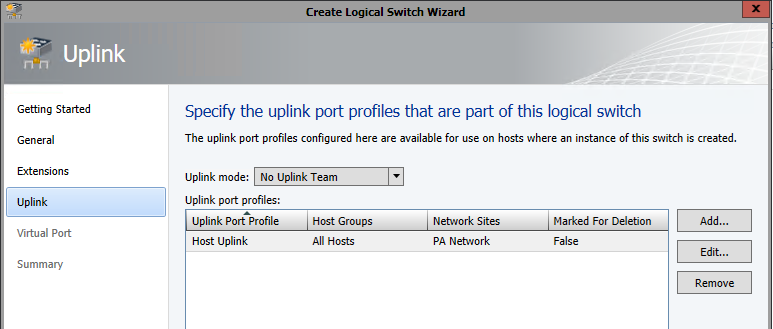
Optionally, you can create a virtual port classification and profile. This will allow you to enable/disable virtual adapter features or create tiers of service. Next, we can create the Logical Switch. From Fabric > Networking > Logical Switches select Create Logical Switch in the ribbon. Give the Switch a name and specify extensions as necessary. Associate the Uplink port profile we created in the previous step.Associate Logical Switch with Uplink Port Profile

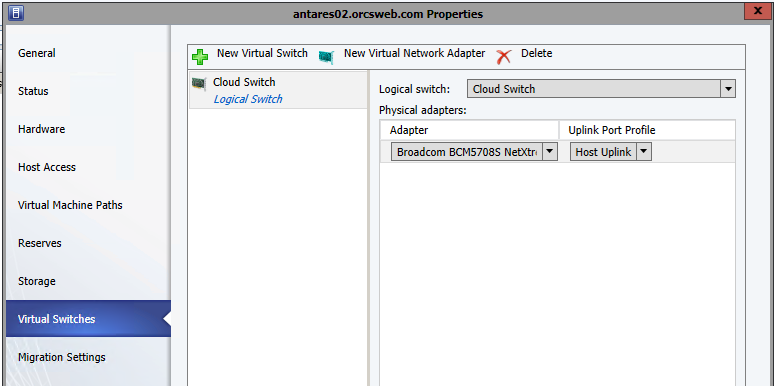
Add you virtual port profiles if you created them and then click Finish to create the switch. We’ll now need to associate the switch with our host(s). Find your host under Fabric > Servers > All Hosts > Hostname, right-click and select properties. Click Virtual Switches and then click New Virtual Switch > New Logical Switch. If you have multiple Logical Switches, select the switch we created in the previous step, then select the appropriate adapter(s) and the Uplink Port Profile we created previously. Click OK to assign the logical switch.Assign Switch

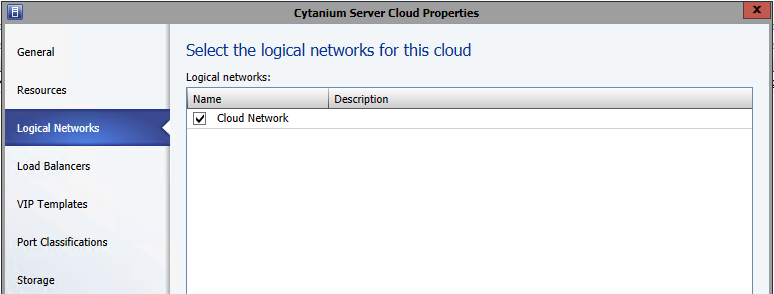
Once the job completes, we’ll be able to associate our Logical Network with our cloud which will allow it to show up in the Service Management Portal. Under VMs and Services > Clouds, right-click on the name of your cloud and select Properties. Click Logical Networks, and select the checkbox next to the name of the Logical Network we created in the first step. Click OK.Assign Logical Network


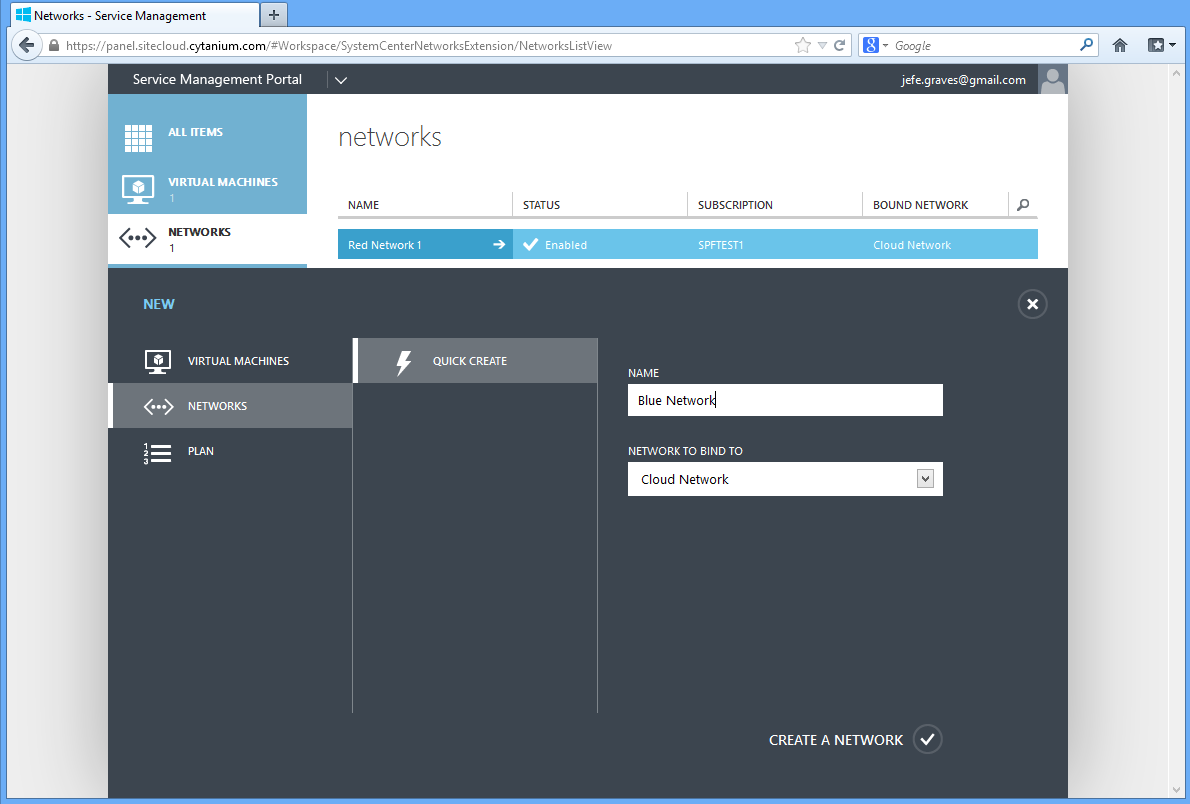
You can now create VM Networks in the Service Management Portal that are bound to the Logical Network using NVGRE.Service Management Portal Create Network

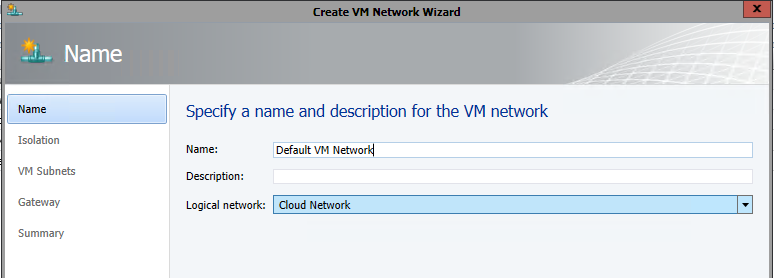
The last step is to create a default VM Network to associate with our templates and hardware profiles. Select VMs and Services > VM Networks and click Create VM Network from the Ribbon. Name the name and associate it with the Logical Network we created in step 1.Create Default VM Network

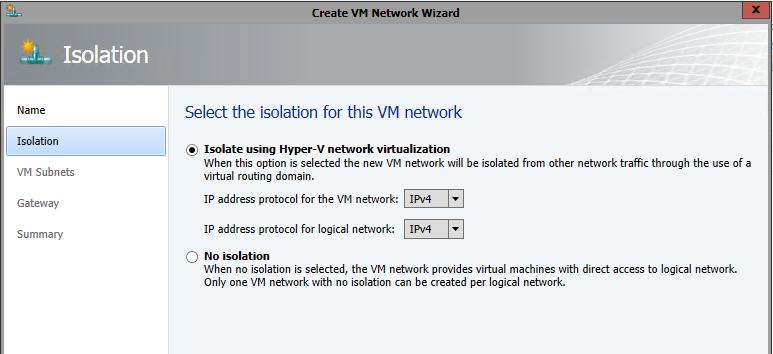
Chose the option to Isolate using Hyper-V network virtualization with IPv4 addresses for VM and logical networks.Configure NVGRE Isolation

Specify a subnet for VM Network though it will not be used. Select No connectivity on the External connectivity screen and click Finish to create the VM Network. Configure your templates and hardware profiles to use this VM Network in order for them to work properly in the Service Management Portal.

SQL Server Reporting Services error installing DPM 2012 SP1 with remote SQL 2012 database

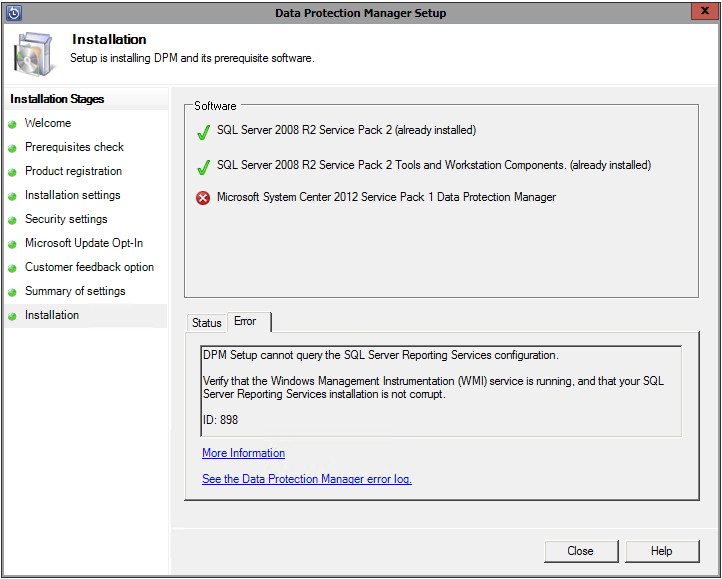
We use Microsoft Data Protection Manager in our environment to protect our Windows workloads. Recently, DPM 2012 SP1 was released and we have begun the process of upgrading each of our DPM servers to this version, but encountered a problem with the latest server to be upgraded. Though the prerequisite check was successful, DPM would fail to install citing an error with SQL Server Reporting Services on our remote SQL 2012 server:

DPM Setup cannot query the SQL Server Reporting Services configuration

DPM Setup cannot query the SQL Server Reporting Services configuration

Viewing the error log, we can see the following error attempting to query the SSRS configuration via WMI:

[3/4/2013 12:05:44 PM] Information : Getting the reporting secure connection level for DPMSQL01/MSSQLSERVER
[3/4/2013 12:05:44 PM] Information : Querying WMI Namespace: \\DPMSQL01\root\Microsoft\SqlServer\ReportServer\RS_MSSQLSERVER\v10\admin for query: SELECT * FROM MSReportServer_ConfigurationSetting WHERE InstanceName=’MSSQLSERVER’
[3/4/2013 12:05:44 PM] * Exception : => System.Management.ManagementException: Provider load failure

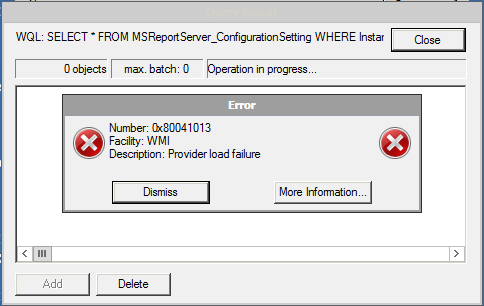
DPM is using WMI to get information about the SSRS installation, and is getting a “Provider load failure” error message. The natural troubleshooting technique here is to attempt to run this query manually via wbemtest from the SQL server itself, and sure enough, we end up with a 0x80041013 “Provider Load Failure” error message:

0x80041013 Provider Load Failure

0x80041013 Provider Load Failure

The SQL Server was originally deployed as SQL 2008 R2 and then upgraded to SQL 2012 SP1. Though there is a KB article describing this issue, there is no update for SQL 2012 SP1. You’ll also notice that the path mentioned in the error code includes v10 – which refers to SQL 2008. So, it seems as though the underlying problem has to do with an issue with the upgrade from SQL 2008 R2 to SQL 2012 and the WMI namespace.

Rather than open a PSS case to find the root cause, we decided it was probably faster to uninstall SQL entirely, then install a fresh instance of SQL 2012 and restore the DPM databases. If you choose to go this route, be sure to take a backup of your SSRS encryption key, DPM databases, master db, msdb, and the SSRS databases. If you don’t, you’ll spend hours reconfiguring reports, setting up SQL security and you’ll have to run DPMSync to recreate the SQL jobs.