Multi-tenant Azure Site Recovery E2A using Virtual Machine Manager

Azure Site Recovery (ASR) is simple, automated protection and disaster recovery service delivered from the cloud. It enables replication and failover of workloads between datacenters, and from on-premises to Azure. ASR supports physical machines, VMWare and Hyper-V environments. ASR integrates with Windows Azure Pack (WAP) enabling service providers to offer managed disaster recovery for IaaS workloads through the Cloud Solution Provider (CSP) program. I’ll run through configuring ASR to support your multi-tenant cloud, and point out several important caveats in the configuration.

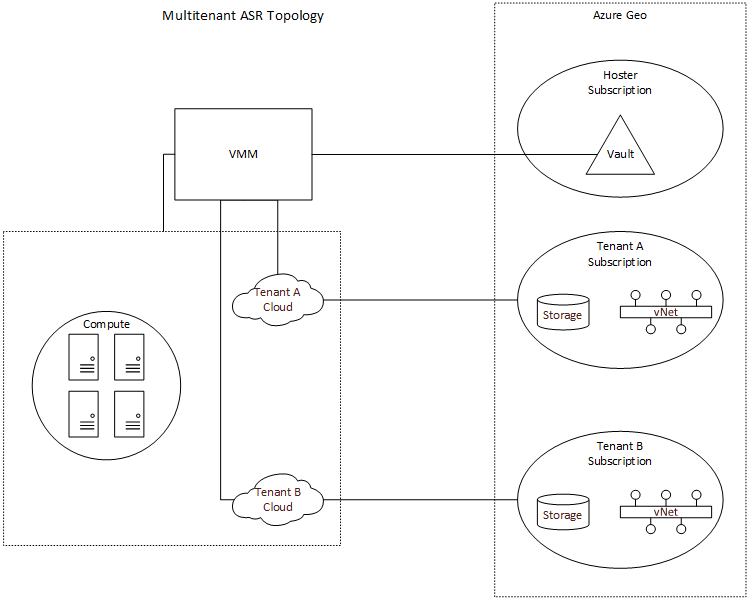
The CSP program enables service providers to resell Microsoft first-party cloud services like Azure, while owning the customer relationship and enabling value-add services. Azure subscriptions provisioned under the CSP program are single-tenant, which presents a challenge when configuring ASR with WAP and Virtual Machine Manager (SCVMM). In order to enable ASR, you must first register a SCVMM server with a Recovery Services vault within an Azure subscription. This will allow ASR to query the SCVMM server and retrieve metadata such as names of virtual machines and networks. In most service provider configurations, a single SCVMM server supports multiple tenants, and as such, you need to register SCVMM to a “master” vault in a subscription owned by the service provider. SCVMM can only be registered to a single vault, which also means that if you are using Azure as a DR target, you can only fail VM’s to a single Azure region. While the SCVMM server can only be registered to a single subscription, we can configure per-cloud protection policies specifying compute and storage targets in other subscriptions. This is an important distinction, as it means that the service provider will need to create separate clouds in VMM (and therefore separate plans in WAP) for EACH tenant. This enables a hoster to provide managed disaster recovery for IaaS workloads in a multi-tenant SCVMM environment. The topology is illustrated below.

Multitenant-ASR

While the initial configuration of the Recovery Services vault can now be done in the Azure portal, configuration of ASR to support multi-tenancy requires using powershell. You’ll need at least version 0.8.10 of Azure Powershell, but I recommend using Web Platform Installer to get the latest.

First,  if you are using the Recovery Services cmdlets for the first time in your subscription, you should register the Azure provider for Recovery Services. Before you can do this, first enable access to the Recovery Services provider on your subscription, by running the following commands. **NOTE: It may take up to an hour to enable access to Recovery Services on your subscription. Attempts to register the provider might fail in the interim.

Register-AzureRmProviderFeature -FeatureName betaAccess -ProviderNamespace Microsoft.RecoveryServices
Register-AzureRmResourceProvider -ProviderNamespace Microsoft.RecoveryServices

Then, let’s setup some constants we’ll use later.

$vaultRgName = "WAPRecoveryGroup"
$location = "westus"
$vaultName = "WAPRecoveryVault"
$vmmCloud = "AcmeCorp Cloud"
$policyName = "AcmeCorp-Policy"
$serverName = "VMM01.contoso.int"
$networkName = "YellowNetwork"
$vmName = "VM01"

Next, connect to your service provider subscription (this can be any direct subscription – EA/Open/PAYG).

$UserName = "user@provider.com"
$Password = "password"
$SecurePassword = ConvertTo-SecureString -AsPlainText $Password -Force
$Cred = New-Object System.Management.Automation.PSCredential -ArgumentList $UserName, $SecurePassword
Login-AzureRmAccount -Credential $Cred

If you have access to multiple subscriptions, you’ll need to set the subscription context.

#Switch to the service provider's subscription
Select-AzureRmSubscription -TenantId 00000000-0000-0000-0000-000000000000 -SubscriptionId 00000000-0000-0000-0000-000000000000

Now we can create the resource group and vault.

#Create the Resource Group for the vault
New-AzureRmResourceGroup -Name $vaultRgName -Location $location
#Create the Recovery Services vault
$vault = New-AzureRmRecoveryServicesVault -Name $vaultName -ResourceGroupName $vaultRgName -Location $location
#Set the vault context
Set-AzureRmSiteRecoveryVaultSettings -ARSVault $vault
#Download vault settings file
Get-AzureRmRecoveryServicesVaultSettingsFile -Vault $vault

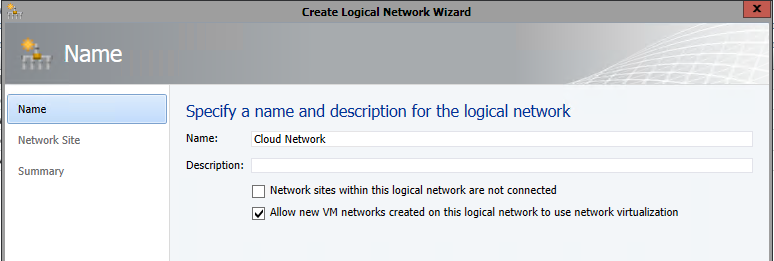
At this point, you’ll need to download the Azure Site Recovery provider and run the installation on your SCVMM server, then register the SCVMM server with the vault using the settings file you just downloaded. Additionally, you’ll need to install (but do not configure) the Microsoft Azure Site Recovery agent on each of the Hyper-V servers. Screenshots can be found here.

Now that SCVMM has been registered with the vault, and the agents have been installed, we can create the storage account and virtual network in the tenant subscription.

#Switch to the tenant's subscription
Select-AzureRmSubscription -TenantId 00000000-0000-0000-0000-000000000000 -SubscriptionId 00000000-0000-0000-0000-000000000000
#Storage account must be in the same region as the vault
$storageAccountName = "drstorageacct1"
$tenantRgName =  "AcmeCorpRecoveryGroup" 
#Create the resource group to hold the storage account and virtual network
New-AzureRmResourceGroup -Name $tenantRgName -Location $location
#Create the storage account
$recoveryStorageAccount = New-AzureRmStorageAccount -ResourceGroupName $tenantRgName -Name $storageAccountName -Type "Standard_GRS" -Location $location
#Create the virtual network and subnet
$subnet1 = New-AzureRmVirtualNetworkSubnetConfig -Name "Subnet1" -AddressPrefix "10.0.1.0/24"
$vnet = New-AzureRmVirtualNetwork -Name $networkName -ResourceGroupName $tenantRgName -Location $location -AddressPrefix "10.0.0.0/16" -Subnet $subnet1

We’re ready to create the protection policy and associate it to the SCVMM cloud.

#Switch to the service provider's subscription
Select-AzureRmSubscription -TenantId 00000000-0000-0000-0000-000000000000 -SubscriptionId 00000000-0000-0000-0000-000000000000
#Create the policy referencing the storage account id from the tenant's subscription
$policyResult = New-AzureRmSiteRecoveryPolicy -Name $policyName -ReplicationProvider HyperVReplicaAzure -ReplicationFrequencyInSeconds 900 -RecoveryPoints 1 -ApplicationConsistentSnapshotFrequencyInHours 1 -RecoveryAzureStorageAccountId $recoveryStorageAccount.Id
$policy = Get-AzureRmSiteRecoveryPolicy -FriendlyName $policyname
#Associate the policy with the SCVMM cloud
$container = Get-AzureRmSiteRecoveryProtectionContainer -FriendlyName $vmmCloud
Start-AzureRmSiteRecoveryPolicyAssociationJob -Policy $policy -PrimaryProtectionContainer $container

Once the policy has been associated with the cloud, we can configure network mapping.

#Retrieve the on-premises network
$server = Get-AzureRmSiteRecoveryServer -FriendlyName $serverName
$network = Get-AzureRmSiteRecoveryNetwork -Server $server -FriendlyName $networkName
#Create the network mapping referencing the virtual network in the tenant's subscritpion
New-AzureRmSiteRecoveryNetworkMapping -PrimaryNetwork $network -AzureVMNetworkId $vnet.Id

Lastly, we enable protection on the virtual machine.

#Get the VM metadata
$vm = Get-AzureRmSiteRecoveryProtectionEntity -ProtectionContainer $container -FriendlyName $vmName
#Enable protection. You must specify the storage account again
Set-AzureRmSiteRecoveryProtectionEntity -ProtectionEntity $vm -Protection Enable –Force -Policy $policy -RecoveryAzureStorageAccountId $recoveryStorageAccount.Id

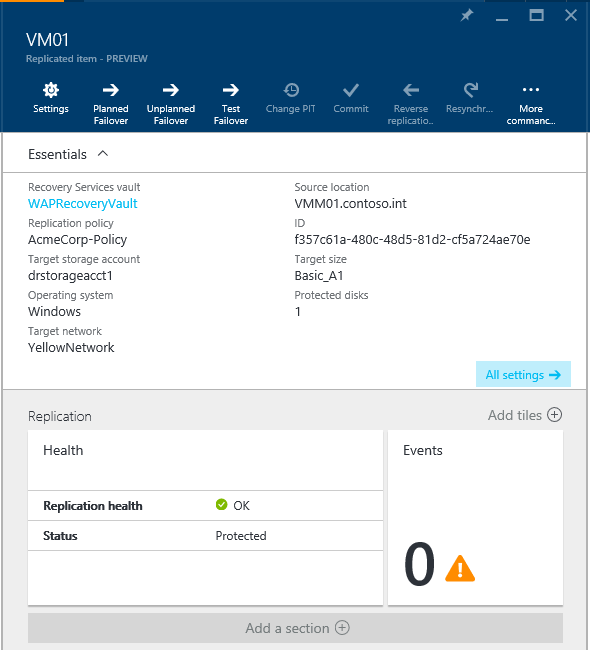
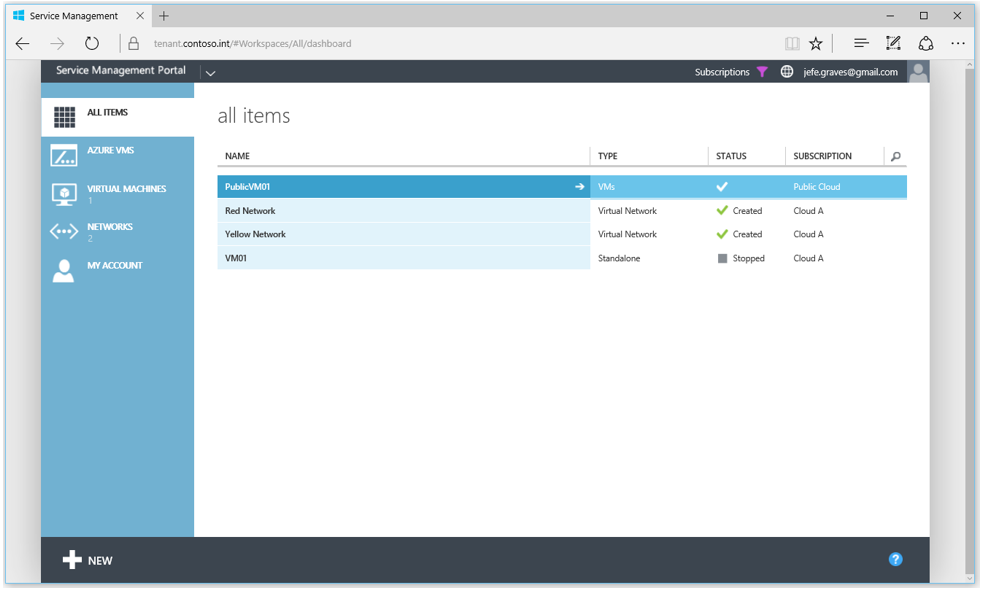
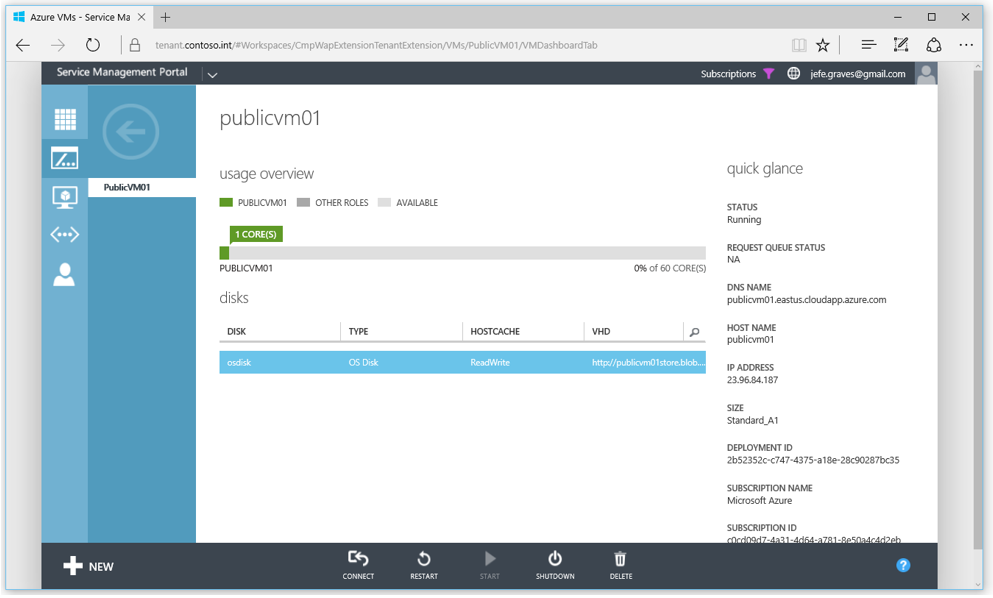
You can monitor protection and perform failovers for a virtual machine in a multi-tenant SCVMM environment to fail over to a tenant’s subscription in Azure from the Recovery Services vault in the provider’s Azure subscription.

Protected-VM01

Azure Pack Connector

In my role as Cloud Technology Strategist with Microsoft over the past 18 months, I’ve been working closely with service providers of all types in making hybrid cloud a reality. Microsoft is uniquely positioned to be able to deliver on the 3 key pillars of cloud – on-premises, hosted, and public – via the Microsoft Cloud Platform. Service providers understand the value of hybrid and, with the release of Azure Pack Connector, have a tool they can use to provide a unified experience for managing public and private cloud.

Azure Pack was released in the fall of 2013 as a free add-on for Windows Server and System Center. It extended the private cloud technology delivered in Virtual Machine Manager to provide self-service multi-tenant Infrastructure as a Service (IaaS) through Hyper-V, in a manner that is consistent with IaaS in public Azure. As more and more enterprises see the value in distributed cloud, service providers are looking to extend their managed services to be able to provision and manage workloads not only running in their data center via Azure Pack, but also IaaS workloads running in public Azure. While Azure Pack ensures the portal and API is consistent, it was still two separate management experiences. Azure Pack Connector bridges that gap by enabling provisioning and management of IaaS in public Azure, through Azure Pack.

Azure Pack Connector

The solution was originally developed by Microsoft IT for internal use to enable various development teams to self-service on public Azure IaaS. Azure Pack Connector was born out of collaboration with the Microsoft Hosting and Cloud Services team to bring the MSIT solution to service providers as open source software released under MIT license. Azure Pack Connector was developed specifically with Cloud Solution Provider partners is in mind, supporting Azure Resource Manager API and including tools to configure Azure subscription provisioned in the CSP portal or CREST API for use with Azure Pack Connector.

The solution consists of 4 main components:

  • Compute Management Service – A windows service that orchestrates the provisioning and de-provisioning of Azure VM’s.
  • Compute Management API – A backend API supporting UI components and enabling management of Azure VM’s.
  • Admin Extension – UI extension for Azure Pack that enables on-boarding and management of Azure subscriptions.
  • Tenant Extension – UI extension for Azure Pack that enables tenant self-service provisioning and management of Azure VM’s.

The Azure Pack Connector subscription model uses a 1-to-1 mapping of Azure Pack plans to Azure Subscriptions, allowing the administrator to control VM operating systems and sizes on a per plan basis and Azure regions globally. Once a user has a subscription to an Azure Pack plan that has an attached Azure subscription, they can provision and manage Azure VM’s through the Azure Pack tenant portal.

Azure Pack Connector Dashboard

This video walkthrough will help explain the features and demonstrate how to use Azure Pack Connector:


The Azure Pack Connector solution is published on GitHub:

https://github.com/Microsoft/Phoenix

Head on over and grab the binaries to expand your Azure Pack installation today!


WMI Bug with Scale Out File Server

During the build out of our Windows Azure Pack infrastructure, I uncovered what I believe is a bug with WMI and Scale Out File Server. For us, the issue bubbled up in Virtual Machine Manager where deployments of VM templates from a library on a SOFS share would randomly fail with the following error:

Error (12710)

VMM does not have appropriate permissions to access the Windows Remote Management resources on the server ( CLOUD-LIBRARY01.domain.com).

Unknown error (0x80338105)

This issue was intermittent, and rebooting the SOFS nodes always seemed to clear up the problem. Upon tracing the process, I found BITS was getting an Access Denied error when attempting to create the URL in wsman. Furthermore, VMM was effectively saying the path specified did not exist. From the VMM trace:

ConvertUNCPathToPhysicalPath (catch CarmineException) [[(CarmineException#f0912a) { Microsoft.VirtualManager.Utils.CarmineException: The specified path is not a valid share path on CLOUD-LIBRARY01.domain.com.  Specify a valid share path on CLOUD-LIBRARY01.domain.com to the virtual machine to be saved, and then try the operation again.

Further testing, I found I got mixed results when querying cluster share properties via WMI:

PS C:\Users\jeff> gwmi Win32_ClusterShare -ComputerName CLOUD-LIBRARY01

None.

PS C:\Users\jeff> gwmi Win32_ClusterShare -ComputerName CLOUD-LIBRARY01

Name                                    Path                                    Description
—-                                    —-                                    ———–
\\CLOUD-VMMLIB\ClusterStorage$          C:\ClusterStorage                       Cluster Shared Volumes Default Share
\\CLOUD-LIBRARY\ClusterStorage$         C:\ClusterStorage                       Cluster Shared Volumes Default Share
\\CLOUD-VMMLIB\MSSCVMMLibrary           C:\ClusterStorage\Volume1\Shares\MSS…

Finally, while viewing procmon while performing the WMI queries:

A success:

Date & Time:  6/3/2014 3:56:20 PM
Event Class:   File System
Operation:     CreateFile
Result: SUCCESS
Path:   \\CLOUD-VMMLIB\PIPE\srvsvc
TID:    996
Duration:       0.0006634
Desired Access:        Generic Read/Write
Disposition:    Open
Options:        Non-Directory File, Open No Recall
Attributes:     n/a
ShareMode:   Read, Write
AllocationSize: n/a
Impersonating:         S-1-5-21-xxxx
OpenResult:   Opened

A failure:

Date & Time:  6/3/2014 3:56:57 PM
Event Class:   File System
Operation:     CreateFile
Result: ACCESS DENIED
Path:   \\CLOUD-VMMLIB\PIPE\srvsvc
TID:    996
Duration:       0.0032664
Desired Access:        Generic Read/Write
Disposition:    Open
Options:        Non-Directory File, Open No Recall
Attributes:     n/a
ShareMode:   Read, Write
AllocationSize: n/a
Impersonating:         S-1-5-21-xxx

What’s happening here is that WMI is attempting to access the named pipe of the server service on the SOFS cluster object. Because we’re using SOFS, the DNS entry for the SOFS cluster object contains IP’s for every server in the cluster. The WMI call attempts to connect using the cluster object name, but because of DNS round robin, that may or may not be the local node. It would have appropriate access to that named pipe for the local server, but it will not for other servers in the cluster.

There are two workarounds for this issue. First, you can add a local hosts file entry on each of the cluster nodes containing the SOFS cluster object pointing back to localhost, or second, you can add the computer account(s) of each cluster node to the local Administrators group of all other cluster nodes. We chose to implement the first workaround until the issue can be corrected by Microsoft.

VMM 2012 R2 service crashes on start with exception code 0xe0434352

Was working on a new VMM 2012 R2 install for a Windows Azure Pack POC and spent the better part of a day dealing with a failing VMM Service. SQL 2012 SP1 had been installed on the same server and during install, VMM was configured to run under the local SYSTEM account and use the local SQL instance. Installation completed successfully, but the VMM service would not start, logging the following errors in the Application log in Event Viewer:

Log Name: Application
Source: .NET Runtime
Date: 12/31/2013 12:43:27 PM
Event ID: 1026
Task Category: None
Level: Error
Keywords: Classic
User: N/A
Computer: AZPK01
Description:
Application: vmmservice.exe
Framework Version: v4.0.30319
Description: The process was terminated due to an unhandled exception.
Exception Info: System.AggregateException
Stack:
at Microsoft.VirtualManager.Engine.VirtualManagerService.WaitForStartupTasks()
at Microsoft.VirtualManager.Engine.VirtualManagerService.TimeStartupMethod(System.String, TimedStartupMethod)
at Microsoft.VirtualManager.Engine.VirtualManagerService.ExecuteRealEngineStartup()
at Microsoft.VirtualManager.Engine.VirtualManagerService.TryStart(System.Object)
at System.Threading.ExecutionContext.RunInternal(System.Threading.ExecutionContext, System.Threading.ContextCallback, System.Object, Boolean)
at System.Threading.ExecutionContext.Run(System.Threading.ExecutionContext, System.Threading.ContextCallback, System.Object, Boolean)
at System.Threading.TimerQueueTimer.CallCallback()
at System.Threading.TimerQueueTimer.Fire()
at System.Threading.TimerQueue.FireNextTimers()

Log Name: Application
Source: Application Error
Date: 12/31/2013 12:43:28 PM
Event ID: 1000
Task Category: (100)
Level: Error
Keywords: Classic
User: N/A
Computer: AZPK01
Description:
Faulting application name: vmmservice.exe, version: 3.2.7510.0, time stamp: 0x522d2a8a
Faulting module name: KERNELBASE.dll, version: 6.3.9600.16408, time stamp: 0x523d557d
Exception code: 0xe0434352
Fault offset: 0x000000000000ab78
Faulting process id: 0x10ac
Faulting application start time: 0x01cf064fc9e2947a
Faulting application path: C:\Program Files\Microsoft System Center 2012 R2\Virtual Machine Manager\Bin\vmmservice.exe
Faulting module path: C:\windows\system32\KERNELBASE.dll
Report Id: 0e0178f3-7243-11e3-80bb-001dd8b71c66
Faulting package full name:
Faulting package-relative application ID:

I attempted re-installing VMM 2012 R2 and selected a domain account during installation, but had the same result. I enabled VMM Tracing to collect debug logging and was seeing various SQL exceptions:

[0]0BAC.06EC::‎2013‎-‎12‎-‎31 12:46:04.590 [Microsoft-VirtualMachineManager-Debug]4,2,Catalog.cs,1077,SqlException [ex#4f] caught by scope.Complete !!! (catch SqlException) [[(SqlException#62f6e9) System.Data.SqlClient.SqlException (0x80131904): Could not obtain information about Windows NT group/user ‘DOMAIN\jeff’, error code 0x5.

I was finally able to find a helpful error message in the standard VMM logs located under C:\ProgramData\VMMLogs\SCVMM.\report.txt (probably should have looked their first):

System.AggregateException: One or more errors occurred. —> Microsoft.VirtualManager.DB.CarmineSqlException: The SQL Server service account does not have permission to access Active Directory Domain Services (AD DS).
Ensure that the SQL Server service is running under a domain account or a computer account that has permission to access AD DS. For more information, see “Some applications and APIs require access to authorization information on account objects” in the Microsoft Knowledge Base at http://go.microsoft.com/fwlink/?LinkId=121054.

My local SQL instance was configured to run under a local user account, not a domain account. I re-checked the VMM installation requirements, and this requirement is not documented anywhere. Sure enough, once I reconfigured SQL to run as a domain account (also had to fix a SPN issue: http://softwarelounge.co.uk/archives/3191) and restarted the SQL service, the VMM service started successfully.

Using same remote SQL 2012 SP1 instance for DPM 2012 SP1 and DPM 2012 R2

We recently began to deploy DPM 2012 R2 into our environment. For ease of management, we use a single remote SQL instance for all of our DPM installations. Naturally, we decided to use the same remote SQL 2012 SP1 instance for new DPM 2012 R2 installs.

One of the first steps requires that you run the DPM Remote SQL Prep on the SQL server. When we ran this from the DPM 2012 R2 installation media, it upgraded the existing DPM 2012 SP1 Remote SQL Prep files causing all of the existing jobs on the DPM 2012 SP1 servers to fail. The errors were not evident in the DPM console, rather they were logged to in the SQL Agent on the remote SQL instance:

Message
Executed as user: DOMAIN\sqlservice. The process could not be created for step 1 of job 0x8ADCFE6FE202F04F8C7A11C240E42059 (reason: The system cannot find the file specified). The step failed.

The resolution was to re-run the DPM Remote SQL Prep install from the DPM 2012 SP1 media AFTER the DPM Remote SQL Prep install was run from the DPM 2012 R2 media on the remote SQL server. This restored the necessary files on disk and jobs began running again immediately.

Configure VMM 2012 SP1 Network Virtualization for use with Service Management Portal

With the RTM release of the Service Management Portal from Microsoft, hosters can configure VMM 2012 SP1 to allow self-service tenants to create NVGRE networks for use with VM’s deployed through the portal. The VMM Engineering Blog has a great post that provides a basis for understanding how Network Virtualization is configured in VMM 2012 SP1.

The process can be summarized as follows:

  1. Create a Logical Network with a Network Site & Subnet for use as the Provider Address.
  2. Create an IP Pool on the Logical Network for the Provider Address space.
  3. Create a Host Port Profile linked to the Network Site created in step 1.
  4. Optional: Create a port classification and profile for the virtual adapter. This will allow you to enable DHCP and Router guard on your templates and hardware profiles.
  5. Create the Logical Switch referencing the Host Port Profile (and Virtual Port Classification and Profile if you created them).
  6. Assign the Logical Switch to your Hyper-V hosts.
  7. Assign the Logical Network to your Cloud.
  8. Create a default VM Network for use with templates and hardware profiles.

To create the logical network, in VMM, go to Fabric > Networking > Logical Network and select Create Logical Network from the ribbon menu. Give the network a name (this is what will appear in the Katal portal) and select the “Allow new VM networks created on this logical network to use network virtualization” checkbox, then click Next.Create Logical Network

Add a new network site to be used as the Provider Address network. This is what the Hyper-V hosts will use to communicate with one another.Create Network Site

Now that a Logical Network and Site have been created, we’ll need to create an IP Pool for the Provider Addresses. Right-click on your logical network, and select Create IP Pool. Create IP Pool

Associate the Pool with the Network Site we created in the previous step.Associate Pool with Network Site

You can leave the default range and specify gateway and DNS settings if your Hyper-V hosts span multiple subnets. Next, we’ll want to create a Host Port Profile and associate it with the network site. Right-click Fabric > Networking > Native Port Profiles and select Create Native Port Profile. Name it appropriately and change the type to Uplink port profile.Create Host Port Profile

Associate the Port Profile with the Network Site we created on the Logical Switch and check the checkbox to Enable Windows Network Virtualization. Click Next and Finish.Associate Network Site with Uplink Port Profile

Optionally, you can create a virtual port classification and profile. This will allow you to enable/disable virtual adapter features or create tiers of service. Next, we can create the Logical Switch. From Fabric > Networking > Logical Switches select Create Logical Switch in the ribbon. Give the Switch a name and specify extensions as necessary. Associate the Uplink port profile we created in the previous step.Associate Logical Switch with Uplink Port Profile

Add you virtual port profiles if you created them and then click Finish to create the switch. We’ll now need to associate the switch with our host(s). Find your host under Fabric > Servers > All Hosts > Hostname, right-click and select properties. Click Virtual Switches and then click New Virtual Switch > New Logical Switch. If you have multiple Logical Switches, select the switch we created in the previous step, then select the appropriate adapter(s) and the Uplink Port Profile we created previously. Click OK to assign the logical switch.Assign Switch

Once the job completes, we’ll be able to associate our Logical Network with our cloud which will allow it to show up in the Service Management Portal. Under VMs and Services > Clouds, right-click on the name of your cloud and select Properties. Click Logical Networks, and select the checkbox next to the name of the Logical Network we created in the first step. Click OK.Assign Logical Network


You can now create VM Networks in the Service Management Portal that are bound to the Logical Network using NVGRE.Service Management Portal Create Network

The last step is to create a default VM Network to associate with our templates and hardware profiles. Select VMs and Services > VM Networks and click Create VM Network from the Ribbon. Name the name and associate it with the Logical Network we created in step 1.Create Default VM Network

Chose the option to Isolate using Hyper-V network virtualization with IPv4 addresses for VM and logical networks.Configure NVGRE Isolation

Specify a subnet for VM Network though it will not be used. Select No connectivity on the External connectivity screen and click Finish to create the VM Network. Configure your templates and hardware profiles to use this VM Network in order for them to work properly in the Service Management Portal.

SQL Server Reporting Services error installing DPM 2012 SP1 with remote SQL 2012 database

We use Microsoft Data Protection Manager in our environment to protect our Windows workloads. Recently, DPM 2012 SP1 was released and we have begun the process of upgrading each of our DPM servers to this version, but encountered a problem with the latest server to be upgraded. Though the prerequisite check was successful, DPM would fail to install citing an error with SQL Server Reporting Services on our remote SQL 2012 server:

DPM Setup cannot query the SQL Server Reporting Services configuration

DPM Setup cannot query the SQL Server Reporting Services configuration

Viewing the error log, we can see the following error attempting to query the SSRS configuration via WMI:

[3/4/2013 12:05:44 PM] Information : Getting the reporting secure connection level for DPMSQL01/MSSQLSERVER
[3/4/2013 12:05:44 PM] Information : Querying WMI Namespace: \\DPMSQL01\root\Microsoft\SqlServer\ReportServer\RS_MSSQLSERVER\v10\admin for query: SELECT * FROM MSReportServer_ConfigurationSetting WHERE InstanceName=’MSSQLSERVER’
[3/4/2013 12:05:44 PM] * Exception : => System.Management.ManagementException: Provider load failure

DPM is using WMI to get information about the SSRS installation, and is getting a “Provider load failure” error message. The natural troubleshooting technique here is to attempt to run this query manually via wbemtest from the SQL server itself, and sure enough, we end up with a 0x80041013 “Provider Load Failure” error message:

0x80041013 Provider Load Failure

0x80041013 Provider Load Failure

The SQL Server was originally deployed as SQL 2008 R2 and then upgraded to SQL 2012 SP1. Though there is a KB article describing this issue, there is no update for SQL 2012 SP1. You’ll also notice that the path mentioned in the error code includes v10 – which refers to SQL 2008. So, it seems as though the underlying problem has to do with an issue with the upgrade from SQL 2008 R2 to SQL 2012 and the WMI namespace.

Rather than open a PSS case to find the root cause, we decided it was probably faster to uninstall SQL entirely, then install a fresh instance of SQL 2012 and restore the DPM databases. If you choose to go this route, be sure to take a backup of your SSRS encryption key, DPM databases, master db, msdb, and the SSRS databases. If you don’t, you’ll spend hours reconfiguring reports, setting up SQL security and you’ll have to run DPMSync to recreate the SQL jobs.

Install SCVMM 2012 Console on non-domain machine

Since I work remotely, my workstation is not joined to the corporate domain. This presents various issues for administrative consoles. Some use integrated authentication to communicate with their server counterparts, others allow you to specify the credentials to use when connecting. The worst part is that there does not seem to be any consistency – even among products of the same suite from the same company.

Take SCVMM 2012 for instance. A feature the added based on feedback that we provided was to allow you to specify the domain credentials the console uses when connecting to the server – similar to what SCOM 2007 R2 allowed. Unfortunately, they still required that the workstation be joined to a domain in order to install the console. Notice I said, “a domain” and not “the domain” – it doesn’t matter if your workstation is part of your corporate domain, rather Micrsoft arbitrarily decided to require any domain-joined workstaion as a pre-requisite. The worst part is, the console functions just fine on systems that are not domain-joined.

With that rant out of the way, here’s how you can by-pass the domain check at installation. Browse to the proper bitness folder for your workstation on the installation media (D:\amd64 or D:\i386). Under the Setup>MSI>Client folder, you’ll find the AdminConsole.msi file. Just double-click it to run. Once installed, the console will allow you to specify your domain credentials when connecting to the VMM Server:

DPM 2010 Tape Belongs to a DPM server sharing this library

Recently, I ran into an issue with our DPM 2010 shared tape library installation where several tapes added back to the library where reporting that they belonged to another DPM server sharing the library. I did not care about the data on these tapes, rather, they just needed to be marked as Free in order to be re-used. I logged into each of our DPM servers trying to find the server that owned the tape, but all of them reported the same error.

I tried performing erase operations, re-cataloging the tapes, identifying the unknown tapes, using the ForceTapeFree script , and external erase operations but DPM did not want to free it’s grip. Finally, I surmised that it must be something in the DPMDB rather than actual data on the tape.

It turns out that the media had been assoicated with an orphaned Media Pool. To correct this, I used the following DB queries.

First, I needed to locate the proper information about the tape. This query will give you the slot and barcode number which should allow you to find the piece of media you need to correct. You’ll want the GlobalMediaId field from this query:

select media.BarcodeValue, media.SlotNum, media.MediaId, gmedia.MediaPoolId
from tbl_MM_Global_ArchiveMedia gmedia
    innerjoin tbl_MM_Media media
        on gmedia.MediaId = media.GlobalMediaId

Next, you’ll want to find the appropriate “Free Media Pool” for your library. You can do this with the following query:

select library.ProductId, library.SerialNo, library.LibraryId, mpool.Name, mpool.MediaPoolId, mpool.GlobalMediaPoolId
from tbl_MM_MediaPool mpool
innerjoin tbl_MM_Library library
on mpool.LibraryId = library.LibraryId
where mpool.Name =‘Free Media Pool’

You’ll want the GlobalMediaPoolId GUID from that query. We then need to update the media with the proper MediaPoolId:

declare @GlobalMediaId asvarchar
declare @GlobalMediaPoolId asvarchar

set @GlobalMediaId =‘<GUID from query 1>’
set @GlobalMediaPoolId =‘<GUID from query 2>’

update tbl_MM_Global_ArchiveMedia
set MediaPoolId = @GlobalMediaPoolId
where MediaId = @GlobalMediaId

Lastly, perform a refresh in the DPM Console. Your tapes should now be marked as Free.