Read & Write .NET machine key with Powershell

We’re putting together webfarms all the time at OrcsWeb, and one of the cardinal rules with webfarms is that all systems need to have matching settings. To help automate this process, I put together a quick Powershell script that will read/write the machine key to the root machine.config files for all versions of the .NET framework.

machineKeys.ps1

# Machine Key Script
#
# Version 1.0
# 6/5/2012
#
# Jeff Graves
#
param ($readWrite = "read", $allkeys = $true, $version, $validationKey, $decryptionkey, $validation)
 
function GenKey ([int] $keylen) {
	$buff = new-object "System.Byte[]" $keylen
	$rnd = new-object System.Security.Cryptography.RNGCryptoServiceProvider
	$rnd.GetBytes($buff)
	$result =""
	for($i=0; $i -lt $keylen; $i++)	{
		$result += [System.String]::Format("{0:X2}",$buff[$i])
	}
	$result
}
 
function SetKey ([string] $version, [string] $validationKey, [string] $decryptionKey, [string] $validation) {
    write-host "Setting machineKey for $version"
    $currentDate = (get-date).tostring("mm_dd_yyyy-hh_mm_s") # month_day_year - hours_mins_seconds
 
    $machineConfig = $netfx[$version]
 
    if (Test-Path $machineConfig) {
        $xml = [xml](get-content $machineConfig)
        $xml.Save($machineConfig + "_$currentDate")
        $root = $xml.get_DocumentElement()
        $system_web = $root."system.web"
        if ($system_web.machineKey -eq $nul) { 
        	$machineKey = $xml.CreateElement("machineKey") 
        	$a = $system_web.AppendChild($machineKey)
        }
        $system_web.SelectSingleNode("machineKey").SetAttribute("validationKey","$validationKey")
        $system_web.SelectSingleNode("machineKey").SetAttribute("decryptionKey","$decryptionKey")
        $system_web.SelectSingleNode("machineKey").SetAttribute("validation","$validation")
        $a = $xml.Save($machineConfig)
    }
    else { write-host "$version is not installed on this machine" -fore yellow }
}
 
function GetKey ([string] $version) { 
    write-host "Getting machineKey for $version"
    $machineConfig = $netfx[$version]
 
    if (Test-Path $machineConfig) { 
        $machineConfig = $netfx.Get_Item($version)
        $xml = [xml](get-content $machineConfig)
        $root = $xml.get_DocumentElement()
        $system_web = $root."system.web"
        if ($system_web.machineKey -eq $nul) { 
        	write-host "machineKey is null for $version" -fore red
        }
        else {
            write-host "Validation Key: $($system_web.SelectSingleNode("machineKey").GetAttribute("validationKey"))" -fore green
    	    write-host "Decryption Key: $($system_web.SelectSingleNode("machineKey").GetAttribute("decryptionKey"))" -fore green
            write-host "Validation: $($system_web.SelectSingleNode("machineKey").GetAttribute("validation"))" -fore green
        }
    }
    else { write-host "$version is not installed on this machine" -fore yellow }
}
 
$global:netfx = @{"1.1x86" = "C:\WINDOWS\Microsoft.NET\Framework\v1.1.4322\CONFIG\machine.config"; `
           "2.0x86" = "C:\WINDOWS\Microsoft.NET\Framework\v2.0.50727\CONFIG\machine.config"; `
           "4.0x86" = "C:\WINDOWS\Microsoft.NET\Framework\v4.0.30319\CONFIG\machine.config"; `
           "2.0x64" = "C:\WINDOWS\Microsoft.NET\Framework64\v2.0.50727\CONFIG\machine.config"; `
           "4.0x64" = "C:\WINDOWS\Microsoft.NET\Framework64\v4.0.30319\CONFIG\machine.config"}
if(!$allkeys)
{
    while(!$version) {
        $input = read-host "Version (1.1x86, 2.0x86, 4.0x86, 2.0x64, 4.0x64)"
        if ($netfx.ContainsKey($input)) { $version = $input }
    }
}
 
if ($readWrite -eq "read")
{
    if($allkeys) {
        foreach ($key in $netfx.Keys) { GetKey -version $key }
    }
    else {
        GetKey -version $version
    }
}
elseif ($readWrite -eq "write")
{   
    if (!$validationkey) {
    	$validationkey = GenKey -keylen 64
    	write-host "Validation Key: $validationKey" -fore green
    }
 
    if (!$decryptionkey) {
    	$decryptionKey = GenKey -keylen 24
    	write-host "Decryption Key: $decryptionKey" -fore green
    }
 
    if (!$validation) {
    	$validation = "SHA1"
    	write-host "Validation: $validation" -fore green
    }
 
    if($allkeys) {
        foreach ($key in $netfx.Keys) { SetKey -version $key -validationkey $validationkey -decryptionKey $decryptionKey -validation $validation}
    }
    else {
        SetKey -version $version -validationkey $validationkey -decryptionKey $decryptionKey -validation $validation
    }
}


Using SQL Database Audits for change detection

There are several reasons you may want to audit the data in your SQL databases. It’s helpful when trying to track down a bug in software, trying to piece together the source of unexpected data, or to meet compliance doctrines. Depending upon your needs, there are several ways to accomplish this. If you need auditing in order to be able to track and revert changes to data, trigger-based table auditing is probably best.

However, when you need to generate audit trails for compliance reasons, Microsoft’s SQL Server has a few built-in ways of doing so. C2 auditing is supported, however the amount of data generated makes this a non-viable option for most installations. Starting with SQL 2008, Microsoft introduced a new high-performance feature called SQL Server Audit. This functions at both the server level (included with all editions) and the database level (enterprise edition). This will allow you to audit a myriad of server and database level functions, and can help ensure your SQL footprint is in compliance.

SQL Server audit is composed of a few different functions. At the server level, you can define an auditing configuration that writes to a file, the NT Application Log, or the NT Security Log. Logging to a file has the least performance overhead and writing to the Security log requires special permissions. From there, you can configure Server level auditing, and/or Database level auditing. The auditing rules can be fine-tuned to apply to specific objects in the database and for specific user principals. For this example, I will configure auditing of Update and Delete events for all tables in a database for all users – a scenario that can effectively meet a requirement commonly known as File Integrity Monitoring or Change Detection for audit trails.

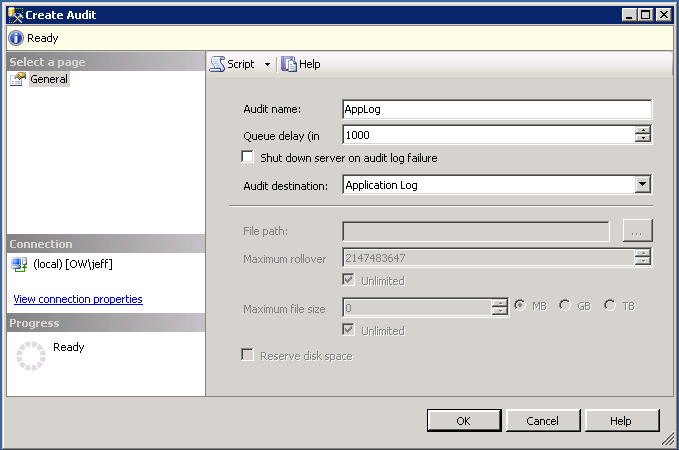
First, we’ll setup an auditing specification to log events the Application Log. Under Security, right-click Audits and select New Audit. Give the Audit an appropriate name and select Application Log as the destination. Click OK. Then right-click the Audit that is created and select enable.

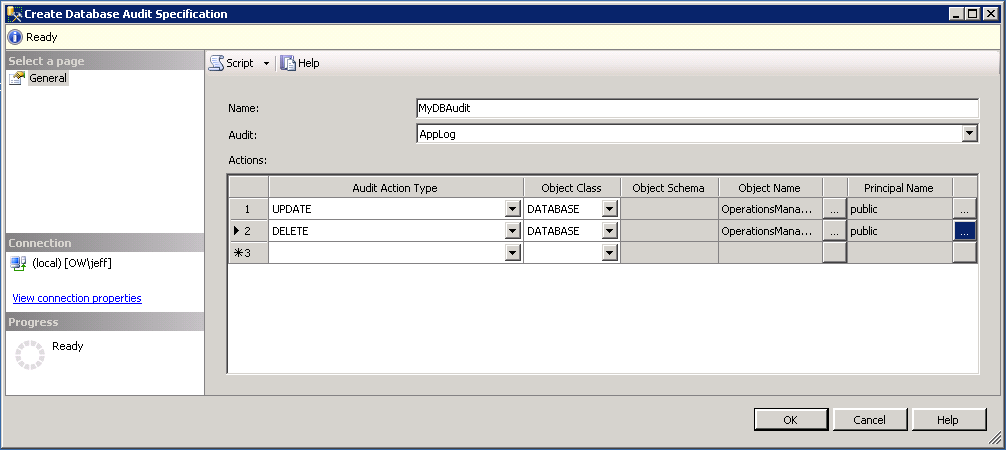
Next, go to the database you would like to audit. Under Security right-click Database Audit Specification and select New Database Audit Specification. Name the database audit and select the appropriate audit configuration (AppLog). Under Actions, select the actions you would like to audit, one at a time. Set the Object Class to Database, select the database in the Object Name column, and select the [public] database role in the Principal Name column to audit all users. Even though the pop-up window will allow you to select multiple items, each row can contain only 1 object and principal. Click OK. Then right-click the Database Audit that is created and select enable.

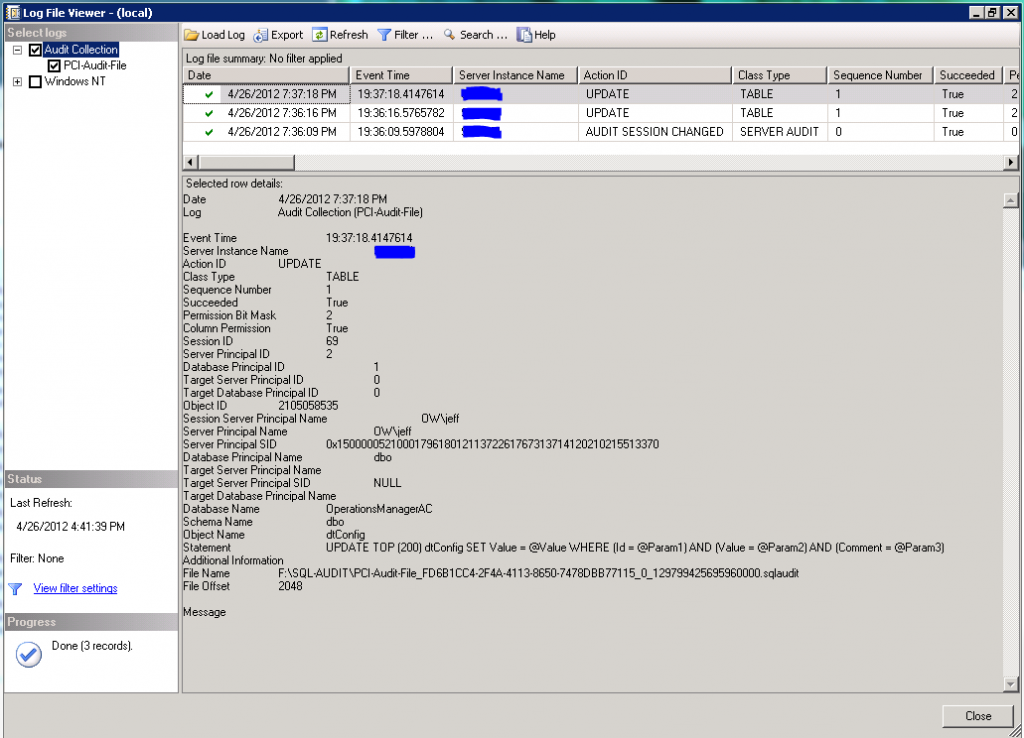
Once enabled, you can now test your audit configuration by updating or deleting database for any table in the audited database. Right-click on the audit specification at the server level and select View Audit Logs to see generated audit events.


Install SCVMM 2012 Console on non-domain machine

Since I work remotely, my workstation is not joined to the corporate domain. This presents various issues for administrative consoles. Some use integrated authentication to communicate with their server counterparts, others allow you to specify the credentials to use when connecting. The worst part is that there does not seem to be any consistency – even among products of the same suite from the same company.

Take SCVMM 2012 for instance. A feature the added based on feedback that we provided was to allow you to specify the domain credentials the console uses when connecting to the server – similar to what SCOM 2007 R2 allowed. Unfortunately, they still required that the workstation be joined to a domain in order to install the console. Notice I said, “a domain” and not “the domain” – it doesn’t matter if your workstation is part of your corporate domain, rather Micrsoft arbitrarily decided to require any domain-joined workstaion as a pre-requisite. The worst part is, the console functions just fine on systems that are not domain-joined.

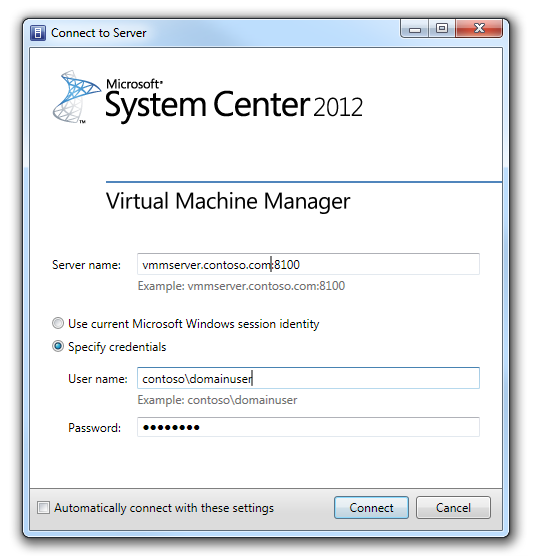
With that rant out of the way, here’s how you can by-pass the domain check at installation. Browse to the proper bitness folder for your workstation on the installation media (D:\amd64 or D:\i386). Under the Setup>MSI>Client folder, you’ll find the AdminConsole.msi file. Just double-click it to run. Once installed, the console will allow you to specify your domain credentials when connecting to the VMM Server:

Backup Database using MySQL Workbench

It’s possible to backup a MySQL database remotely even if you do not have administrative privileges. Most articles describe running mysqldump directly on the server, but that’s not always possible. Fortunately, you can do this from MySQL Workbench. I was able to backup the WordPress database from my Cytanium Shared Windows Hosting account.

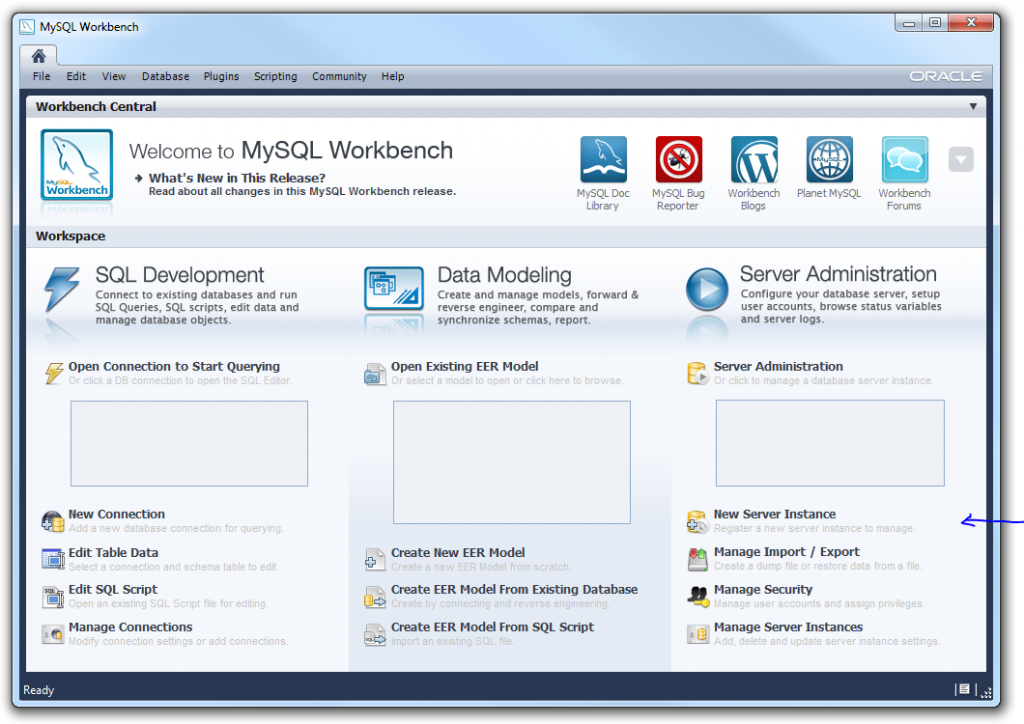
First, you’ll want to download and install the latest version of MySQL Workbench (I used 5.2.39). After installing, you’ll need to configure a Server Administration connection:

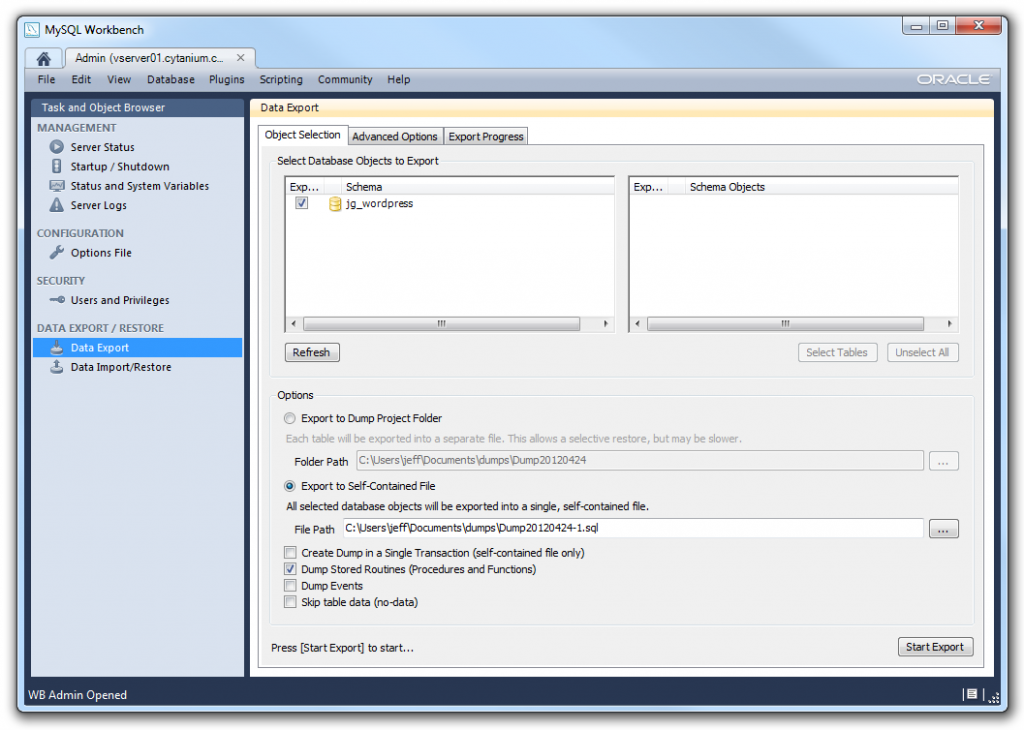
Follow the instructions in the wizard by entering the remote host address, username, password and default schema. If your account does not have root privileges, you will want to select “Do not use remote management.” Once complete, double-click on the new connection listed under Server Administration. Under Data Export / Restore, select Data Export:

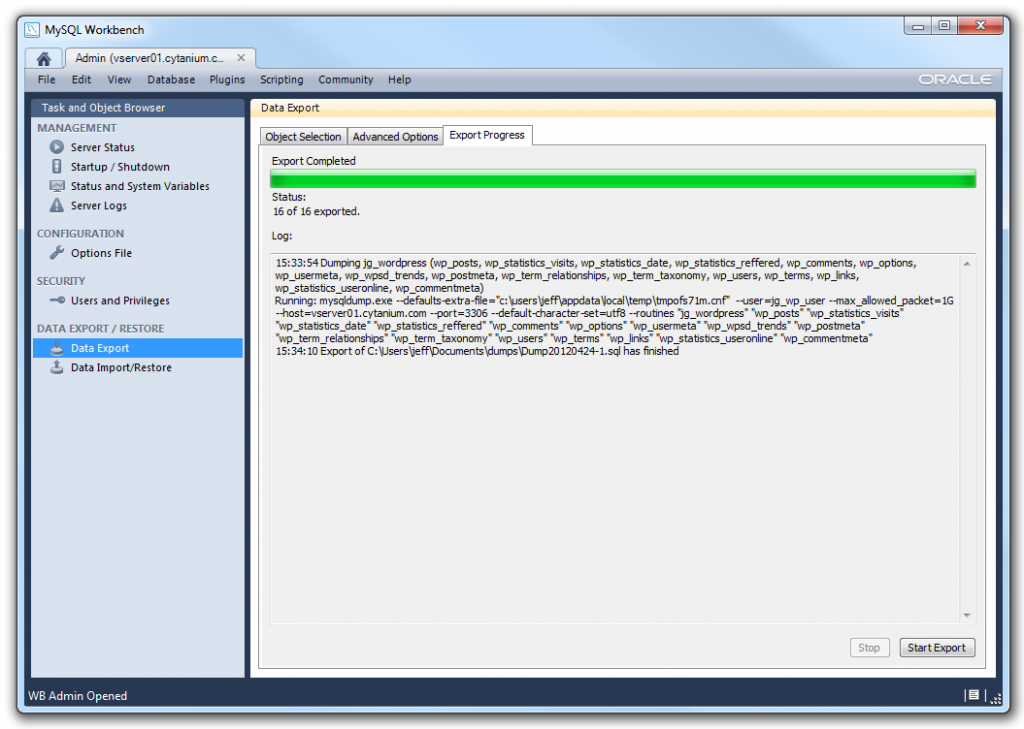
Select your database, export to a self-contained file, and dump stored routines. Click Start Export when ready. MySQL WorkBench will then export the database schema and data to a .sql file you can use to restore your database.

Razor ASP.NET web pages and CSHTML Forbidden errors

Recently, we had a support request come through for Cytanium’s ASP.NET 4.5 beta from a user trying to access an app written for ASP.NET web pages with Razor syntax. After publishing the files, the user was receiving the following YSOD:

Server Error in ‘/’ Application.


This type of page is not served.

Description: The type of page you have requested is not served because it has been explicitly forbidden.  The extension ‘.cshtml’ may be incorrect.   Please review the URL below and make sure that it is spelled correctly.
Requested URL: /testpage.cshtml

Normally, this is indicative of incorrect Application Pool settings. Razor syntax only works with ASP.NET 4.0 and requires the Integrated Pipeline to function properly. However, you also need to appropriate ASP.NET MVC files on the server – either in the GAC or deployed to your local /bin folder. Most people have ASP.NET MVC GAC’d on their development systems, so the application will work locally without having the appropriate DLL’s in the /bin folder of the web application. But that’s not necessarily the case on the server side. Per Microsoft’s recommendation, ASP.NET MVC is not GAC’d on the servers as there could be version issues that have a wide impact on all sites running on a shared host. Rather, it is recommended to bin deploy ASP.NET MVC DLL’s to each site. Once the appropriate DLL’s are in the /bin folder, and the app is running under ASP.NET 4.0 Integrate Pipeline, IIS will serve files written with Razor syntax.

Server 2008 R2 SP1 Hyper-V Dynamic Memory Settings

While working on a recent project for Cytanium Windows VPS Servers, I uncovered a little documented feature that I thought was new for Windows 8 Hyper-V, but was actually implemented in 2008 R2 SP1. It has to do with the minimum and maximum values for VM’s using Dynamic Memory in Hyper-V. The GUI exposes the concept of startup memory and maximum memory, where startup is the amount exposed to the VM while booting as well as the minimum amount of RAM the hypervisor will allocate to the VM, and maximum being the limit the VM will consume.

While working through the WMI API, I stumbled across this:

http://msdn.microsoft.com/en-us/library/cc136856(v=vs.85).aspx

Limit – The maximum amount of memory that may be consumed by the virtual system. For a virtual system with dynamic memory enabled, this represents the maximum memory setting.

Reservation – Specifies the amount of memory guaranteed to be available for this VM. For a virtual system with dynamic memory enabled, this represents the minimum memory setting.

VirtualQuantity – The total amount of RAM in the virtual system, as seen by the guest operating system. For a virtual system with dynamic memory enabled, this represents the initial memory available at startup.

So, there’s actually three settings where VirtualQuantity and Limit map to the startup and maximum values in the GUI. But what about Reservation? This is actually the minimum amount of memory the hypervisor will allocate for a VM. When you configure startup memory in the GUI or via SCVMM, it’s actually setting VirtualQuantity and Reservation to the same values. The reasoning behind this is simple – Microsoft wants to protect you from yourself. By setting the VirtualQuantity to something larger than the Reservation, you could potentially encounter a scenario where a VM reboots, and the host does not have enough memory to satisfy the VM, and has to power down the VM. This is a non-issue in Windows 8 because of Smart Paging.

On the flip side, the value specified in VirtualQuantity is also the amount of memory reported in the VM during boot. So this can cause confusion for some users because the VM may only report the VirtualQuantity on startup, and will always only report the high watermark of RAM allocated – which is typically less than the maximum available to the VM. To prevent this, we can set the VirtualQuantity value to the same as the Limit, and then set the reservation value to the minimum required to run the Operating System. This ensures that the VM always reports the maximum amount of memory available to it, while still allowing the hypervisor to dynamically allocate only what’s necessary to run the workload.

Ben Armstrong has a great post outlining how this can be done via WMI:

http://blogs.msdn.com/b/virtual_pc_guy/archive/2010/09/15/scripting-dynamic-memory-part-5-changing-minimum-memory.aspx

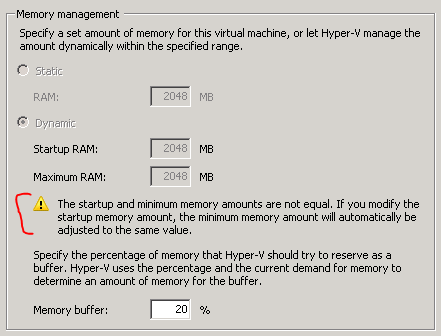
Once you change these values, the GUI actually recognizes the change and warns that modifying the settings will revert to default behavior:

But the actual values behind the scenes:

Limit:                  2048
Reservation:       512
VirtualQuantity:  2048

Shortly after booting, Hyper-V recoups the unused RAM:

But the VM still reports the high watermark:

One potential downside to doing this is that the amount of in-use RAM could be reported incorrectly inside the VM. However, based on my testing, this occurs when using Dynamic Memory via traditional methods as well. The problem is that Windows calculates in use RAM by subtracting available RAM from total RAM. So, for the above VM, the amount of in use RAM is report as ~1.8GB, rather than the ~600MB that’s actually in use by the VM at startup. Do note however, that this occurs anytime a VM is using Dynamic Memory and bursts above the startup value. The VM always reports the high watermark and encounters the same miscalculation of available memory if the memory demand decreases.

Running Windows 8 Server from a USB Flash Drive with Phison Controller

Since I deployed my HP Proliant Microserver, I had been running ESX from a USB flash drive. Now that Windows 8 Beta is available, I wanted to test out some of the new Hyper-V features in my home lab. All the talk about Windows To Go had me thinking it would be a good test to run Windows 8 Hyper-V server from a USB flash drive. After all, deploying Microsoft Hyper-V Server 2008 R2 on a USB Flash Drive was already supported.

I found a good tutorial about running Windows 8 Developer Preview from a UFD which outlines the process. If you’ve used WAIK before, then you’re familiar with the process which basically involves creating the partitions on disk, and then applying a WIM file to the partition. This process works great for Consumer edition on many UFD’s, however, Windows To Go is not supported with server edition. That doesn’t mean Windows 8 Server cannot be installed to a UFD though – it just means that the same rules apply as 2008 R2.

Specifically, the UFD needs to have it’s Removable Media Bit set to 0. This is a setting in the UFD’s controller that tells Windows how to treat the device. Typically, when you attach a UFD, Windows classifies the device as a Removable Disk:

There’s a couple of limitations that come with Removable Disks in Windows though. Specifically, you can’t create multiple partitions on them (even if you do via other partitioning methods, Windows will only show you the first partition), and you can’t run Windows directly from them. So, in order to deploy Windows 8 server to a UFD, the RMB needs to be set to 0.

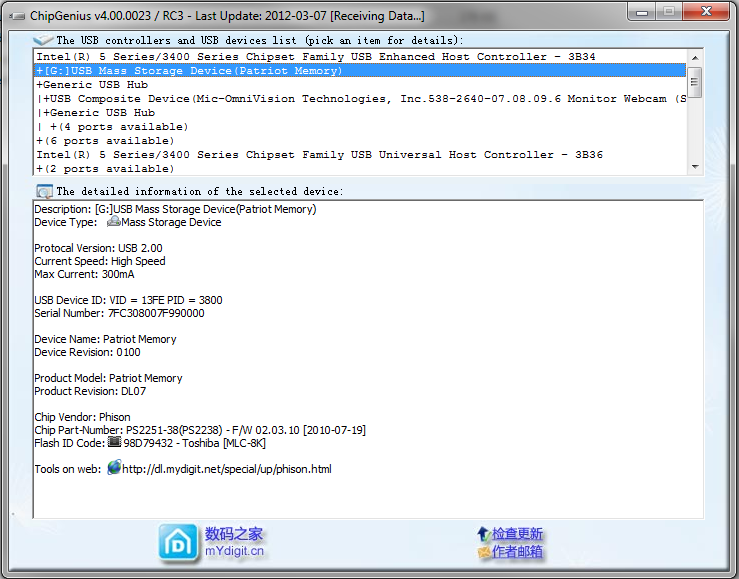
Some UFD manufacturers provide utilities to set this. Lexar has the BootIt utility for instance. This utility may work for UFD’s manufactured by others provided it’s using the same controller. After some searching, I came across and excellent thread that described how to flip the Removable Media Bit for non-Lexar UFD’s. The ChipGenius and USBDeview utilities will give you detailed information about the Controller in the UFD:

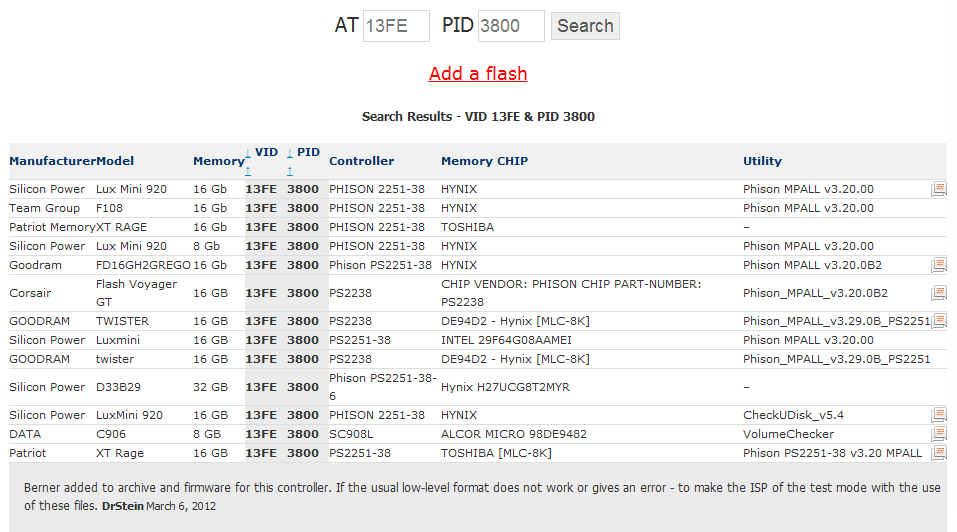
This tool provides a few critical pieces of information: The Chip Vendor, Part Number, VID and PID. Using the VID and PID, you can find out if there is a tool available that will allow you to program the UFD controller. Head over to the Russian site flashboot.ru (I recommend using Chrome and you can auto-translate the page) and enter your VID and PID. This will list all known UFD’s matching those ID’s and let you know what utility you can use to program the controller, as well as helpful hints from other users. In my case, the Patriot XT Rage 16GB UFD showed up in the list:

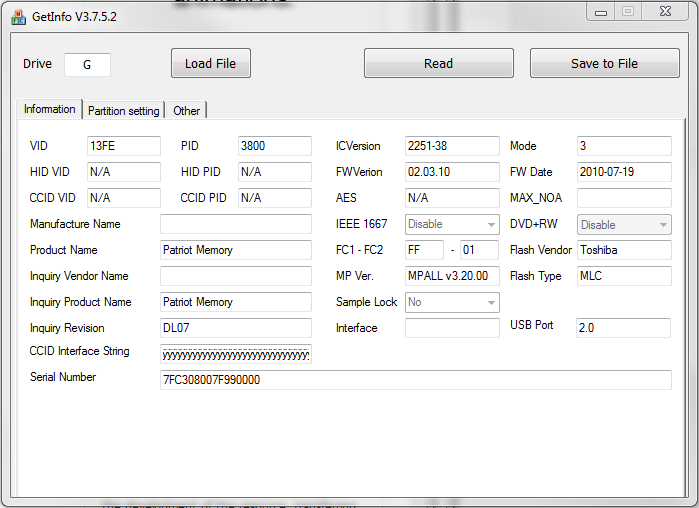
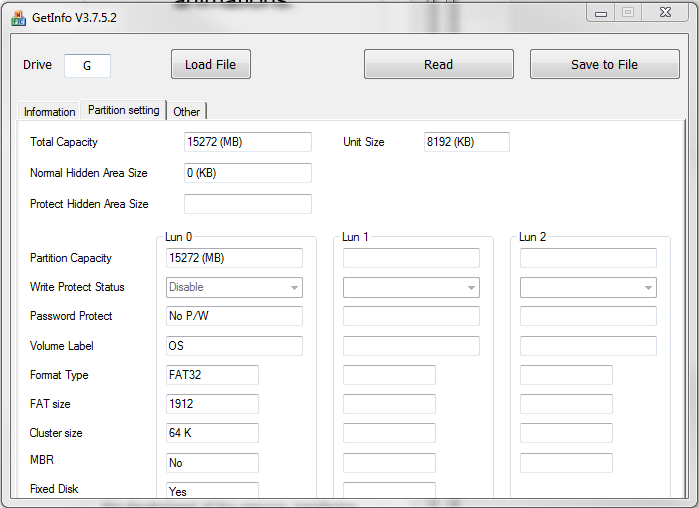
In my case, I needed to use Phison’s MPALL tool (version 3.20) to program the Phison PS2251-38 controller on the Patriot XT Rage 16GB UFD. FlashBoot.ru has a catalog of all utilities for Phison controllers and I was able to easily download the necessary version. Inside the MPALL archive, you’ll find a few utilities. The first is GetInfo which displays current configuration of the controller:

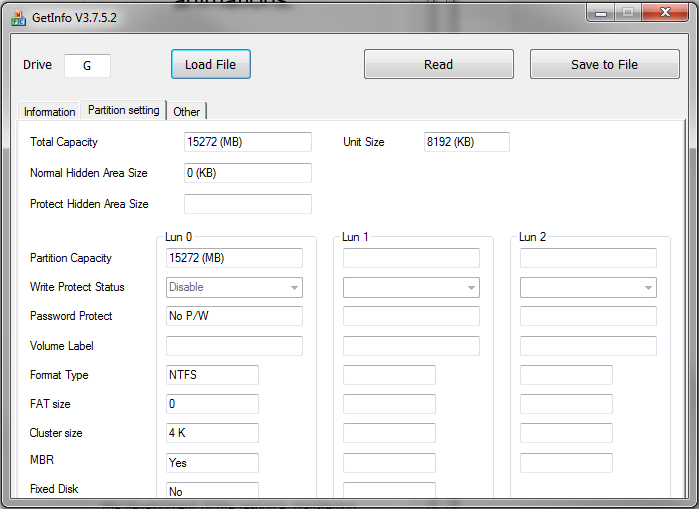
The second tab has partition information:

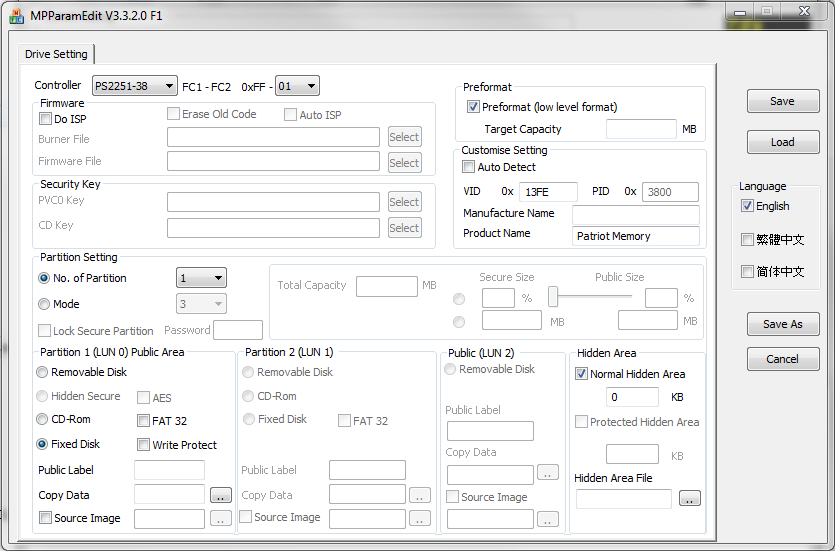
Notice the Fixed Disk setting of “No” – this is the RMB on Phison controllers. All that’s necessary is for us to update that using the other utilities in the archive. It took some testing/tweaking to figure out how things work with the Phison USB Mass Production Tool, and admittedly I’m a bit fuzzy on the specifics. However, it looks as though there are two controller configuration sections that need updating: F1 and F2 (I haven’t been able to find what these mean, but they seem to be common to all UFD’s). There are two Parameter Editor utilities that generate INI files that can then be used by the flash utility, one for the F1 configuration (writes to a MP.INI file) and one for the F2 configuration (writes to the QC.INI file). In here, we can set the UFD to be a Fixed Disk:

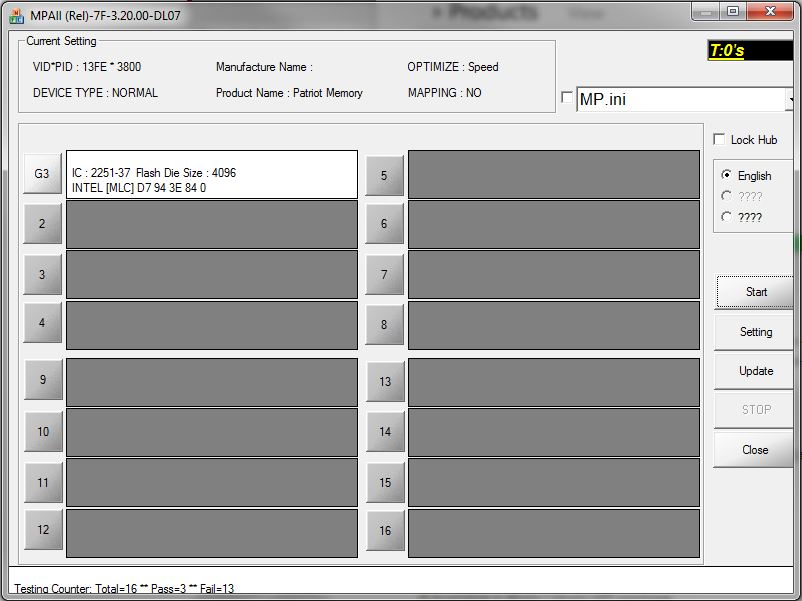
You will find all of the necessary information from the GetInfo screen for the Controller, FC1-FC2 settings, the VID and PID’s, etc. Once you have your settings in place, hit save to write them to the MP.ini file. From there, you can use the MPALL F1 utility to write the configuration to the UFD. When performing this procedure, ensure that ONLY the UFD you want to program is connected. Insert the USB flash drive, click the Update button which will populate the various boxes with ANY UFD found that has a Phison controller. Once it’s detected, click Start to program.

Once F1 is done, you’ll need to do the same for F2. I was unable to get it to successfully update the F2 settings using any of the versions, however, even though the MPALL F2 utility reported an error, GetInfo did show that both F1 + F2 where set on the controller after the update. A few notes that may save you some time:

  •  I’m not sure where the “MAPPING” setting comes from, but when I created my MP.INI and QC.INI files using the ParamEditor utilities, the MPALL utilities would not find my UFD. I had to add MAPPING=0 to the Configuration section of both files.
  • The Inquiry Version of my UFD was PMAP to start and though I had it set in MP.INI, the MPALL F1 utility changed to to DL07. Because of this, my QC.ini had to have Inquiry Version set to DL07 in to avoid a Incorrect Inquiry Version error message.

Once this is done properly, the partition will show as a fixed disk:

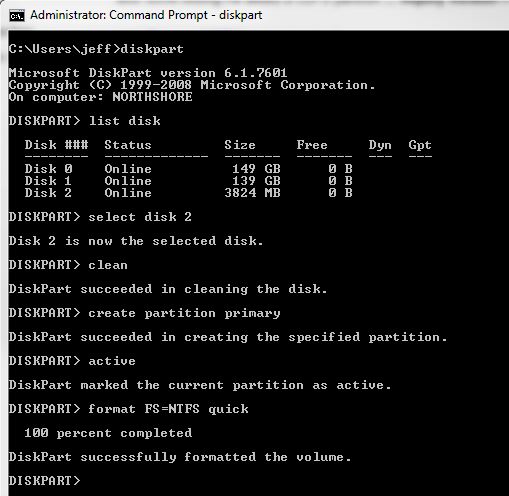
Now that we have a UFD with the RMB set to 0, we can proceed with deploying Windows 8 to it. Obviously, the FAT32 partition the pre-format created won’t work for Windows 8, so we’ll need to clean out that information. We’ll use diskpart for this – run the following commands from a command prompt:

select disk X
clean
create partition primary
active
format FS=NTFS quick

This will delete the existing partition table, create a new primary partition and mark it as active and then format it as NTFS. Now, we can use the imagex utility (available as part of the WAIK) to apply the install.wim file to the UFD. Either mount the ISO or insert the DVD and apply the image to the UFD:

imagex /apply F:\sources\install.wim 4 G:\

The number 4 is the index of the image in the WIM file to be applied. The Windows 8 beta media has multiple available (Standard Core, Standard w/ GUI, Datacenter Core, and Datacenter w/ GUI) so I’m applying Datacenter w/ GUI by selecting index 4. You can read the available options by using the imagex /info F:\sources\install.wim command. Once the image has been applied, we need to write a boot record using bcdboot:

bcdboot G:\windows /s G:\

If you’ve done everything correctly, you should now have a bootable UFD with a base install of Windows 8 Server that is recognized as a non-removable hard disk:

Fix Unresponsive iPhone 4 Home Button

**UPDATE: This procedure worked for a while, but the issue eventually returned. I repeated the procedure again and again, each time it would work for a bit and then the issue would return. Last night, I dismantled my iPhone, cleaned the home button contacts and re-assembled it and it’s working again. Hopefully, that will take care of this issue once and for all. I used the guide on ifixit.com to remove the home button: http://www.ifixit.com/Guide/Installing-iPhone-4-Home-Button/3144/1

**UPDATE 2: It’s be over two months and no signs of the issue returning since disassembling my phone and cleaning the contact for the home button. Definitely seems to be the long term fix.

**UPDATE 3: Nearly 5 months after I took my phone apart and cleaned the home button, it was still working as if new. I decided to upgrade to the iPhone 5 and I’ve sold my iPhone 4 to NextWorth. They determined it was in excellent condition FWIW.

I’ve been dealing with an unresponsive iPhone 4 Home Button for some time. Clicking the home button registered roughly one out of every 10 clicks. I had a tough time getting to the home screen or getting the task manager to load. During halftime of last night’s Pats/Jets game (Go Pats!) I decided to see if I could find a fix for it.

As I suspected, most resolutions were about heading to the Apple store for a replacement or taking apart your iPhone and replacing the home button PCB membrane & flex cable – not a quick or easy fix. I had replaced the battery on my original iPhone once, so I was not really keen on attempting to take apart the phone and I opt’d not to purchase AppleCare so I’m out of warranty. However, I stumbled across this YouTube video that had an easy fix.

The gist of it is that there’s a “gunk” build-up around & behind the home button (makes sense – just look at your keyboard). The user recommends using rubbing alcohol to attempt to clean it out and ensure good contact. I gave it a shot as described in the video, and voila! My iPhone 4 now registers every home button click without issue.

VMFS Resource Temporarily Unavailable

I was performing some maintenance on a few VMFS LUNs and came across a few files for a VM that I knew were no longer in use. There were a couple of old snapshot files and a VMDK that had been renamed when doing a restore.

After confirming the files were no longer needed or in use, I attempted to remove them using the rm command. ESXi reported back the following error:

rm: cannot remove ‘.vmdk’: Resource temporarily unavailable

After some quick research, I realized it was likely a file lock that was causing the error. VMFS allows access from multiple ESXi servers at the same time by implementing per-file locking. That likely meant that an ESXi host other than the current owner of the VM had a lock on the file. The cluster was small enough that I was able to simply log in to each host and attempt the delete. After 3 attempts, I found the host with the lock to the files and was able to successfully delete them from the VMFS store.

I had tried removing the files via the datastore browser in vSphere hoping that it would be smart enough to know which host had the lock on the file, and issue the delete the command on that host – but no such luck. There was a way to detect which host had a lock on the files in ESX, but I have not found a similar mechanism in ESXi. Until then, trial and error will suffice.

Multithreaded Powershell Port Scanner

We recently had to perform a hardware upgrade of a perimeter firewall. Doing so is a major undertaking, and while we have very good documentation, it’s always important to do some real-world testing.

To facilitate this, we needed to perform some port scanning from outside our network to ensure that A) All of our firewall rule documentation matched what was actually configured, and B) Ensure a smooth transition to the new hardware. Most port scanners I found were capable of scanning a port range for a given IP set. But I wasn’t able to find much of anything that could take specific IP/port data and return the results. I had previously written a simple ASP.NET application to do this, but it wasn’t designed for testing large datasets.

ASP.NET Port Scanner

So, I decided Powershell was the best bet. There were several available examples, but nothing that truly did what we needed. I was able to pull several resources together and came up with the attached Powershell script. Credit for the port detection goes to Boe Prox, to Gaurhoth for the IP range powershell functions, and to Oisin Grehan for the multithreading code.

The result is a script that takes a CSV input and outputs the results to CSV. You can specify IP addresses (eg. 192.168.100.1), CIDR subnets (192.168.1.0/24, 10.254.254.16/28, and/or IP ranges (10.0.1.1-10). The services.xml file in the bin folder contains a powershell object with port settings for various well-know ports and can be modified to meet your needs. Port cans be specified using their well-known name (eg. SMTP, RDP, HTTP) or in a protocol/portNum format (eg. tcp/80, udp/53, tcp/4900-4910).

Scanning is fairly quick:

PS D:\temp\portscanner> .\PortScanner.ps1 Importing Data from .\externalrules.csv
Imported 3033 targets
Flattening targets into endpoints
There are 3996 to scan
Begin Scanning at 07/08/2011 15:58:31
Waiting for scanning threads to finish...
We scanned 3996 endpoints in 399.1811698
Exporting data to .\results.csv

Happy networking!

portscanner