Compare Two Directories with Powershell

We use DFS to keep webfarm nodes’ content in sync and ran across a problem where a directory with thousands of files and folders had one missing file on a replica. Here’s a quick script we used to find out what files were missing:

$dir1 = “\\server1\c$\folder1”
$dir2 = “\\server2\c$\folder1”
$d1 = get-childitem -path $dir1 -recurse
$d2 = get-childitem -path $dir2 -recurse
$results = @(compare-object $d1 $d2)

foreach($result in $results)
{
$result.InputObject
}


Directory: \\server1\c$\folder1\subfolder

Mode LastWriteTime Length Name
—- ————- —— —-
-a— 2/16/2012 4:08 PM 162 ~$README.txt

This will output all of the files and directories that exist in only one location.

Server-side workaround for BEAST SSL vulnerability on IIS

Recently, a vulnerability in the CBC cipher suite used in the SSL and TLS protocols was discovered that could allow an attacker to gain access to encrypted information. While the attack is not easily implemented, it will show up on compliance audits and auditors don’t like that. Fortunately, there is a server-side fix for Server 2008 and above that can be easily implemented without breaking compatibility with clients.

More information about the attack and workarounds can be found here: http://blogs.msdn.com/b/kaushal/archive/2011/10/03/taming-the-beast-browser-exploit-against-ssl-tls.aspx.

The workaround is to enable TLS 1.1 and/or 1.2 on servers that support it, and prioritize cipher suites so RC4 takes precedence over CBC. Server 2008 R2 and above supports TLS 1.1 and 1.2 – you can enable those protocols by following the instructions in KB 2588513. You’ll also want to change the priority of cipher suites on all Server 2008 and above systems using group policy (either a local group policy object for a single server, or by modifying domain policy in an AD environment).

1. Open Group Policy Editor (locally, Start>Run>gpedit.msc).
2. Browse to Computer Configuration>Administrative Templates>Network>SSL Configuration Settings.
3. Modify SSL Cipher Suite Order: set it as enabled, and enter a comma delimited list of cipher suites. I recommend the following:

TLS_RSA_WITH_RC4_128_SHA,TLS_RSA_WITH_RC4_128_MD5,SSL_CK_RC4_128_WITH_MD5,TLS_RSA_WITH_AES_128_CBC_SHA,TLS_RSA_WITH_AES_256_CBC_SHA,TLS_RSA_WITH_3DES_EDE_CBC_SHA,TLS_ECDHE_ECDSA_WITH_AES_128_CBC_SHA_P256,TLS_ECDHE_ECDSA_WITH_AES_128_CBC_SHA_P384,TLS_ECDHE_ECDSA_WITH_AES_128_CBC_SHA_P521,TLS_ECDHE_ECDSA_WITH_AES_256_CBC_SHA_P256,TLS_ECDHE_ECDSA_WITH_AES_256_CBC_SHA_P384,TLS_ECDHE_ECDSA_WITH_AES_256_CBC_SHA_P521,TLS_ECDHE_RSA_WITH_AES_128_CBC_SHA_P256,TLS_ECDHE_RSA_WITH_AES_128_CBC_SHA_P384,TLS_ECDHE_RSA_WITH_AES_128_CBC_SHA_P521,TLS_ECDHE_RSA_WITH_AES_256_CBC_SHA_P256,TLS_ECDHE_RSA_WITH_AES_256_CBC_SHA_P384,TLS_ECDHE_RSA_WITH_AES_256_CBC_SHA_P521,TLS_DHE_DSS_WITH_AES_128_CBC_SHA,TLS_DHE_DSS_WITH_AES_256_CBC_SHA,TLS_DHE_DSS_WITH_3DES_EDE_CBC_SHA,SSL_CK_DES_192_EDE3_CBC_WITH_MD5,SSL_CK_DES_64_CBC_WITH_MD5

4. Reboot the server for the setting to take effect.

Troubleshooting Error 0xC004F042 after installing new KMS key

We recently installed KB 2757817 on our Server 2008 SP2 KMS host to support Server 2012 installations. Following the instructions, we used the slmgr script to install the new Server 2012 product key and activate the KMS host. However, after doing so, attempting to activate a Server 2012 client using slmgr /ato gave us error 0xC004F074 suggesting that it could not contact the KMS server. After ensuring that the KMS server was accessible from the client and that the DNS records were registered properly, I checked Event Viewer on the client and found this entry:

Log Name: Application
Source: Microsoft-Windows-Security-SPP
Date: 10/14/2012 11:24:07 AM
Event ID: 12288
Task Category: None
Level: Information
Keywords: Classic
User: N/A
Computer: client.domain.com
Description:
The client has sent an activation request to the key management service machine.
Info:
0xC004F042, 0x00000000, kmshost.domain.com:1688

According to KB 938450, this error means a mismatch between the client and server KMS keys, however the KMS host was properly reporting the key as VOLUME_KMS_2012_C. I found a thread that suggested removing the key, rebooting, installing the key, activating and rebooting again to resolve a similar issue with 2008 R2. Given that this is a production system, rebooting outside of a maintenance window isn’t possible, however, that gave me the idea that the KMS service may cache the key. Sure enough, after restarting the Software Licensing Service on the KMS host, we could successfully activate Server 2012 client systems.

Must have addons for Windows 8

I recently upgraded both my desktop and MacBook Pro to Windows 8. I was a bit reluctant since I rely heavily on the desktop experience of Windows 7 for work. While the Metro UI is great for tablets, I’ve found it cumbersome to use as a desktop. I started pinning items to the taskbar with Windows 7, so using that same functionality in Windows 8 has made things a lot easier. Here are a few recommendations to make your Windows 8 system more desktop friendly:

1. Windows 7 Style start menu. My preference is Start8 from Stardock. It’s a simple install and works flawlessly. Performance is excellent and with the exception of right-clicking on Computer to get to the System applet in Control Panel, it works exactly as the Windows 7 start menu.

2. Gadgets. I was apparently one of the few users who liked and relied upon gadgets. There’s so many things vying for my attention on my desktop, Gadgets were a great way for me to watch system resources, server response times, twitter updates, and access music quickly. There’s a few solutions available over at ghacks.net, but my favorite is the 8Gadget Pack. It includes a bunch of the Gadgets I already used and it’s a clean install rather than dumping pre-RTM bits on a RTM system. One drawback is that it’s a Vista style sidebar instead of Windows 7 style, but nearly all of my gadgets (All CPU Meter, Drives MeterRemote Desktop Gadget, Server PingTweetz, and my own WAAF Gadget) worked without issue. I couldn’t get the in-box RSS reader to work, but that could be that I’m using Office 2013 preview.

3. Media Center. Again, I must have been one of the few users who loves this feature. While it’s not completely going away in Windows 8, it’s no longer inbox. Furthermore, it’s not available until October 26th – which makes no sense to me. Since I’ve already upgraded my laptop to Windows 8 and I rely on Media Center to connect up my OTA antenna so I can get out of market NFL games from distant stations, I needed a work around. Luckily, Tom Keating has a great blog post describing his attempts Installing Media Center in Windows 8 Pro RTM. While I don’t recommend using a pirated key, this *should* get you by until the 26th when you can revert back to your existing key. I should mention that initially, I had installed using the Windows 8 Pro VL media from my MSDN subscription and that “Add features to Windows 8” is ONLY available in the Retail version. So I had to re-install the OS on both my laptop and desktop using the proper media to get that option to even show up.

4. Acrobat Reader. I thought having an in-box PDF reader would be an awesome addition to Windows 8 – until I found out that it’s Metro only. So that means when I need to open up invoices so I can enter them into an Excel spreadsheet, I have to keep switching between Metro and Desktop. Highly annoying and extremely unproductive. You’ll still need Adobe’s Acrobat Reader if you plan on actually using PDF’s.

Have favorite tools/tweaks for your Windows 8 installation? Post them in the comments section.

Features on Demand in Server 2012

Windows 8 and Server 2012 introduce a new concept of Features on Demand whereby each installation contains only basic components. Adding new components requires the OS to gather source files from an external location for installation. This is a move away from Server 2008 and Server 2008 R2 where an installation contained everything necessary to service the installation. When adding new features, Windows would simply use its locally cached installation sources.

This was a great concept for home users who no longer needed to worry about having source media, and it resolved a lot of problems for IT administrators having to deal with missing files for patching. The problem was that it drastically increased the size of every installation in the datacenter, chewing up tons of un-needed space. With Server 2012, Microsoft has found a decent balance between the two – provided you configure your environment appropriately.

By default, Server 2012 will go out to Windows Update any time it’s looking for a feature for which it does not have the source files. For example, a common feature that many programs still use for which Windows does not cache installation files locally is the .NET Framework 3.5. Under normal circumstances, you’ll simply use Server Manager to add the new features and never notice the difference. However, if you have a WSUS configured or if the server does not have Internet access, you might see the following error:

Update NetFx3 of Package Microsoft .NET Framework 3.0 failed to be turned on. Status: 0x800f0906.

The error means that Windows was unable to find appropriate source installation files to add the feature. This is because WSUS doesn’t currently support the new Features on Demand functionality in Server 2012. There are a few ways to workaround this issue.

First, you can specify a source from the command line using the Enable-Feature and Source switches for the DISM tool (or -Source parameter from the Install-WindowsFeature powershell command). You can then point to the X:\Sources\Sxs directory to proceed with the installation. The GUI will also allow you to specify this alternate source via the Add Roles and Features Wizard via a yellow warning banner on the confirmation screen.

Second, you can use a GPO or modify the registry to tell Windows to by-pass your WSUS server and go directly to Windows Update when servicing your Server 2012 installation. There are two REG_DWORD values that control this behavior located under [Software\Microsoft\Windows\CurrentVersion\Policies\Servicing]. The first is UseWindowsUpdate – setting this to 2 tells Windows to NEVER go to Windows Update for enabling features. The second is RepairContentServerSource – setting this to 2 tells Windows to go to Windows Update for repair source only (does not affect servicing). Both of these can be controlled via GPO (new Servicing.admx template) under Computer Configuration > Administrative Templates > System > Specify settings for optional component installation and component repair.

Last, you can use a GPO or modify the registry to point Windows to a list of installation source locations – similar to functionality in Server 2003 and XP. These can either be a copy of the X:\Sources\Sxs directory from installation media, or the actual WIM file (either install.wim from installation media or a copy of your company’s customized WIM image). Again, the value is located under [Software\Microsoft\Windows\CurrentVersion\Policies\Servicing]. Setting the REG_EXPAND_SZ value named LocalSourcePath allows you to specify one or more installation source locations (separated by a semicolon). To point to a WIM file, use the following format:

WIM:[path to wim]:[index]

You must specify the index so Windows knows where to find the appropriate installation files for your Server 2012 instance. The nice thing about using a WIM file is that you can perform offline servicing of the image to ensure that it always contains the latest patches and updates.

Error creating Server 2012 cluster on 2008 domain

We worked with Microsoft extensively throughout the Server 2012 TAP program providing feedback in various areas. We encountered an issue late in the program when creating a Server 2012 cluster on our production domain. We did not see this same issue in any lab environment, or in our development environment which mirrors production.

When attempting to create the cluster, the wizard would fail when creating the AD objects. We confirmed that the user had proper permissions, and did not encounter the same issues creating 2008 or 2008 R2 clusters on our production domain. After working with Microsoft, they recommended we install KB 976424 on our production domain controllers. After installing this hotfix and rebooting all of the domain controllers, we were able to create a Server 2012 cluster on our 2008 domain without issue.

Patching Server 2012 using Solarwinds Patch Manager

**UPDATE: Microsoft released KB 2734608 on August 24th, 2012 that describes a patch for WSUS 3.0 SP2 to support Windows 8 and Server 2012 which makes this procedure unnecessary unless you want to take advantage of new features supported in WSUS on Server 2012.

**NOTE: The configuration described here is not supported by SolarWinds.

With Server 2012 RTM around the corner, we’re working diligently to ensure that our infrastructure is configured appropriately to support it. Part of the excellent service OrcsWeb provides is managed Windows patching for all of the systems on our network. We pride ourselves in ensuring the best possible hosting experience, so deploying Microsoft critical and security patches in a timely manner is a must.

In order to patch a Server 2012 system, you must use a Server 2012 system running the WSUS role – WSUS 3.0 SP2 will not work with Server 2012. The reason is an incompatibility between the Windows Update client on Server 2012 and the WSUS server. That being said, a Server 2012 system running the WSUS role, can provide updates to Windows Server 2003, Server 2008, Server 2008 R2, and Server 2012 clients – provided they have the client update of KB 2720211. Using GPO’s, you could then configure your systems to connect to your WSUS server, and patch themselves during an appropriate window. We utilize Solarwinds Patch Manager (formerly EminentWare Extension Pack) to compliment WSUS for our environment. It provides additional functionality like the ability to publish 3rd party updates via WSUS (for Dell firmware & drivers, or Adobe updates for instance) and pushing patches during discrete windows – something our customers have asked for time and again.

Unfotunately, even the current beta version of Patch Manager (version 1.8) cannot be installed on Server 2012 (at the time of this writing), so that leaves us without a fully supported way of patching our Server 2012 systems. That being said, anyone in the IT industry knows *supported* and *it works* are two completely different concepts. Using a decentralized architecture, we are able to leverage a Server 2012 system running the WSUS role and Patch Manager 1.8 beta running on Server 2008 R2 with the WSUS 3.0 SP2 console to successfully patch Server 2012 clients.

I’ve outlined the steps below to accomplish this:

  1. Install the WSUS role on a Server 2012 system (we’ll call this WSUS-SERVER).
  2. Configure WSUS-SERVER to synchronize updates and arrange computers into groups like you would in previous versions of WSUS.
  3. Configure a GPO for domain clients to use WSUS-SERVER to receive updates.
  4. Install the WSUS 3.0 SP2 console on a Server 2008 R2 SP1 system (we’ll call this PATCH-SERVER).
  5. Connect to WSUS-SERVER from the WSUS 3.0 SP2 console on PATCH-SERVER.
  6. Install Patch Manager 1.8 Beta on PATCH-SERVER.
  7. During the configuration of Patch Manager, select WSUS-SERVER as your WSUS server and DO NOT configure 3rd party updates (unfortunately, 3rd party update publishing does not work because of the console version mismatch).

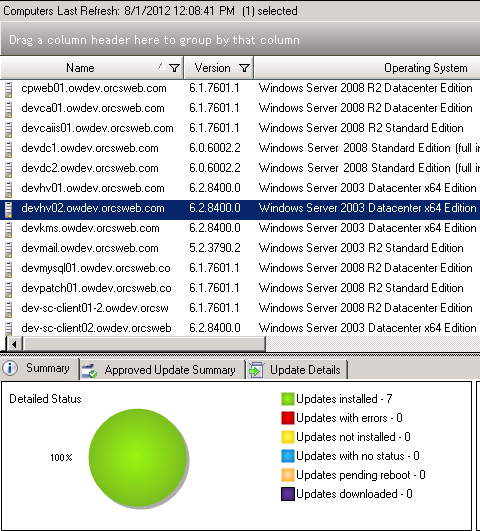
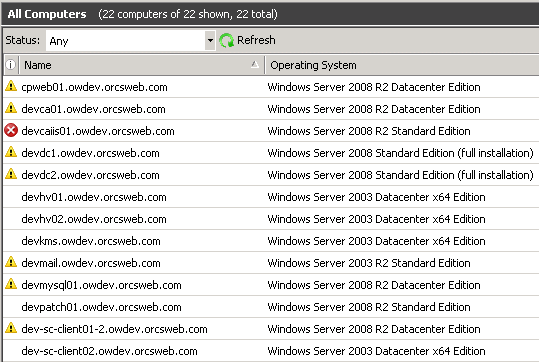
The WSUS 3.0 SP2 and Patch Manager consoles will incorrectly report the Operating System version as Windows Server 2003 x64 Edition, even though the systems are running Server 2012 RC (8400).


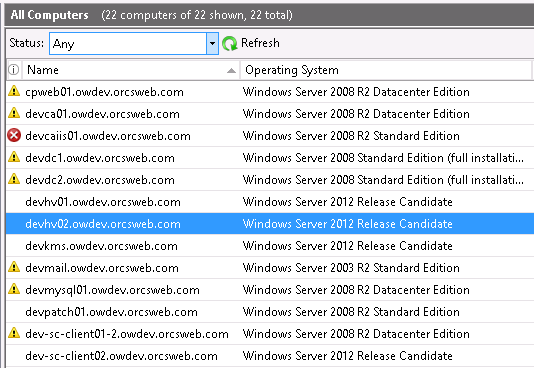
The WSUS console on Server 2012 will show the correct OS version:

Server 2012 clients can be included in standard Patch Manager jobs like any other client.

Happy Patching!


WSUS and update download failure 0x80244017

Recently configured WSUS on Server 2012 RC for a lab environment in preparation for RTM and ran into a configuration problem. Clients were failing to download updates and reporting error 0x80244017. After ensuring my RC installation was updated with KB 2627818 and that the clients had KB 2720211, I double checked that clients could access the WSUS site: https://wsusserver:8531/ClientWebService/client.asmx (you’ll receive a YSOD .NET error if you load that in a web browser, it’s normal). The C:\Windows\WindowsUpdate.log file contained the following error information:

WARNING: Download job failed because of proxy auth or server auth.
Error 0x80244017 occurred while downloading update; notifying dependent calls.

After some brief troubleshooting, I came across a post that suggested it was an authentication problem, but anonymous authentication had been configured in IIS appropriately. I compared NTFS permissions of the WSUS folder with a working installation in our production environment, and found that the local Users group did not have permissions. After granting the Users group Read permissions, clients were able to successfully download updates.

Fix Windows Update 800F0902 Error

Recently worked on a 2008 SP2 server that was receiving error 800F0902 when trying to check for updates. I confirmed access to the WSUS server manually via Internet Explorer and also confirmed no proxy settings were coming into play. I tried the age old trick of stopping the Windows Update service and renaming the C:\Windows\SoftwareDistribution folder to SoftwareDistribution.old and restarting the service. This regenerates the Windows Update configuration for you. This stubborn error survived that reset, so I finally came across a Microsoft FixIT KB article to fix Windows Update problems. I’m quite skeptical of using these, and I prefer to know exactly what’s being fixed, but without any other options, I decided to give it a try. No surprise, it said it found a configuration problem and fixed it, but the error persisted. A few other posts suggested an issue with trustedinstaller.exe (aka Windows Module Installer Service) so I gave that a restart and started receiving 80080005 errors. Another post suggested that after a reboot, this error cleared for that user. Sure enough, a reboot solved the problem for me as well.

Running Windows 8 Server from a USB Flash Drive with Phison Controller

Since I deployed my HP Proliant Microserver, I had been running ESX from a USB flash drive. Now that Windows 8 Beta is available, I wanted to test out some of the new Hyper-V features in my home lab. All the talk about Windows To Go had me thinking it would be a good test to run Windows 8 Hyper-V server from a USB flash drive. After all, deploying Microsoft Hyper-V Server 2008 R2 on a USB Flash Drive was already supported.

I found a good tutorial about running Windows 8 Developer Preview from a UFD which outlines the process. If you’ve used WAIK before, then you’re familiar with the process which basically involves creating the partitions on disk, and then applying a WIM file to the partition. This process works great for Consumer edition on many UFD’s, however, Windows To Go is not supported with server edition. That doesn’t mean Windows 8 Server cannot be installed to a UFD though – it just means that the same rules apply as 2008 R2.

Specifically, the UFD needs to have it’s Removable Media Bit set to 0. This is a setting in the UFD’s controller that tells Windows how to treat the device. Typically, when you attach a UFD, Windows classifies the device as a Removable Disk:

There’s a couple of limitations that come with Removable Disks in Windows though. Specifically, you can’t create multiple partitions on them (even if you do via other partitioning methods, Windows will only show you the first partition), and you can’t run Windows directly from them. So, in order to deploy Windows 8 server to a UFD, the RMB needs to be set to 0.

Some UFD manufacturers provide utilities to set this. Lexar has the BootIt utility for instance. This utility may work for UFD’s manufactured by others provided it’s using the same controller. After some searching, I came across and excellent thread that described how to flip the Removable Media Bit for non-Lexar UFD’s. The ChipGenius and USBDeview utilities will give you detailed information about the Controller in the UFD:
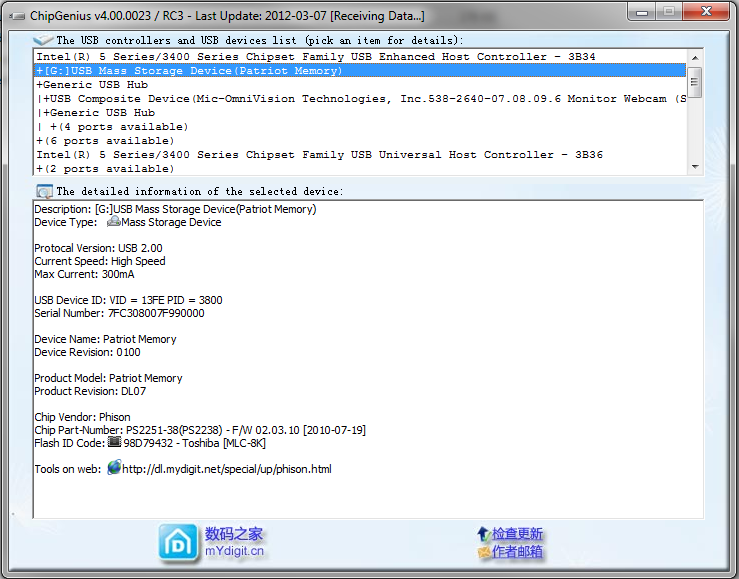
This tool provides a few critical pieces of information: The Chip Vendor, Part Number, VID and PID. Using the VID and PID, you can find out if there is a tool available that will allow you to program the UFD controller. Head over to the Russian site flashboot.ru (I recommend using Chrome and you can auto-translate the page) and enter your VID and PID. This will list all known UFD’s matching those ID’s and let you know what utility you can use to program the controller, as well as helpful hints from other users. In my case, the Patriot XT Rage 16GB UFD showed up in the list:
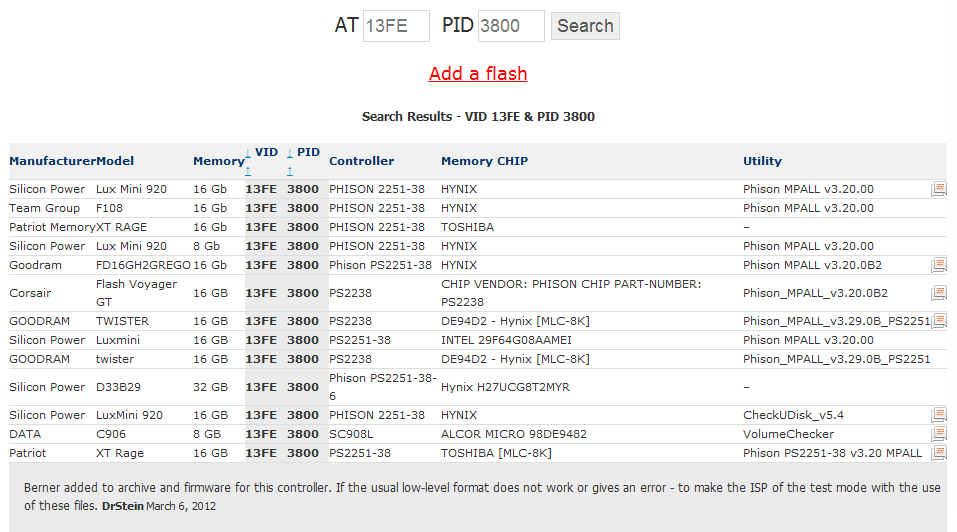
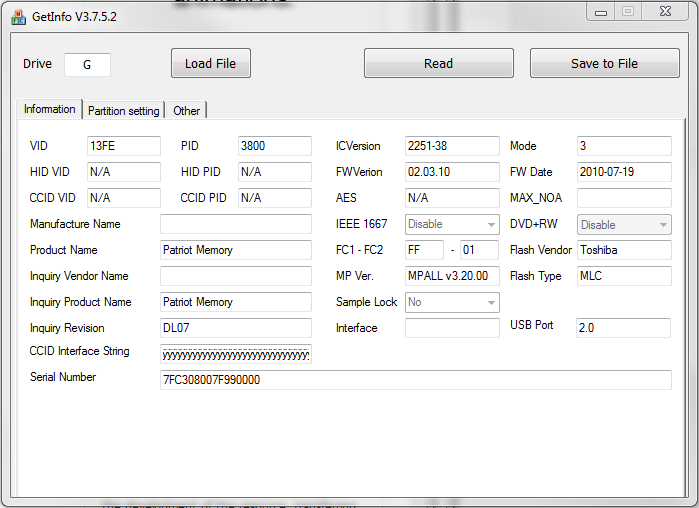
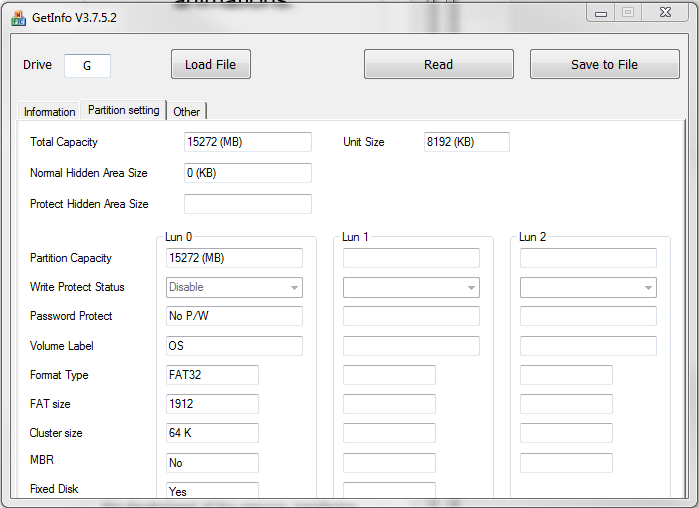
In my case, I needed to use Phison’s MPALL tool (version 3.20) to program the Phison PS2251-38 controller on the Patriot XT Rage 16GB UFD. FlashBoot.ru has a catalog of all utilities for Phison controllers and I was able to easily download the necessary version. Inside the MPALL archive, you’ll find a few utilities. The first is GetInfo which displays current configuration of the controller:
The second tab has partition information:
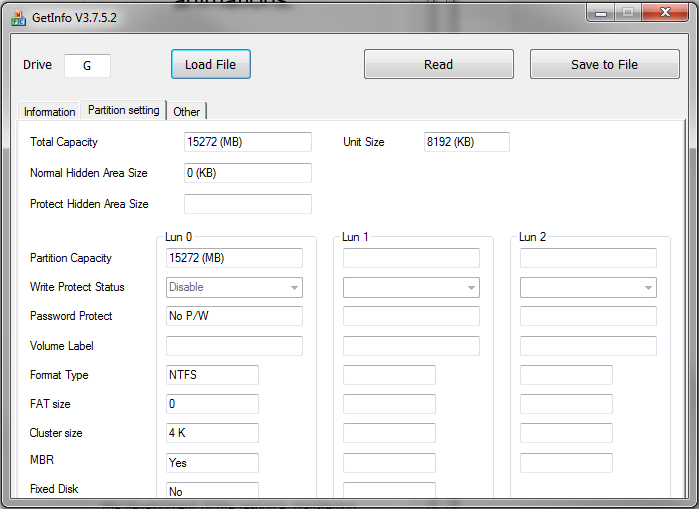
Notice the Fixed Disk setting of “No” – this is the RMB on Phison controllers. All that’s necessary is for us to update that using the other utilities in the archive. It took some testing/tweaking to figure out how things work with the Phison USB Mass Production Tool, and admittedly I’m a bit fuzzy on the specifics. However, it looks as though there are two controller configuration sections that need updating: F1 and F2 (I haven’t been able to find what these mean, but they seem to be common to all UFD’s). There are two Parameter Editor utilities that generate INI files that can then be used by the flash utility, one for the F1 configuration (writes to a MP.INI file) and one for the F2 configuration (writes to the QC.INI file). In here, we can set the UFD to be a Fixed Disk:
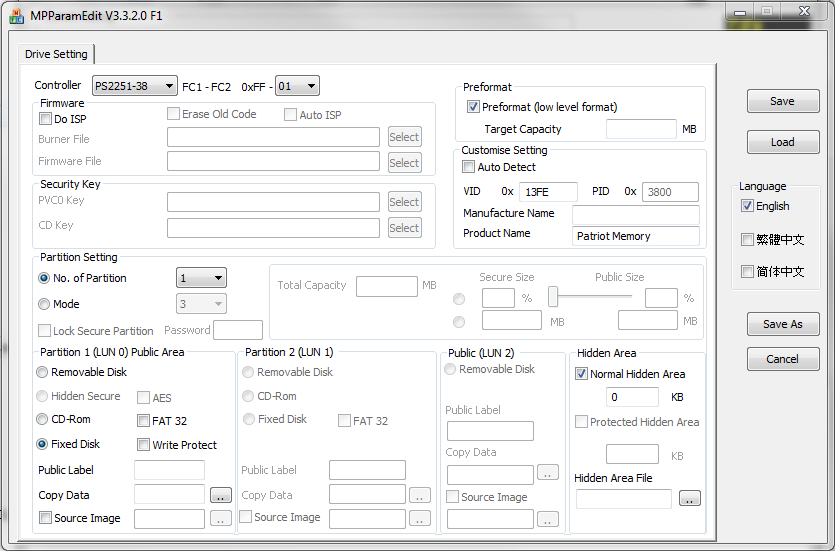
You will find all of the necessary information from the GetInfo screen for the Controller, FC1-FC2 settings, the VID and PID’s, etc. Once you have your settings in place, hit save to write them to the MP.ini file. From there, you can use the MPALL F1 utility to write the configuration to the UFD. When performing this procedure, ensure that ONLY the UFD you want to program is connected. Insert the USB flash drive, click the Update button which will populate the various boxes with ANY UFD found that has a Phison controller. Once it’s detected, click Start to program.
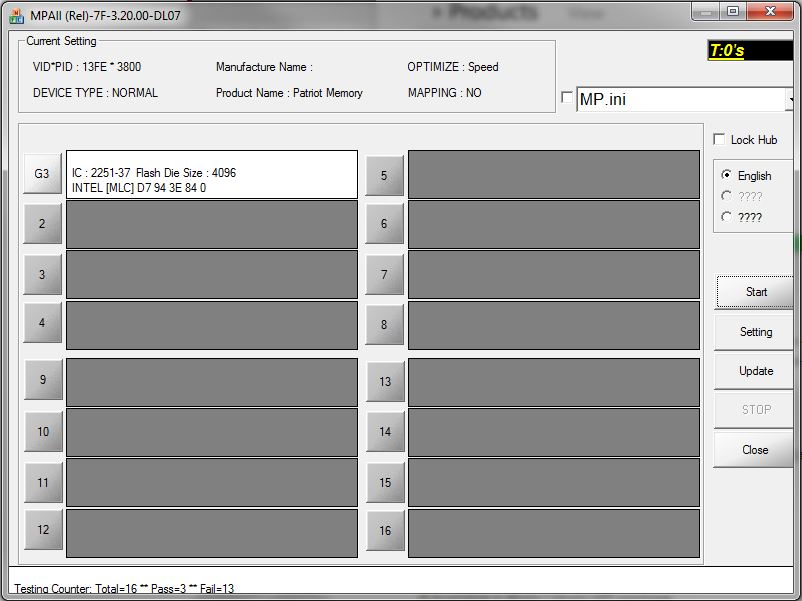
Once F1 is done, you’ll need to do the same for F2. I was unable to get it to successfully update the F2 settings using any of the versions, however, even though the MPALL F2 utility reported an error, GetInfo did show that both F1 + F2 where set on the controller after the update. A few notes that may save you some time:

  •  I’m not sure where the “MAPPING” setting comes from, but when I created my MP.INI and QC.INI files using the ParamEditor utilities, the MPALL utilities would not find my UFD. I had to add MAPPING=0 to the Configuration section of both files.
  • The Inquiry Version of my UFD was PMAP to start and though I had it set in MP.INI, the MPALL F1 utility changed to to DL07. Because of this, my QC.ini had to have Inquiry Version set to DL07 in to avoid a Incorrect Inquiry Version error message.

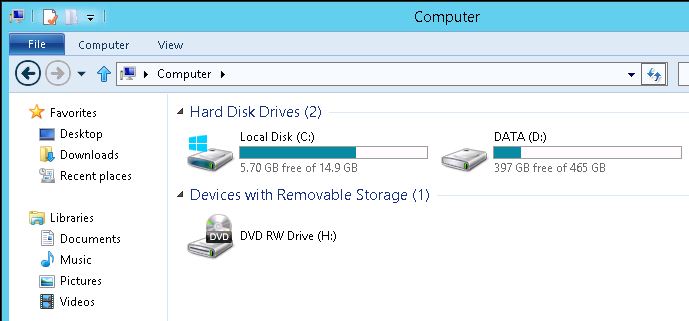
Once this is done properly, the partition will show as a fixed disk:
Now that we have a UFD with the RMB set to 0, we can proceed with deploying Windows 8 to it. Obviously, the FAT32 partition the pre-format created won’t work for Windows 8, so we’ll need to clean out that information. We’ll use diskpart for this – run the following commands from a command prompt:

select disk X
clean
create partition primary
active
format FS=NTFS quick
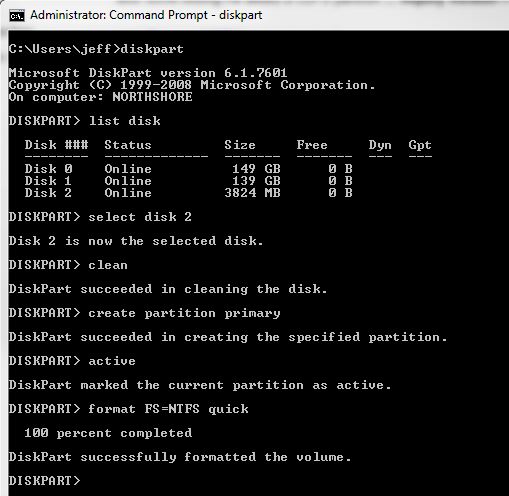
This will delete the existing partition table, create a new primary partition and mark it as active and then format it as NTFS. Now, we can use the imagex utility (available as part of the WAIK) to apply the install.wim file to the UFD. Either mount the ISO or insert the DVD and apply the image to the UFD:

imagex /apply F:\sources\install.wim 4 G:\

The number 4 is the index of the image in the WIM file to be applied. The Windows 8 beta media has multiple available (Standard Core, Standard w/ GUI, Datacenter Core, and Datacenter w/ GUI) so I’m applying Datacenter w/ GUI by selecting index 4. You can read the available options by using the imagex /info F:\sources\install.wim command. Once the image has been applied, we need to write a boot record using bcdboot:

bcdboot G:\windows /s G:\

If you’ve done everything correctly, you should now have a bootable UFD with a base install of Windows 8 Server that is recognized as a non-removable hard disk: