ASP.NET MVC 4 Custom Validation for CIDR Subnet

I recently worked on a rWhois project that required writing an ASP.NET MVC 4 based admin portal. One of the last things I tackled was adding validation to inputs. Adding validation to a MVC model is super-simple with Data Annotations. By adding these annotations to your model, both client and server-side validation comes to life. There’s a great tutorial describing how to accomplish this on the asp.net site:

http://www.asp.net/mvc/tutorials/mvc-4/getting-started-with-aspnet-mvc4/adding-validation-to-the-model

The in-box DataAnnotations class provides numerous built-in validation attributes that can be applied to any property. Things like strings of specific length, or integers within a range, or even regex matching is supported using the built-in validation attributes – and they are automatically wired up when you use Visual Studio to add views with scaffolding. But what about when the built-in attributes don’t quite do what you need?

I needed to create validation that confirms the input is both in proper CIDR format (ie. 10.0.0.0/8 and not “some text”) and that the supplied CIDR subnet is valid (ie. 192.168.100.0/24 is a proper network/bitmask, but 192.168.100.50/24 is not). Validating that the input is in the proper format can easily be done with regex. Just add the following to annotation to the appropriate property on your model:

[RegularExpression(@"^(([0-9]|[1-9][0-9]|1[0-9]{2}|2[0-4][0-9]|25[0-5])\.){3}([0-9]|[1-9][0-9]|1[0-9]{2}|2[0-4][0-9]|25[0-5])(\/(\d|[1-2]\d|3[0-2]))$", ErrorMessage="Not valid CIDR format")]

To check that the supplied input is a valid network/bitmask CIDR combination, I needed custom validation. You can easily extend the ValidationAttribute and implement IClientValidatable to add your custom validation. First, you’ll want to create a new class and reference the DataAnnotations and Mvc namespaces:

using System.ComponentModel.DataAnnotations;
using System.Web.Mvc;
 
namespace MvcApplication1.Validation
{
    public class CIDRSubnet : ValidationAttribute, IClientValidatable
    {
 
    }
}

Next, we’ll want to create the appropriate server-side validation by overriding the ValidationResult class and adding the CIDR subnet check:

    protected override ValidationResult IsValid(object value, ValidationContext validationContext)
    {
        //validate that valus is valid cdir
        string[] cidr = ((string)value).Split(new char[] { '/' });
        string[] ip = cidr[0].Split(new char[] { '.' });
        int i = (Convert.ToInt32(ip[0]) << 24) | (Convert.ToInt32(ip[1]) << 16) | (Convert.ToInt32(ip[2]) << 8) | (Convert.ToInt32(ip[3]));
        int mask = Convert.ToInt32(cidr[1]) == 0 ? 0 : ~((1 << (32-29)) - 1);
        int network = i & mask;
 
        if (i != network) return new ValidationResult("Not a valid CIDR Subnet");
        return ValidationResult.Success;
    }

Now we want to create our client side validation function. Create a new javascript file and make sure it’s referenced in your View:

function ipv4checker(input) {
    //confirm cidr is valid network
    var cidr = input.split('/');
    var base = cidr[0];
    var bits = cidr[1];
    var ip = base.split('.');
    var i = (ip[0] << 24 | ip[1] << 16 | ip[2] << 8 | ip[3]);
    var mask = bits == 0 ? 0 : ((1 << (32 - bits)) - 1) ^ 0xFFFFFFFF;
    var network = i & mask;
 
    if (i == network) { return true; }
    else { return false; }
}

Assuming jquery and jquery unobtrusive validation libraries have already been added to your project, you can then add a method to the validator, and wire it up. I’m not passing any parameters here, but you could also include parameters:

 
//custom vlidation rule - check IPv4
$.validator.addMethod("checkcidr",
    function (value, element, param) {
    return ipv4checker(value);
    });
 
//wire up the unobtrusive validation
$.validator.unobtrusive.adapters.add
    ("checkcidr", function (options) {
        options.rules["checkcidr"] = true;
        options.messages["checkcidr"] = options.message;
    });

Then, you’ll need to implement the GetClientValidationRules method in your custom validation class:

    public IEnumerable<ModelClientValidationRule> GetClientValidationRules(ModelMetadata metadata, ControllerContext context)
    {
        ModelClientValidationRule rule = new ModelClientValidationRule();
        rule.ValidationType = "checkcidr";
        rule.ErrorMessage = "Not a valid CIDR Subnet";
        return new List<ModelClientValidationRule> { rule };
    }

Lastly, add a reference to your custom validation class in the model and add the custom validation attribute to your property:

using System.ComponentModel.DataAnnotations;
using MvcApplication1.Validation;
 
namespace MvcApplication1.Models
{
    public class Allocation
    {
        [Required]
        [RegularExpression(@"^(([0-9]|[1-9][0-9]|1[0-9]{2}|2[0-4][0-9]|25[0-5])\.){3}([0-9]|[1-9][0-9]|1[0-9]{2}|2[0-4][0-9]|25[0-5])(\/(\d|[1-2]\d|3[0-2]))$", ErrorMessage="Not valid CIDR format")]
        [CIDRSubnet(ErrorMessage="Not a valid CIDR Subnet")]
        public string IPNetwork { get; set; }
    }
}

Microsoft Service Management Portal User Account Password cannot be reset

We’ve been working with Microsoft for quite some time on their Windows Azure for Windows Server project. Microsoft is bringing Azure technology to their Server platform for hosters to take advantage of. The environment consists of a portal and several providers. The portal uses standard ASP.NET membership for users.

Recently, we had a user who forgot his password. After enabling password reset functionality in the portal, the user received an email containing a link to reset the password, but encountered an error when trying to perform the reset. The following error was logged on the portal server:

Error:MembershipPasswordException: The user account has been locked out.

The aspnet_Membership table in Microsoft.MgmtSvc.PortalConfigStore contains an IsLockedOut field. The value was set to 1 for this user because of the number of incorrect login attempts. Setting it back to 0 allowed the user to update his password:

 
USE Microsoft.MgmtSvc.PortalConfigStore
UPDATE aspnet_Membership
SET IsLockedOut = 0
WHERE email = 'user@domain.org'


Windows Server 2008 Firewall Block rule prevents RPC communication

Recently opened a PSS case regarding on issue we discovered with the Windows Firewall with Advanced Security on Server 2008 SP2. As a web host, we have many customer web servers with various ports open to the Internet. From time to time, nefarious users will test the server’s security. Part of the standard response is to block all access to the server from the offending IP. This is realized by creating a Windows Firewall with Advanced Security rule that blocks traffic on all ports, for all services with the remote IP scope set to the IP in question.

The problem was uncovered when we noticed backups were failing. The backup program in use leverages a dynamic RPC endpoint for communication, and with the block rule in place, the communication between the customer’s server and the backup server was failing – even though the scope of the block rule was configured to use only the attacker’s IP address. Furthermore, there was a rule specifically allowing communication from the backup server’s on the dynamic RPC endpoint.

Block Rule:

Rule Name: Block Hacker
———————————————————————-
Enabled: Yes
Direction: In
Profiles: Domain,Private,Public
Grouping:
LocalIP: Any
RemoteIP: 1.2.3.4/255.255.255.255
Protocol: Any
Edge traversal: No
Action: Block

Backup server rule:

Rule Name: Allow Backups
———————————————————————-
Enabled: Yes
Direction: In
Profiles: Domain,Private,Public
Grouping:
LocalIP: Any
RemoteIP: 10.1.1.0/255.255.255.0
Protocol: TCP
LocalPort: RPC
RemotePort: Any
Edge traversal: No
Action: Allow

According to PSS, this is a known issue with Server 2008 SP2. It was fixed in 2008 R2 but this apparently will not be fixed in Server 2008. Luckily, there is a workaround. By creating a rule with action of Secure and allowing it to override block rules and selecting the computer account of the server in question, we can ensure proper communication:

Rule Name: Fix Server 2008 firewall bug
———————————————————————-
Enabled: Yes
Direction: In
Profiles: Domain,Private,Public
Grouping:
LocalIP: Any
RemoteIP: Any
Protocol: TCP
LocalPort: RPC
RemotePort: Any
Edge traversal: No
InterfaceTypes: Any
RemoteComputerGroup: D:(A;;CC;;;S-1-5-21-2041841331-1236329097-1724550537-522200)
Security: Authenticate
Action: Bypass

The reason this works has to do with the order in which Windows Firewall applies rules – that process is described in detail here: http://technet.microsoft.com/en-us/library/cc755191(v=ws.10).aspx. This also seems to be the reason the communication is blocked – block rules are processed before allow rules and rules with broader scope before those with a more narrow scope.

Cannot find Newtonsoft.Json error when deploying

We recently revamped our source control, continuous integration, and bug tracking solution at OrcsWeb to take advantage of Git. Part of the solution includes a build server that automatically runs tests against projects and, assuming they pass, packages the and deploys the application using Web Deploy. Several of the projects typically include NuGet packages, and a new feature of NuGet (as of 1.6 & 2.0) allows you to exclude these NuGet packages when committing to source control. By enabling package restore, NuGet will automatically download any packages from packages.config on any system where they’re missing.

After uploading a new MVC 4 project that was using this NuGet Package Restore functionality, I was receiving the YSOD that asp.net “Could not load file or assembly ‘Newtonsoft.Jason, Version=4.5.0.0′”. I confirmed that NuGet was downloading the packages on the build server, but for some reason it wasn’t being included in the deployment. BlackSpy’s solution for the Newtonsoft.Json error on stackoverflow.com fixed the issue for me as well.

I removed the entry for Newtonsoft.Json version 4.5.6 from packages.config, saved and built the project, then re-added Newtonsoft.Json 4.5.11 from NuGet and committed the changes. The build server picked up the updates, downloaded the missing package, and deployed it to the server.


Running a MVC 4 application on IIS7

Recently tried to get a new MVC 4 application running on IIS7 and ran into an issue that required a hotfix. The IIS7 server was 2008 SP2 fully patched and had both .NET 2.0 and .NET 4.5 installed, however, whenever I attempted to load the application, IIS would return a 403.14 error message about a directory listing being denied.

Many solutions suggested that ASP.NET wasn’t registered properly, and I confirmed that my application pool settings were correct (need to run Integrated Mode or configure asp.net to handle all traffic so requests are routed to the controllers). Others recommended code solutions, but Sean Anderson’s solution on this stackoverflow.com post was the resolution for me.

There’s an extensionless URL hotfix (I blogged about this hotfix in relation to 404 errors) for IIS7 that is required: http://support.microsoft.com/kb/980368.

Linking spam sent through shared IIS SMTP server to a user

As a web host, one of the most time-consuming processes is investigating spam sent through mail servers. Many legit websites have forms and other functions that send email to users. If left unchecked, spammers can leverage these to send unsolicited mail.

In our environment, we enable the IIS SMTP role on our web servers and configure them to allow relaying only from localhost with basic authentication. This means that only local sites hosted in IIS can send mail and they have to provide a username and password to do so. Unfortunately, the IIS SMTP service does not log that username – it’s long been a point of contention with the IIS SMTP service. Most administrator’s recommendations suggest using another service, such as SmarterMail. However, there are ways to extract the authenticated username sending spam.

In order to use this method, you’ll need to capture a packet trace while spam is being sent. This will allow you to see the entire SMTP transaction between client and server. The catch here is that we are using localhost and most packet capture utilities cannot capture loopback traffic. Wireshark has an article that goes into detail about why it can’t capture loopback traffic. There is a utility that we can use called RawCap that will capture this local traffic at the socket level and output it into a format that Wireshark can parse. So, depending on the source of the spam, you’ll either want to use Wireshark (for remote) or RawCap (for local) to capture network data.

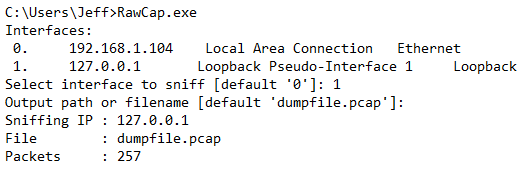
RawCap has an interactive prompt to guide you through the capture process:

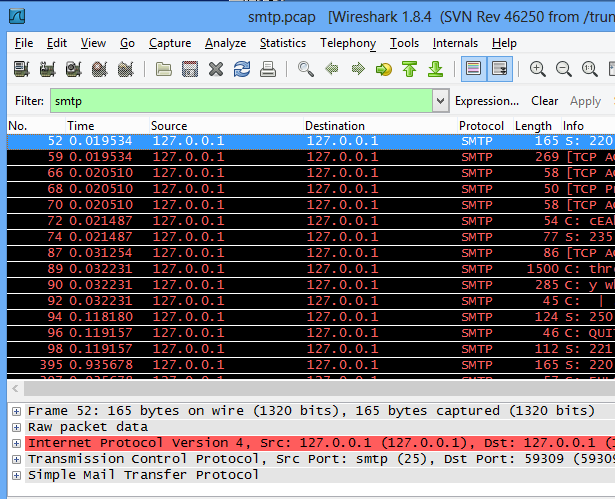
Once you’ve capture sufficient traffic, you can cancel the capture by hitting Ctrl+C and then opening the resulting file in Wireshark for analysis. You’ll likely have a lot of network “noise” that you’ll want to filter out by using a filter of “smtp”:

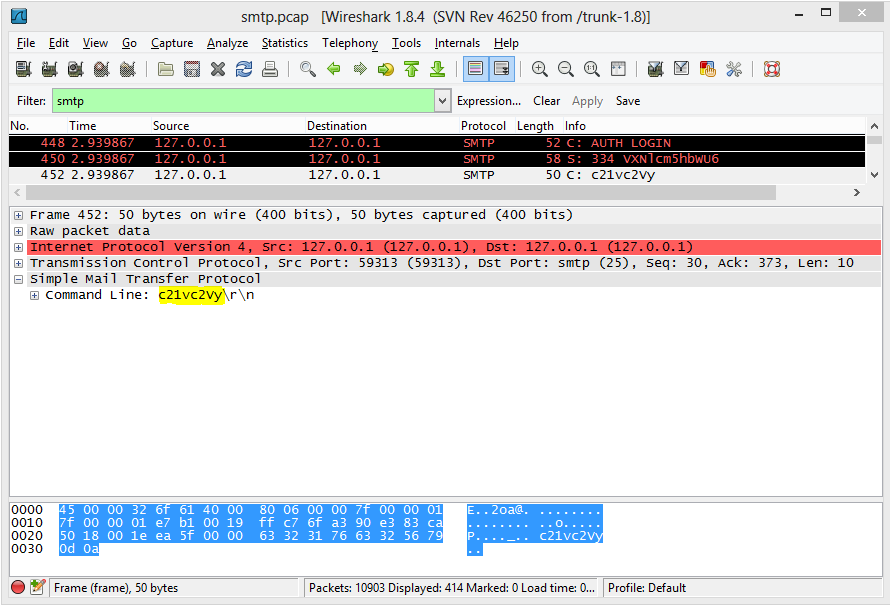
From here, we can drill down to the AUTH LOGIN command sent by the client, and a 334 response from the server:

To explain what’s happening here, after the EHLO command, the server responds with what verbs it supports. The client then issues the AUTH LOGIN command and the server responds with “334 VXNlcm5hbWU6" where "VXNlcm5hbWU6" is a BASE64 encoded string "Username:". The client then responds with the BASE64 encoded username. We can decode this value on base64decode.org to find the username sending spam.

Compare Two Directories with Powershell

We use DFS to keep webfarm nodes’ content in sync and ran across a problem where a directory with thousands of files and folders had one missing file on a replica. Here’s a quick script we used to find out what files were missing:

$dir1 = “\\server1\c$\folder1”
$dir2 = “\\server2\c$\folder1”
$d1 = get-childitem -path $dir1 -recurse
$d2 = get-childitem -path $dir2 -recurse
$results = @(compare-object $d1 $d2)

foreach($result in $results)
{
$result.InputObject
}


Directory: \\server1\c$\folder1\subfolder

Mode LastWriteTime Length Name
—- ————- —— —-
-a— 2/16/2012 4:08 PM 162 ~$README.txt

This will output all of the files and directories that exist in only one location.

Server-side workaround for BEAST SSL vulnerability on IIS

Recently, a vulnerability in the CBC cipher suite used in the SSL and TLS protocols was discovered that could allow an attacker to gain access to encrypted information. While the attack is not easily implemented, it will show up on compliance audits and auditors don’t like that. Fortunately, there is a server-side fix for Server 2008 and above that can be easily implemented without breaking compatibility with clients.

More information about the attack and workarounds can be found here: http://blogs.msdn.com/b/kaushal/archive/2011/10/03/taming-the-beast-browser-exploit-against-ssl-tls.aspx.

The workaround is to enable TLS 1.1 and/or 1.2 on servers that support it, and prioritize cipher suites so RC4 takes precedence over CBC. Server 2008 R2 and above supports TLS 1.1 and 1.2 – you can enable those protocols by following the instructions in KB 2588513. You’ll also want to change the priority of cipher suites on all Server 2008 and above systems using group policy (either a local group policy object for a single server, or by modifying domain policy in an AD environment).

1. Open Group Policy Editor (locally, Start>Run>gpedit.msc).
2. Browse to Computer Configuration>Administrative Templates>Network>SSL Configuration Settings.
3. Modify SSL Cipher Suite Order: set it as enabled, and enter a comma delimited list of cipher suites. I recommend the following:

TLS_RSA_WITH_RC4_128_SHA,TLS_RSA_WITH_RC4_128_MD5,SSL_CK_RC4_128_WITH_MD5,TLS_RSA_WITH_AES_128_CBC_SHA,TLS_RSA_WITH_AES_256_CBC_SHA,TLS_RSA_WITH_3DES_EDE_CBC_SHA,TLS_ECDHE_ECDSA_WITH_AES_128_CBC_SHA_P256,TLS_ECDHE_ECDSA_WITH_AES_128_CBC_SHA_P384,TLS_ECDHE_ECDSA_WITH_AES_128_CBC_SHA_P521,TLS_ECDHE_ECDSA_WITH_AES_256_CBC_SHA_P256,TLS_ECDHE_ECDSA_WITH_AES_256_CBC_SHA_P384,TLS_ECDHE_ECDSA_WITH_AES_256_CBC_SHA_P521,TLS_ECDHE_RSA_WITH_AES_128_CBC_SHA_P256,TLS_ECDHE_RSA_WITH_AES_128_CBC_SHA_P384,TLS_ECDHE_RSA_WITH_AES_128_CBC_SHA_P521,TLS_ECDHE_RSA_WITH_AES_256_CBC_SHA_P256,TLS_ECDHE_RSA_WITH_AES_256_CBC_SHA_P384,TLS_ECDHE_RSA_WITH_AES_256_CBC_SHA_P521,TLS_DHE_DSS_WITH_AES_128_CBC_SHA,TLS_DHE_DSS_WITH_AES_256_CBC_SHA,TLS_DHE_DSS_WITH_3DES_EDE_CBC_SHA,SSL_CK_DES_192_EDE3_CBC_WITH_MD5,SSL_CK_DES_64_CBC_WITH_MD5

4. Reboot the server for the setting to take effect.

Maintain protocol in URL Rewrite Rules

The URL Rewrite 2.0 module for IIS7+ is a very powerful tool for manipulating requests to an IIS server. We use it quite heavily with Application Request Routing load balancers in our environment. The combination allows us to perform L7 load balancing of requests. One of the great features of ARR is the ability to perform SSL offloading, which effectively terminates the SSL connection at the ARR node. Accomplishing this is quite simple – you create your rule and use HTTP:// as the scheme to route to the appropriate server farm. However, there are times when you will want to pass through the protocol to the backend servers.

There are a few ways to accomplish this. First, you could create two rules with a condition tracking the HTTPS server variable and route appropriately. However, this doubles the number of rules to maintain. Second, you could use a condition on the CACHE_URL variable and a back reference in the rewritten URL. The problem there is that you then need to match all of the conditions which could be a problem if your rule depends on a logical “or” match for conditions. Lastly, my preference involves using a rewrite map on the HTTPS server variable.

The idea is that we create a rewrite map named MapProtocol that contains two key value pairs – ON = https and OFF = http (I also prefer to set the default value for the rewrite map to http in the off chance the HTTPS variable does not contain a value). Then, we use that rewrite map in the Action url against the HTTPS server variable. The rule will look something like this:

<rule name="ARR Maintain protcol" enabled="true" stopProcessing="true">
  <match url=".*" />
    <conditions>
      <add input="{LOCAL_ADDR}" pattern="10\.1\.1\.10" />
    </conditions>
  <action type="Rewrite" url="{MapProtocol:{HTTPS}}://Webfarm1/{R:0}" />
</rule>
 
<rewriteMap name="MapProtocol" defaultValue="http">
  <add key="ON" value="https" />
  <add key="OFF" value="http" />
</rewriteMap>

Windows Azure VPN Walkthrough

A recent project has us testing out some of the new Windows Azure features. One important configuration step is getting the Windows Azure environment connected to our on-premise network. To do this, we create a site to site VPN tunnel between an Azure virtual network and your existing on-premise corporate environment. Typically, this is done using VPN hardware (such as Cisco, Fortinet, or Juniper) but can also be done using Windows Server. Microsoft has a decent tutorial on how to create an Azure virtual network with cross-premises connectivity, but it lacks some information about the configuration of the remote end.

First, let’s get a virtual network created in Azure.

1. Login to the Azure Preview Portal.

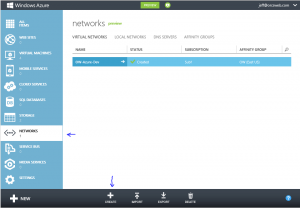
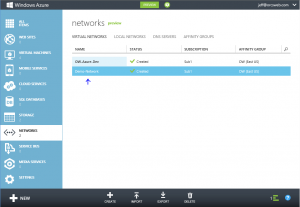
2. In the left-hand column, select Networks, and then click Create on the bottom banner.

3. This will bring up a wizard for creating a virtual network. Give the network a name and either select an existing affinity group if you have one, or create a new one. Virtual Networks must belong to an affinity group and can only be used with VM’s in the same affinity group. Click Next

4. The next screen asks you to define address space and logical subnets. You can use super-netting here to define a large address space (eg. 10.1.0.0/16) and then create logical subnets to group servers (eg. 10.1.1.0/24) for specific server purposes. Define the address space and at least 1 subnet. Click next.

5. On the DNS Servers and Local Network screen, you’ll want to configure a DNS server for this virtual network. For DNS, this will be the DNS server your VM’s in this virtual network use. The Local Network settings require both a Gateway subnet and a Local network. The Gateway network should be a logical subnet of the address space you previously defined (ie. 10.1.0.0/24) and is used only for to run necessary gateway services. The Local network should be networks configured in your on-premise environment. Select Create New Local Network and click next.

6. On the Create New Local Network Screen you’ll need to assign a name to the Local Network, define the VPN endpoint in your on-premise environment and one or more subnets in the Address Space (eg. 10.4.0.0/16) corresponding to local networks configured in your on-premise environment. Click the check mark to create the virtual network.

Now that a virtual network has been created, we need to create a VPN gateway for the network.

1. From the Azure portal, select Networks and then click the name of the virtual network you just created.

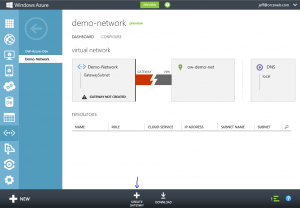
2. You should see an indicator that a Gateway has not yet been created. Click the Create Gateway icon in the bottom banner. Click the Yes check mark that appears in the bottom banner to start the Create Gateway job.

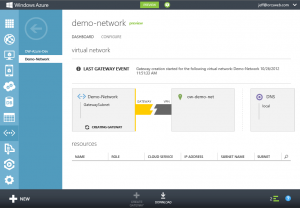
3. It may take up to 15 minutes for the Gateway to be created. A message should appear that the Gateway creation has started.

4. Once completed, a Gateway IP Address will be displayed along with incoming and outgoing data metrics. You’ll need the pre-shared key information to configure the tunnel on your end. Click the View Key button in the bottom banner.

Lastly, you’ll need to configure the site to site VPN tunnel on your VPN hardware device on your on-premise equipment. The following is an example of the necessary information:

Phase 1 (IKE)
Remote Endpoint/Peer IP: Virtual Network Gateway address (this is the Gateway IP Address listed for the virtual network in the Azure portal)
Authentication Method: Pre-shared key
Pre-shared Key: <value from View Key in Azure portal>
Phase 1 Proposal: Encryption AES-128 (or AES-128-CBC), Authentication SHA1
Phase 1 Keylife: 28800s
Phase 1 DH Group: 2

Phase 2 (IPsec)**
Local Network: Local corporate subnet (this is the Local Network you configured when setting up the Azure virtual network)
Remote Network: Azure Virtual network (this is the Address Space you configured when setting up the Azure virtual network)
Phase 2 Proposal: Encryption AES-128 (or AES-128-CBC), Authentication SHA1 (or SHA1-HMAC-96)
Phase 2 Keylife: 3600s AND 102400000 KBytes
Phase 2 DH Group (PFS): Disabled

**Note: Normally, you use the defined subnets in Phase 2. However, I’ve found in practice that the Azure gateway uses 0.0.0.0/0 for Phase2:

2013-05-01 11:33:21 ike 1:OW-Azure:13537:6612914: peer: type=7/7, local=0:0.0.0.0-255.255.255.255:0, remote=0:0.0.0.0-255.255.255.255:0
2013-05-01 11:33:21 ike 1:OW-Azure:13537:6612914: mine: type=7/7, local=0:10.4.0.0-10.4.255.255:0, remote=0:10.1.0.0-10.1.255.255:0
2013-05-01 11:33:21 ike 1:OW-Azure:13537:6612914: no matching phase2 found
2013-05-01 11:33:21 ike 1:OW-Azure:13537::6612914: failed to get responder proposal
2013-05-01 11:33:21 ike 1:OW-Azure:13537: failed to create child SA
2013-05-01 11:33:21 ike 1:OW-Azure:13537: sending error response

If the subnets do not match on both ends, the tunnel will not establish, so you’ll want to use 0.0.0.0/0 for your Phase 2 subnets in the VPN configuration.

You can download a sample configuration script for Cisco ASA, ASR, and ISR or Juniper SRX, J, ISG or SSG systems from the Azure portal by clicking the Download link in the bottom banner (next to the View Key button). You’ll need to modify the script with the proper networks and key. That being said, the scripts assume some things about your configuration so it’s best to configure your end of the VPN tunnel manually. For instance, the script may try to may try to adjust the maximum segment size to 1350 on your VPN device’s external interface which could impact your other configured tunnels. It’s also important to note that firewall and NAT rules are typically required on most VPN hardware devices.

To test connectivity, simply initiate traffic from either side of the tunnel (ie. ping 10.1.1.10 from 10.4.1.10). It helps to have debug trace messages enabled on your VPN hardware device in case of issues. Happy tunneling!